If you have a craving for something delightfully tangy yet irresistibly creamy, this No-Bake Key Lime Pie Recipe will become your new go-to dessert. It’s a perfect balance of zesty key lime juice and smooth sweetened condensed milk nestled in a buttery graham cracker crust, all topped with fluffy whipped cream. The best part? It requires no baking! Whether you’re new to pie-making or a seasoned dessert lover, this easy recipe delivers big on flavor and texture, making it a standout for any occasion.

Ingredients You’ll Need
The magic of this No-Bake Key Lime Pie Recipe comes from its simple, kitchen-friendly ingredients that work in harmony. Each one is carefully chosen to build that perfect trifecta of tart, sweet, and creamy, while the buttery crust adds that satisfying crunch to every bite.
- 1 1/2 cups graham cracker crumbs: Provides a crunchy, slightly sweet base that holds the pie together beautifully.
- 1/3 cup sugar: Adds just the right amount of sweetness to balance the tartness of the lime juice.
- 1/2 cup butter, melted: Binds the crust ingredients to create a rich, buttery foundation.
- 1 (14 oz) can sweetened condensed milk: The secret ingredient that lends creaminess and sweetness without overpowering the lime flavors.
- 1/2 cup key lime juice: Brings the pie’s signature bright and tangy zing that makes this recipe truly special.
- 1 (8 oz) container whipped topping, thawed: Adds lightness and airy texture to the filling for that melt-in-your-mouth finish.
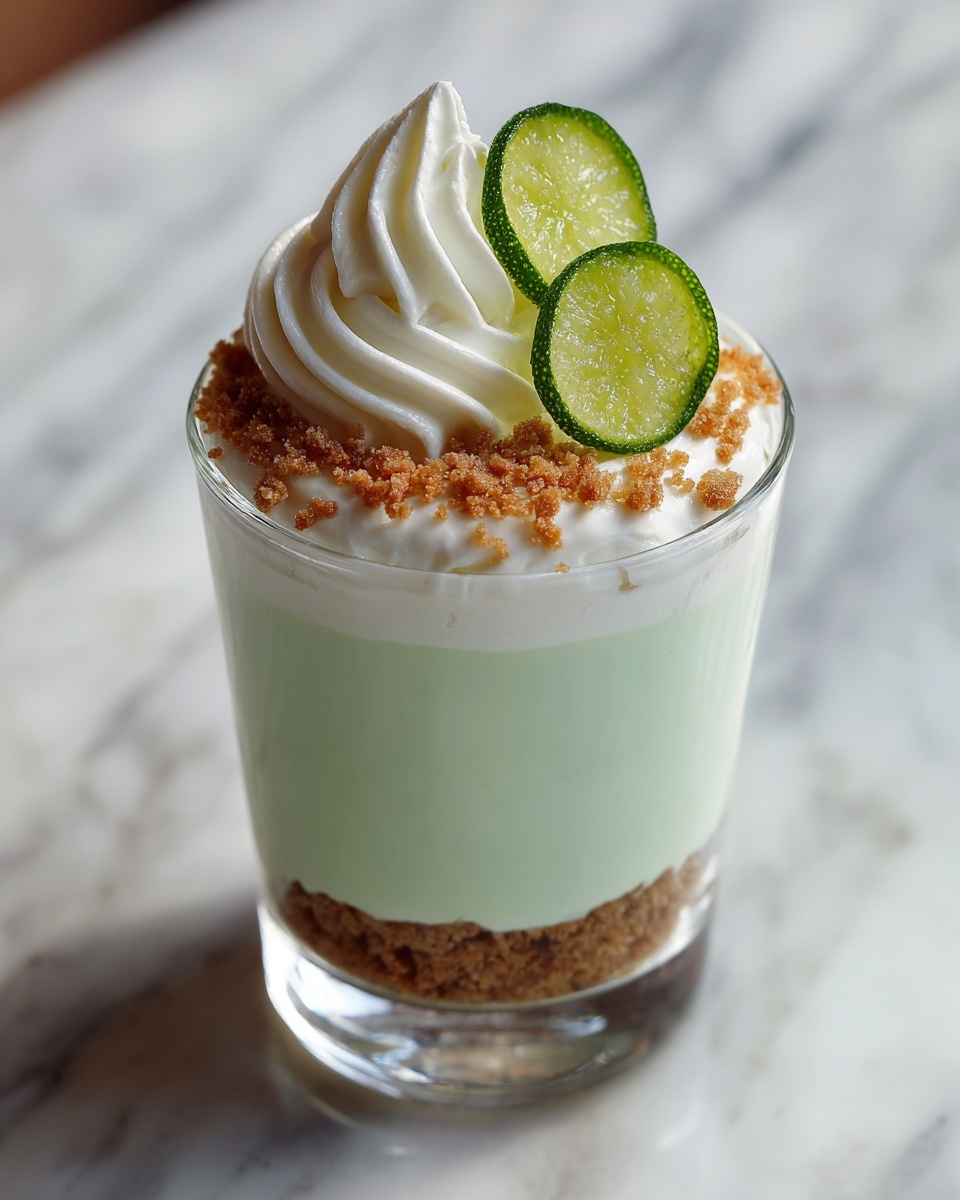
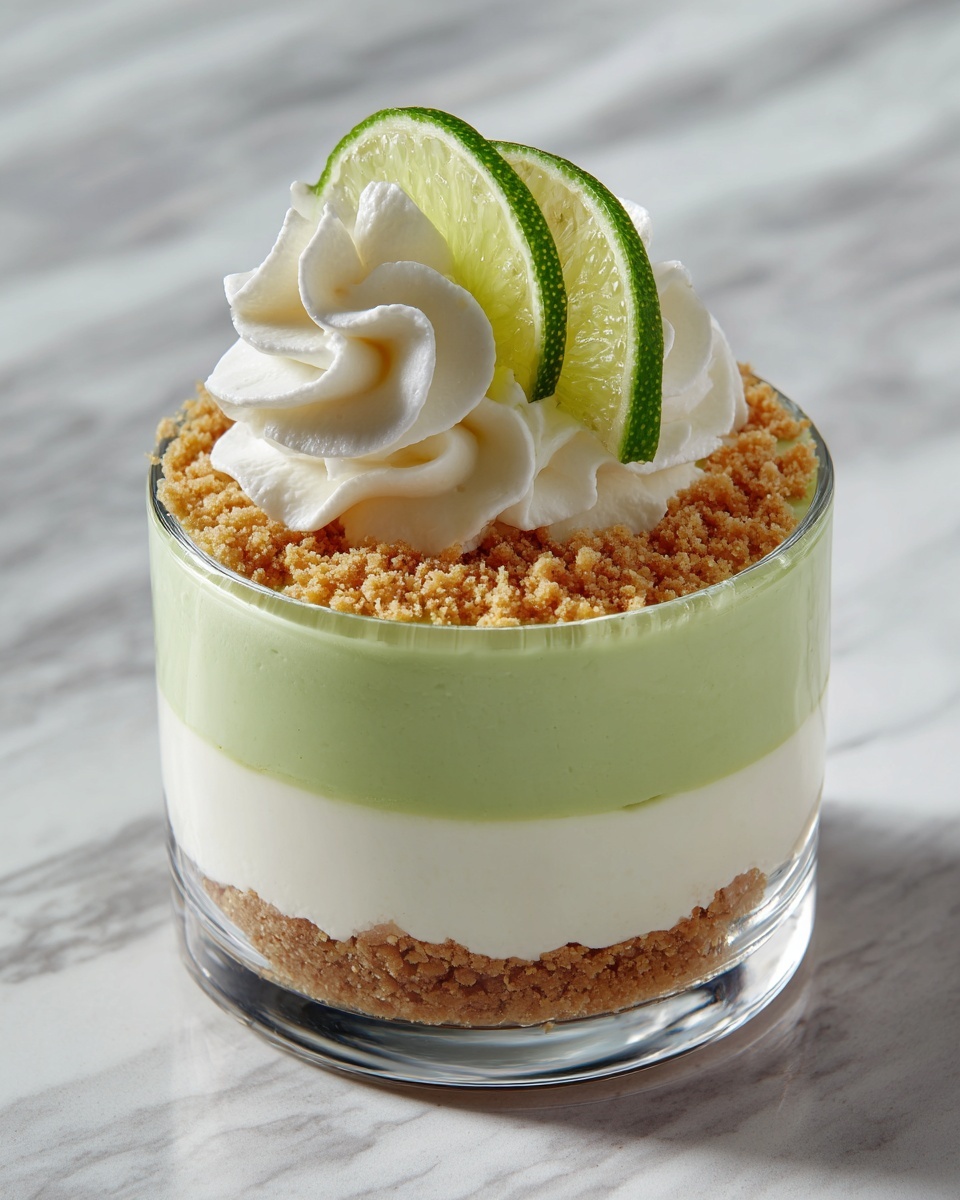
- Lime slices for garnish (optional): Fresh garnishes that brighten the presentation and enhance the lime aroma.
How to Make No-Bake Key Lime Pie Recipe
Step 1: Prepare the Crust
Start by mixing the graham cracker crumbs, sugar, and melted butter in a medium bowl. This combo whispers “perfect crust” because the butter soaks into the crumbs just right to make a firm, flavorful base. Press the mixture evenly into the bottom of a 9-inch pie dish. The patting-down is essential because it ensures your crust holds its shape when the filling goes on.
Step 2: Mix the Filling
Next, whisk together the sweetened condensed milk and key lime juice in a separate bowl. You’ll notice the filling begins to thicken slightly—that’s a sure sign the lime juice is interacting perfectly with the milk. Then gently fold in the thawed whipped topping, carefully blending so the mixture stays light and fluffy rather than dense.
Step 3: Assemble and Chill
Pour the luscious filling over the prepared crust, spreading it evenly so every slice will have the perfect balance of crust and cream. Cover the pie and refrigerate it for at least 4 hours. This chilling time is essential for the filling to set fully, giving you that smooth, sliceable consistency that’s signature to the No-Bake Key Lime Pie Recipe.
Step 4: Garnish and Serve
Just before serving, decorate your masterpiece with fresh lime slices for a pop of color and a hint of extra zest. The lime slices are optional but add a lovely finishing touch that’s both beautiful and flavorful.
How to Serve No-Bake Key Lime Pie Recipe
Garnishes
Adding garnishes is a fun way to elevate your No-Bake Key Lime Pie Recipe. Besides lime slices, you can sprinkle some toasted coconut flakes or finely grated lime zest on top. A few fresh mint leaves also add a bright contrast that complements the lime’s tartness beautifully.
Side Dishes
This pie is a star all on its own, but if you want to pair it with something, refreshing fruit salads or light vanilla ice cream work wonders. They bring extra layers of sweetness or cool creaminess that enhance the pie’s flavor without overshadowing it.
Creative Ways to Present
Serve this pie in mini glass jars for a charming party idea or as individual tartlets for a crowd-pleasing finger dessert. Layering the crust, filling, and garnish in clear vessels lets the beautiful pale green filling shine through, adding an elegant touch to your dessert table.
Make Ahead and Storage
Storing Leftovers
Once you’ve sliced and served, wrap any uneaten pie tightly with plastic wrap and keep it in the refrigerator. It stays fresh and creamy for up to 3 days, so you can savor those tart, sweet bites without rushing.
Freezing
While this No-Bake Key Lime Pie Recipe is best enjoyed fresh, you can freeze it for up to 1 month. Just wrap the whole pie securely in foil and plastic wrap for protection. Thaw overnight in the refrigerator before serving to preserve that silky texture.
Reheating
Since this dessert is meant to be served chilled, reheating is not recommended. Instead, allow it to soften slightly at room temperature for 10 to 15 minutes if it feels too firm coming right out of the fridge.
FAQs
Can I use regular lime juice instead of key lime juice?
Yes, you can substitute with regular lime juice; however, key lime juice has a slightly different, more floral flavor that makes this pie truly distinctive. If you use regular lime juice, the pie will still be delicious but with a slightly less authentic taste.
Do I need to bake the crust?
No baking is required for this no-bake pie crust. The melted butter binds the graham cracker crumbs nicely so the crust holds its shape well after chilling.
How long should I let the pie chill before serving?
It’s best to chill the pie for at least 4 hours to allow the filling to set completely. Overnight chilling is even better for a firmer texture and enhanced flavor melding.
Can I make this pie ahead of time?
Absolutely! This No-Bake Key Lime Pie Recipe is perfect for making a day in advance. Just keep it refrigerated until you’re ready to serve, which also gives the flavors extra time to develop.
Is there a dairy-free version of this pie?
You could experiment with dairy-free alternatives like coconut condensed milk and coconut whipped topping, but those substitutions will change the flavor and texture. For the classic taste and texture, stick with the original ingredients.
Final Thoughts
Trust me, once you try this No-Bake Key Lime Pie Recipe, it’s going to become a staple in your dessert rotation. It’s refreshingly tangy, decadently creamy, and so simple to whip up, it feels like a celebration every time. Whether it’s a casual weeknight treat or a show-stopping party dessert, this pie delivers effortless wow-factor and big smiles. So grab those ingredients and get ready to indulge—you’re about to discover a new favorite!
Print
No-Bake Key Lime Pie Recipe
- Prep Time: 15 minutes
- Cook Time: 0 minutes
- Total Time: 4 hours 15 minutes
- Yield: 8 servings
- Category: Dessert
- Method: No-Cook
- Cuisine: American
Description
A refreshing and creamy no-bake Key Lime Pie with a buttery graham cracker crust, tangy key lime filling, and light whipped topping. Perfect for a quick and easy dessert that requires minimal prep and chilling time.
Ingredients
Crust
- 1 1/2 cups graham cracker crumbs
- 1/3 cup sugar
- 1/2 cup butter, melted
Filling
- 1 (14 oz) can sweetened condensed milk
- 1/2 cup key lime juice
- 1 (8 oz) container whipped topping, thawed
Garnish
- Lime slices for garnish (optional)
Instructions
- Prepare crust: In a medium bowl, combine graham cracker crumbs, sugar, and melted butter. Mix well until the crumbs are evenly coated and can hold shape when pressed. Press this mixture firmly into the bottom and up the sides of a 9-inch pie dish to form the crust.
- Make filling: In a separate bowl, whisk together the sweetened condensed milk and key lime juice until the mixture thickens slightly. Gently fold in the thawed whipped topping to create a light and creamy filling.
- Assemble and chill: Pour the filling evenly into the prepared graham cracker crust. Spread the filling smoothly and place the pie in the refrigerator. Chill for at least 4 hours, or until the filling is fully set and firm to the touch.
- Garnish and serve: Before serving, optionally garnish the pie with lime slices for a fresh, decorative touch. Slice and enjoy this cool, tangy dessert!
Notes
- Ensure the whipped topping is fully thawed for easier mixing.
- Use fresh key lime juice for the best authentic flavor.
- This pie is best served chilled and eaten within 2 to 3 days for optimal freshness.
- To make individual servings, you can use small jars or cups instead of a pie dish.
- For a gluten-free option, substitute graham crackers with gluten-free crumbs or crushed nuts combined with butter.

