
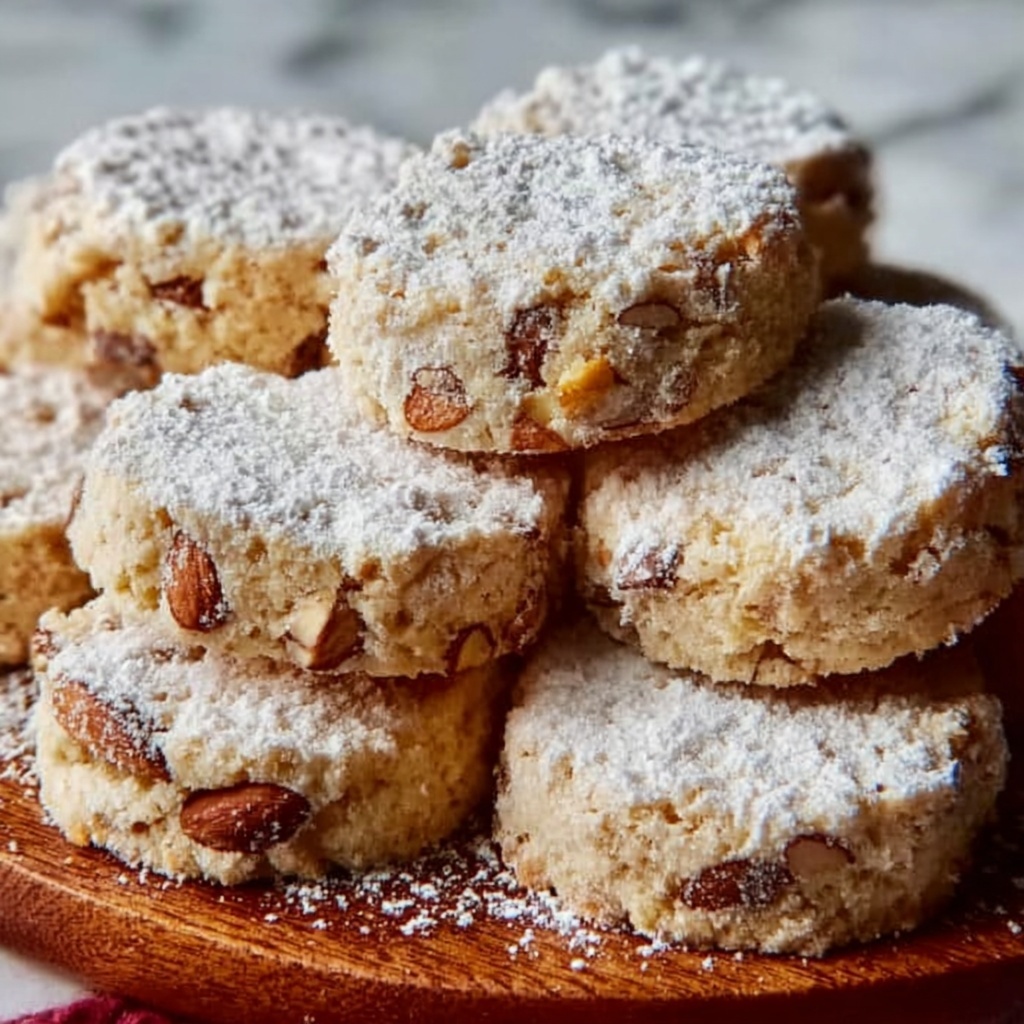
If you’re craving a cookie that feels like a walk through a magical forest on a crisp autumn day, then the Haunted Forest Pine Nut Cookies Recipe is your perfect treat. These cookies combine buttery richness and the subtle crunch of pine nuts to create a flavor that’s both comforting and intriguingly unique. Dust them with a sprinkle of powdered sugar to add a gentle sweetness and a dusting of mystery that truly brings this recipe to life. Whether you’re baking for a cozy night in or sharing with friends, these cookies will enchant everyone who takes a bite.
Ingredients You’ll Need
Simple, pantry-friendly, and thoughtfully chosen ingredients make all the difference in baking the Haunted Forest Pine Nut Cookies Recipe. Each element plays a vital role: from the creamy butter that ensures tenderness, to the pine nuts adding texture and a forest-fresh taste.
- Unsalted butter, softened (1 cup / 227 grams): Provides a rich, creamy base for the dough, crucial for that melt-in-your-mouth texture.
- Granulated sugar (1 cup / 200 grams): Adds sweetness and helps achieve a delicate crisp edge on each cookie.
- Brown sugar, packed (1 cup / 220 grams): Contributes a deep caramel flavor and moisture to keep the cookies soft inside.
- Large eggs (2): Bind the ingredients together and lend structure to the dough.
- Vanilla extract (1 teaspoon): Elevates the overall flavor with warm, inviting notes.
- All-purpose flour (3 cups / 360 grams): The foundation for the dough’s structure and texture.
- Baking soda (1 teaspoon): Provides gentle leavening to keep the cookies tender.
- Salt (1/2 teaspoon): Balances sweetness and sharpens flavors.
- Pine nuts (1 cup / 140 grams): Offer a delightful crunch and a subtle, nutty aroma reminiscent of the forest floor.
- Powdered sugar (for dusting): Adds a final touch of sweetness and a whimsical snowy effect.
How to Make Haunted Forest Pine Nut Cookies Recipe
Step 1: Prep Your Ingredients
Gather all your ingredients in one spot to make your baking session smooth and enjoyable. Having everything ready means you won’t miss a beat as you create these magical cookies.
Step 2: Cream Butter and Sugars
In a large mixing bowl, beat the softened butter together with the granulated sugar and brown sugar until the mixture is light and fluffy. This step is key for incorporating air, giving your cookies a lovely, tender crumb.
Step 3: Add Eggs and Vanilla
One at a time, mix in the eggs, making sure each is fully incorporated before adding the next. Then stir in the vanilla extract, which infuses every bite with a warm aroma.
Step 4: Combine Dry Ingredients
In a separate bowl, whisk together the flour, baking soda, and salt. Gradually mix this dry blend into the wet ingredients, stirring just until combined. Over-mixing here can lead to tough cookies, so keep it gentle.
Step 5: Fold in Pine Nuts
Gently fold the pine nuts into the dough, ensuring they’re evenly distributed. These nuts are the star of the recipe, adding their signature crunch and earthy notes.
Step 6: Shape and Bake
Use a cookie scoop or tablespoon to drop rounded balls of dough onto prepared baking sheets, spacing them about 2 inches apart to allow room for spreading. Bake in a preheated oven at 350°F (175°C) for 10-12 minutes, until the edges turn golden brown but the centers remain soft. This balance keeps these cookies irresistibly chewy and tender.
Step 7: Cool and Dust
Let the cookies cool on the baking sheets for about 5 minutes before transferring them to a wire rack. Once cooled slightly, lightly dust with powdered sugar to recreate the enchanting look of a frost-dusted forest floor.
How to Serve Haunted Forest Pine Nut Cookies Recipe

Garnishes
A light dusting of powdered sugar is perfect, but feel free to sprinkle a few extra pine nuts on top for enhanced texture and visual appeal. If you want to capture the forest theme, adding a few edible flowers or small sprigs of fresh herbs like rosemary can be charming additions.
Side Dishes
These cookies pair wonderfully with a cozy cup of chai tea or a frothy latte, balancing the nutty sweetness with spiced warmth. They also make an excellent companion to vanilla ice cream for a simple dessert upgrade that feels festive yet natural.
Creative Ways to Present
Serve these cookies on a rustic wooden platter surrounded by pine needles and autumn leaves to immerse your guests in the Haunted Forest vibe. Wrapping individual cookies in brown parchment paper tied with twine makes an enchanting gift or party favor.
Make Ahead and Storage
Storing Leftovers
Store your freshly baked Haunted Forest Pine Nut Cookies in an airtight container at room temperature. They’ll stay soft and delicious for up to 5 days, perfect for enjoying throughout the week.
Freezing
If you want to keep these cookies longer, they freeze beautifully. Place them in a single layer on a baking sheet to freeze initially, then transfer to a freezer-safe container or bag. Frozen cookies retain their flavor and texture for up to 3 months.
Reheating
To bring your cookies back to their just-baked warmth, pop them in a preheated oven at 300°F (150°C) for about 5 minutes. This revives their softness and enhances the pine nut aroma, almost like they just came out of the oven.
FAQs
Can I substitute the pine nuts with other nuts?
Absolutely! While pine nuts give this recipe its unique forest-inspired flavor, chopped walnuts or pecans work wonderfully if you want a slightly different crunch and taste profile.
Are these cookies gluten-free?
This recipe calls for all-purpose flour, which contains gluten. To make them gluten-free, you can try substituting with a gluten-free flour blend, but results may vary slightly in texture.
How can I make these cookies more festive for holidays?
Try adding a pinch of cinnamon or nutmeg to the dough for warm spice notes. Topping with colored sugar or mixing in dried cranberries can also add a seasonal twist.
Can I make the dough ahead of time?
Yes, you can prepare the dough up to 24 hours in advance. Keep it covered in the refrigerator and bring to room temperature before baking for the best texture.
What if I don’t have powdered sugar for dusting?
No worries! You can skip the dusting or sprinkle the cookies with a tiny bit of granulated sugar before baking for a subtle sparkle.
Final Thoughts
The Haunted Forest Pine Nut Cookies Recipe is a truly special one to have in your baking repertoire. Its perfect harmony of buttery softness and nutty crunch brings a little enchanted woodland magic right into your kitchen. I can’t wait for you to try making these cookies and discovering how their charm will brighten your day and delight your loved ones.
Print
Haunted Forest Pine Nut Cookies Recipe
- Prep Time: 15 minutes
- Cook Time: 12 minutes
- Total Time: 32 minutes
- Yield: 24 servings
- Category: Dessert
- Method: Baking
- Cuisine: American
Description
Haunted Forest Pine Nut Cookies are soft, buttery cookies filled with crunchy pine nuts and a subtle hint of vanilla. Perfectly baked until the edges are golden brown and the centers remain tender, these cookies are dusted with powdered sugar for an enchanting autumn treat inspired by forest themes.
Ingredients
Wet Ingredients
- 1 cup unsalted butter, softened (approximately 227 grams)
- 1 cup granulated sugar (approximately 200 grams)
- 1 cup brown sugar, packed (approximately 220 grams)
- 2 large eggs
- 1 teaspoon vanilla extract
Dry Ingredients
- 3 cups all-purpose flour (approximately 360 grams)
- 1 teaspoon baking soda
- 1/2 teaspoon salt
Add-ins and Toppings
- 1 cup pine nuts (approximately 140 grams)
- Powdered sugar (for dusting)
Instructions
- Gather Ingredients: Collect all ingredients in one place to ensure a smooth baking process and accurate measuring.
- Cream Butter and Sugars: In a large mixing bowl, beat the softened unsalted butter with granulated sugar and brown sugar until the mixture becomes light and fluffy, which helps create a tender cookie texture.
- Add Eggs and Vanilla: Incorporate the eggs one at a time, mixing well after each addition to maintain emulsification, then add the vanilla extract and stir thoroughly.
- Mix Dry Ingredients: In a separate bowl, whisk together the all-purpose flour, baking soda, and salt to evenly distribute the leavening agent and salt.
- Combine Wet and Dry Ingredients: Gradually add the dry flour mixture to the wet ingredients, stirring just until combined to avoid overmixing which can lead to tough cookies.
- Fold in Pine Nuts: Gently fold in the pine nuts ensuring even distribution throughout the dough.
- Portion Dough: Using a cookie scoop or tablespoon, drop rounded balls of dough onto lined or greased baking sheets, spacing them about 2 inches apart to allow spreading.
- Bake Cookies: Bake in a preheated oven at 350°F (175°C) for 10-12 minutes, until edges turn golden brown and centers remain soft.
- Cool Cookies: Remove the baking sheets from the oven and let cookies cool for about 5 minutes on the sheets before transferring them to a wire rack to cool completely.
- Final Touch: Lightly dust the cooled cookies with powdered sugar. Serve the cookies on a dark wooden platter decorated with pine needles and autumn leaves for an atmospheric presentation.
Notes
- Ensure butter is softened to room temperature for easier creaming with sugars.
- Do not overmix the dough once flour is added to keep cookies tender.
- Use fresh pine nuts for the best flavor and crunch.
- Spacing cookies about 2 inches apart prevents them from merging during baking.
- Powdered sugar dusting adds a festive, snowy look enhancing the haunted forest theme.
- Cookies can be stored in an airtight container for up to 5 days.
- For a nuttier flavor, lightly toast pine nuts before folding into the dough.


