Easter No-Bake Mini Cheesecakes Recipe
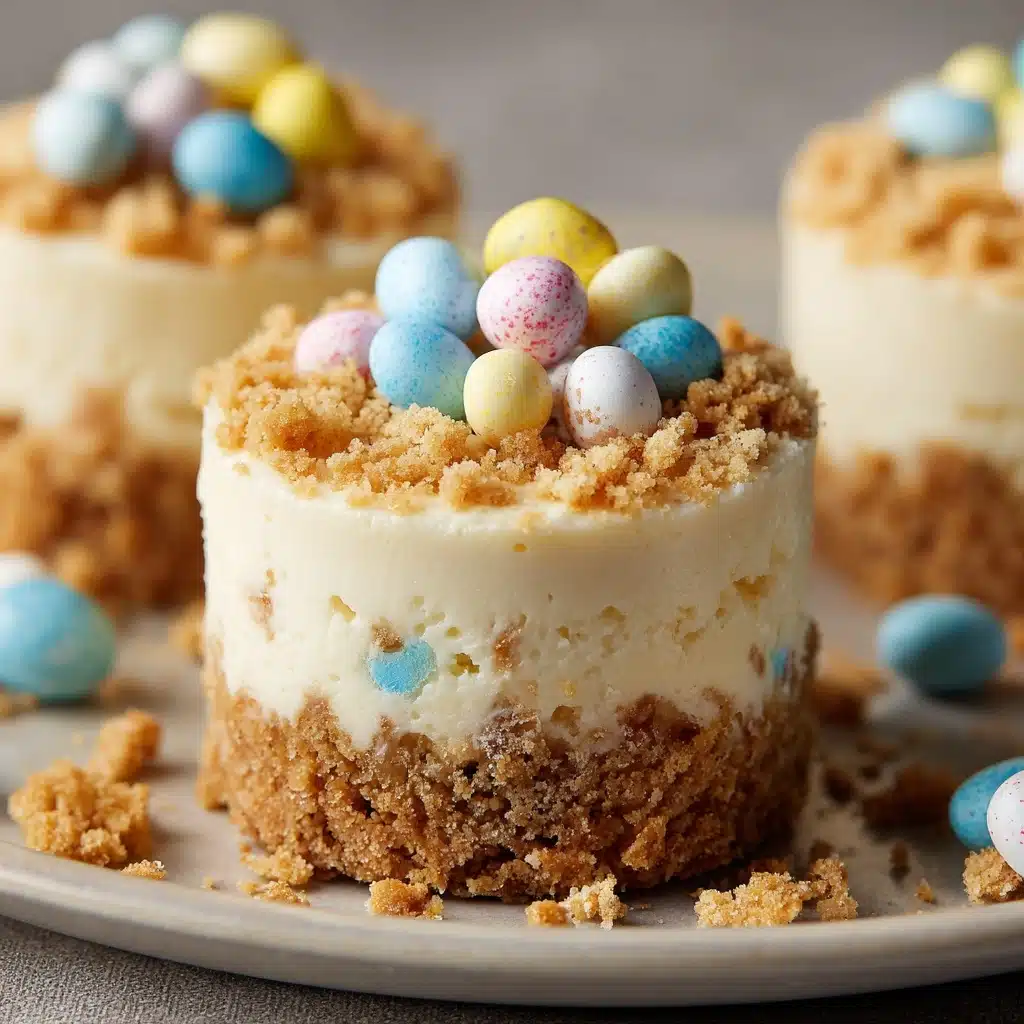
If you’re searching for the ultimate sweet treat this spring, look no further than Easter No-Bake Mini Cheesecakes—a perfectly creamy, colorful, and completely irresistible dessert. These adorable little cheesecakes are smooth, rich, and topped with classic Easter candy, making them a festive indulgence for your holiday table. They require no oven time, can be prepped in advance, and are sure to charm both kids and adults alike. Whether you’re hosting a big family gathering or just adding a cheerful touch to your spring dessert spread, Easter No-Bake Mini Cheesecakes have everything you want in a no-fuss, foolproof holiday dessert.
Ingredients You’ll Need
These mini cheesecakes come together with a handful of straightforward ingredients, each chosen for the magical way it shapes the taste, texture, and festive appearance. Keep these kitchen staples on hand, and you’ll always be ready to whip up a batch when the craving or occasion strikes!
- Graham cracker crumbs: The classic base brings a buttery crunch and just the right hint of caramelized flavor.
- Granulated sugar: Blends into the crust for a subtle sweetness that ties everything together.
- Unsalted butter (melted): Acts as the glue for the crust, adding richness and ensuring perfect sliceability.
- Cream cheese (softened): The heart and soul of any cheesecake—softening it ensures a silky-smooth filling every time.
- Powdered sugar: Dissolves effortlessly into the filling, making it creamy without any grittiness.
- Vanilla extract: Lends a comforting, inviting aroma and underlying warmth to the cheesecake base.
- Heavy whipping cream: Whipped to stiff peaks, it gives these cheesecakes their light-as-air, mousse-like texture.
- Pastel-colored food coloring (optional): A festive way to bring soft springtime hues and a playful touch to the filling.
- Mini chocolate eggs or Easter candy for topping: These make your cheesecakes irresistibly festive—let your creativity shine here!
- Cupcake liners or silicone muffin cups: Essential for easy shaping and even easier serving (plus, they make cleanup a snap).
How to Make Easter No-Bake Mini Cheesecakes
Step 1: Prepare Your Muffin Tin
Begin by lining a muffin tin with cupcake liners or prepping your favorite silicone molds. This step ensures your Easter No-Bake Mini Cheesecakes are easy to remove and come out picture-perfect, every single time. Bonus: liners add a pop of color and make these treats ready for grab-and-go feasting!
Step 2: Make the Crust
In a small bowl, combine your graham cracker crumbs, granulated sugar, and melted butter. Mix them until the texture is like damp, golden sand—that’s when you know it’s ready. Spoon about 1 to 1.5 tablespoons into each prepared liner, then use the back of a spoon or a shot glass to press the mixture firmly into a neat, compact base.
Step 3: Prepare the Creamy Filling
In a large mixing bowl, beat together the softened cream cheese, powdered sugar, and vanilla extract until the mixture becomes gloriously smooth and creamy. Cream cheese is much easier to work with at room temperature, so don’t rush this step—it’s how you guarantee that dreamy texture!
Step 4: Whip the Cream
Next, in a separate bowl, whip the heavy cream until beautiful stiff peaks form. This means the cream stands tall on the beater and gives the cheesecakes their signature pillow-light finish. Gently fold the whipped cream into your cream cheese mixture using a spatula, taking care not to deflate all those lovely bubbles.
Step 5: Add Color (Optional)
If you’re channeling your inner artist, divide the filling into a few bowls and tint each with a drop or two of pastel food coloring. Layer or swirl these colors for a playful, spring-inspired look that’s uniquely yours—a detail that always sparks excitement around the dessert table!
Step 6: Fill and Chill
Now spoon or pipe the filling over each crust, smoothing the tops with the back of a spoon or an offset spatula. Pop the muffin tin in the fridge for at least 4 hours (overnight is fabulous, too). This allows the cheesecakes to set up firm yet creamy, ready for their big moment.
Step 7: Decorate and Serve
Finish your Easter No-Bake Mini Cheesecakes with mini chocolate eggs or your favorite Easter candy. Right before serving, crown each cheesecake with these delightful toppings—it’s such a simple step, but the whimsy and color they bring can’t be overstated!
How to Serve Easter No-Bake Mini Cheesecakes

Garnishes
The finishing flourishes are where your personality shines! Heap on pastel mini eggs, chocolate bunnies, or even a sprinkle of edible glitter for a bit of sparkle. If you want to go extra-fancy, tuck in a few curls of white chocolate or a swirl of whipped cream—these little details instantly elevate your Easter No-Bake Mini Cheesecakes from cute to downright show-stopping.
Side Dishes
While these cheesecakes are stars on their own, you can pair them with a fresh fruit salad (think tangy berries and citrus segments), or a crisp platter of shortbread cookies and tea. Light, fizzy drinks like sparkling lemonade or a gentle Moscato also make perfect companions, enhancing the playful sweetness of your cheesecakes.
Creative Ways to Present
For a festive centerpiece, arrange your Easter No-Bake Mini Cheesecakes on a cake stand, layering them with edible flowers or colored shredded coconut “grass.” Or, pop them into decorative treat boxes for delightful party favors! You could even personalize each cheesecake with a guest’s initial piped in melted chocolate—the little touches are what make memories during the holidays.
Make Ahead and Storage
Storing Leftovers
Your Easter No-Bake Mini Cheesecakes will keep beautifully for up to three days in the refrigerator. Place them in an airtight container to maintain their texture and flavor, and they’ll taste just as luscious on day three as they did on day one—if they last that long!
Freezing
Need to plan even further ahead? These mini cheesecakes freeze like a dream. Set them on a baking sheet in the freezer until firm, then wrap each one in plastic wrap and store in a freezer bag or container. Thaw in the fridge overnight for a foolproof make-ahead treat.
Reheating
No reheating needed with these! In fact, these no-bake beauties are best enjoyed straight from the fridge. If you’ve frozen them, allow a gentle thaw in the refrigerator rather than at room temperature for the best texture and flavor.
FAQs
Can I make Easter No-Bake Mini Cheesecakes gluten-free?
Absolutely! Just swap in gluten-free graham crackers for the crust. The rest of the ingredients are naturally gluten-free, so everyone can enjoy these festive little cheesecakes without worry.
Do I have to use food coloring?
Not at all. The food coloring is purely optional—it’s there for that playful pastel look, but your Easter No-Bake Mini Cheesecakes will taste just as amazing with a classic creamy hue.
Can I use different candies for topping?
Yes! While mini chocolate eggs are a popular favorite, feel free to use any Easter candy you love—from jelly beans to malted eggs or even fruity gummies. Let your imagination run wild for the perfect holiday vibe.
How far in advance can I make these?
You can prepare Easter No-Bake Mini Cheesecakes up to three days ahead. Just save the candy garnish until right before serving so the colors and textures stay fresh.
Why did my filling end up runny?
The most common culprit is under-whipped cream or not chilling the cheesecakes long enough. Be sure to beat your heavy cream until stiff peaks, and give the mini cheesecakes plenty of time to set up in the fridge for that perfect, sliceable texture.
Final Thoughts
Give these Easter No-Bake Mini Cheesecakes a spot at your holiday table this year—they’re as much fun to make as they are to eat! Bursting with creamy flavor, playful color, and kid-friendly charm, they’re a guaranteed crowd-pleaser. Dive in and make your spring celebration unforgettable!
Print
Easter No-Bake Mini Cheesecakes Recipe
- Total Time: 4 hours 25 minutes (includes chilling)
- Yield: 12 mini cheesecakes 1x
- Diet: Non-Vegetarian
Description
These Easter No-Bake Mini Cheesecakes are a delightful treat perfect for the holiday season. Creamy, smooth, and colorful, these individual cheesecakes are topped with mini chocolate eggs for a festive touch.
Ingredients
For the Crust:
- 1 cup graham cracker crumbs
- 2 tablespoons granulated sugar
- 4 tablespoons unsalted butter, melted
For the Filling:
- 2 packages (8 oz each) cream cheese, softened
- 1/2 cup powdered sugar
- 1 teaspoon vanilla extract
- 1 cup heavy whipping cream
- Pastel-colored food coloring (optional)
- Mini chocolate eggs or Easter candy for topping
- Cupcake liners or silicone muffin cups
Instructions
- Prepare the Crust: Line a muffin tin with cupcake liners or use silicone molds. Combine graham cracker crumbs, granulated sugar, and melted butter. Press mixture into each liner.
- Make the Filling: Beat cream cheese, powdered sugar, and vanilla until smooth. Whip heavy cream until stiff, then fold into cream cheese mixture. Add food coloring if desired.
- Assemble: Spoon or pipe filling over crusts. Refrigerate for at least 4 hours.
- Serve: Top with mini chocolate eggs before serving.
Notes
- You can make these ahead of time and store in the fridge for up to 3 days.
- For a gluten-free version, use gluten-free graham crackers.
- Add a teaspoon of lemon zest to the filling for extra flavor.
- Prep Time: 25 minutes
- Cook Time: 0 minutes
- Category: Dessert
- Method: No-Bake
- Cuisine: American
Nutrition
- Serving Size: 1 mini cheesecake
- Calories: 290
- Sugar: 15 g
- Sodium: 160 mg
- Fat: 22 g
- Saturated Fat: 13 g
- Unsaturated Fat: 8 g
- Trans Fat: 0 g
- Carbohydrates: 19 g
- Fiber: 0 g
- Protein: 3 g
- Cholesterol: 60 mg


