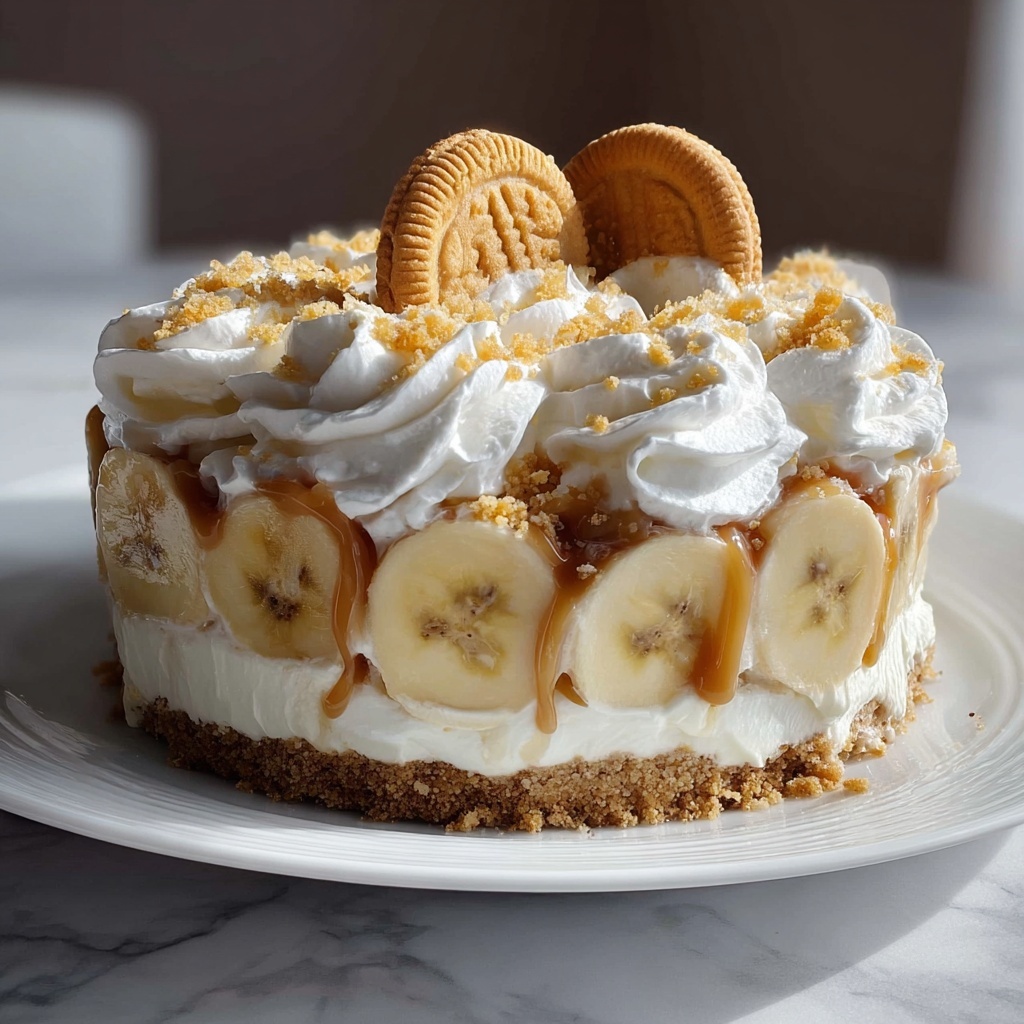
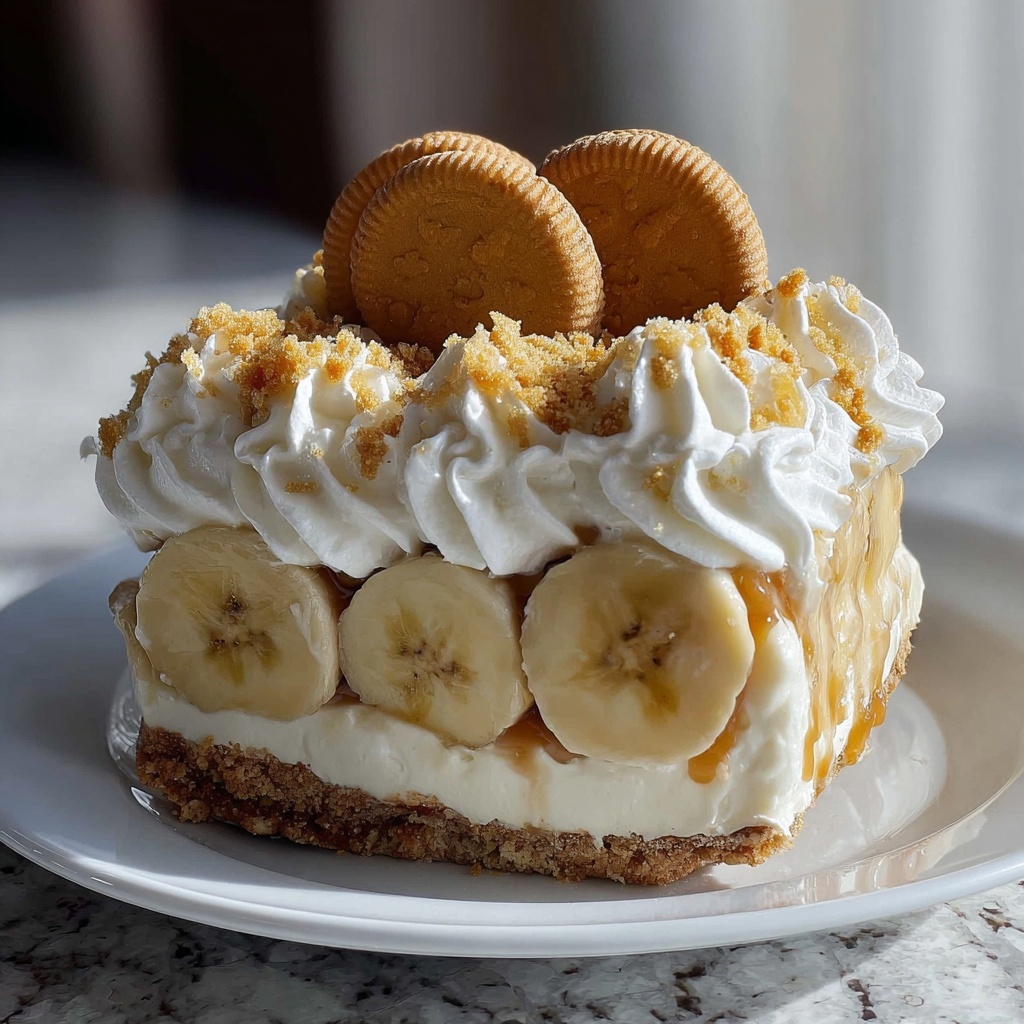
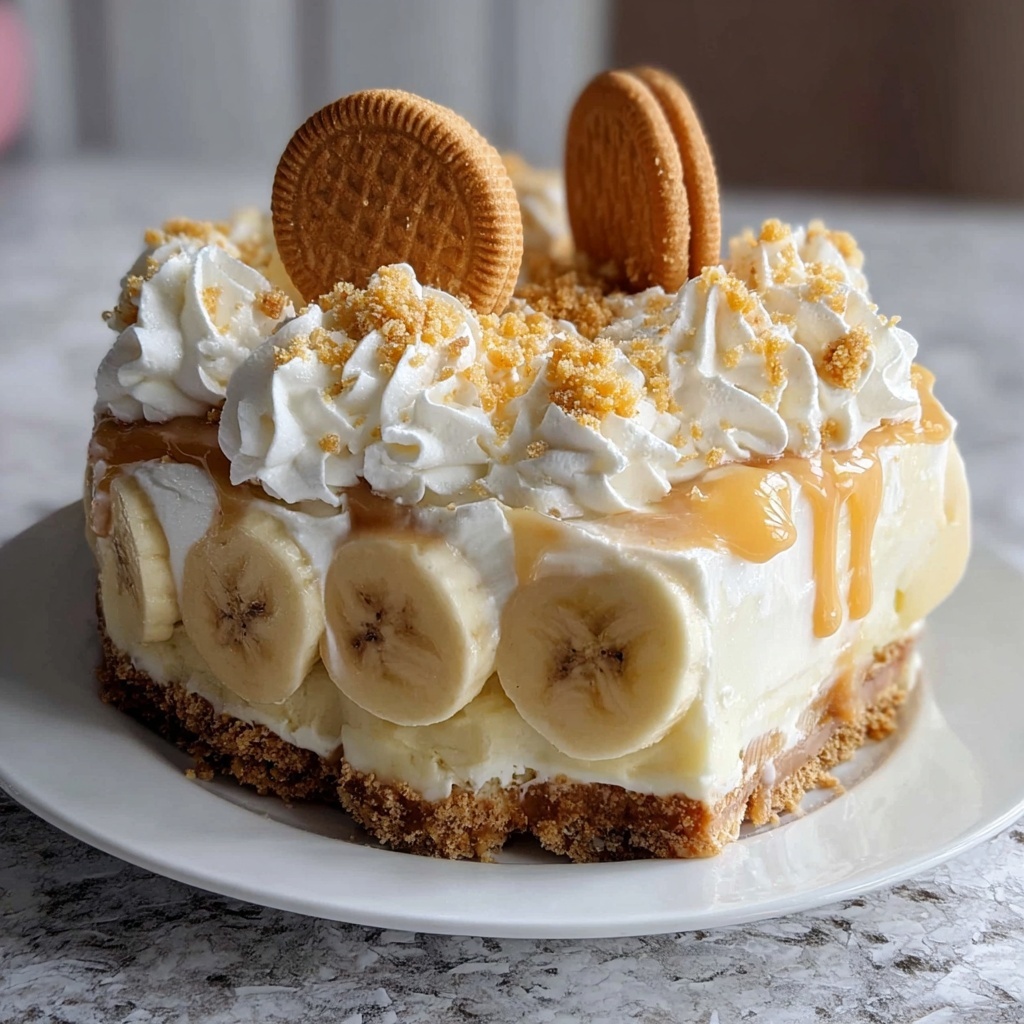
If you have a soft spot for nostalgic desserts that feel like a warm hug on a plate, you are going to adore this Classic Banana Pudding Recipe: 5 Steps to Comfort Food Bliss Recipe. It’s a beautiful balance of creamy, sweet pudding, tender banana slices, and delightful vanilla wafers that melt slightly into the custardy layers. This recipe captures all the best parts of Southern comfort food and wraps them up in a simple, satisfying dessert that anyone can make and enjoy. Whether it’s a family gathering or a quiet night in, this banana pudding will quickly become your go-to comfort treat.
Ingredients You’ll Need
Every ingredient in this recipe plays a crucial role, coming together to create that velvety, flavorful pudding that’s truly unforgettable. From the ripeness of bananas to the simple staples like sugar and milk, each element adds its own magic, whether it’s sweetness, creaminess, or that iconic vanilla wafer crunch.
- 4 ripe bananas: Choose bananas that are perfectly ripe for that rich sweetness and soft texture in each layer.
- 1 box vanilla wafers: These add the classic crunch and absorb the pudding for delightful bites.
- 2 cups milk: The creamy base for your pudding, essential for smooth texture.
- 1/2 cup sugar: Balances the flavors with a gentle sweetness.
- 1/3 cup cornstarch: Acts as the thickening agent to give your pudding that luscious body.
- 1/4 teaspoon salt: Enhances all the flavors without overpowering.
- 4 egg yolks: Brings richness and silky texture to the pudding.
- 2 tablespoons butter: Adds indulgent creaminess and depth of flavor.
- 1 teaspoon vanilla extract: Infuses the dessert with warm, aromatic notes.
- 1 cup whipped cream: A fluffy finishing touch that lightens the pudding layers.
How to Make Classic Banana Pudding Recipe: 5 Steps to Comfort Food Bliss Recipe
Step 1: Combine and cook the pudding base
To start, whisk together milk, sugar, cornstarch, and salt in a saucepan. Heat it over medium while stirring constantly — this step is key for a smooth pudding. You’ll notice it slowly thickens as it cooks, turning from a milky liquid to a dreamy custard base. Patience here ensures luscious texture in every bite.
Step 2: Temper the egg yolks
In a separate bowl, gently whisk the egg yolks. Then slowly pour some of the hot pudding mixture into the yolks while whisking vigorously to warm them without scrambling. This tempering technique keeps your pudding silky and perfect, avoiding any lumps.
Step 3: Cook the egg-infused pudding
Pour the egg yolk mixture back into the saucepan and return it to heat. Cook for an additional two minutes, whisking constantly to thicken the pudding further. This step adds that rich custardy quality that makes banana pudding so comforting.
Step 4: Add butter and vanilla
Remove the pudding from heat and stir in butter and vanilla extract. The butter melts smoothly into the warm pudding, creating a velvety feel, while vanilla brings out that signature sweet aroma you crave in every spoonful.
Step 5: Assemble and chill
Slice your ripe bananas and start layering them in a dish alternating with vanilla wafers. Pour a generous amount of pudding over the layers, then top with whipped cream for a light, airy finish. Chill in the fridge for at least 2 hours — this resting time allows all the flavors to meld beautifully and the wafers to soften just right.
How to Serve Classic Banana Pudding Recipe: 5 Steps to Comfort Food Bliss Recipe
Garnishes
To add a delightful finishing touch, sprinkle crumbled vanilla wafers or a light dusting of cinnamon on top of the whipped cream. Fresh banana slices or a few toasted chopped nuts add texture and visual appeal, making your banana pudding look as irresistible as it tastes.
Side Dishes
This banana pudding stands beautifully on its own but pairs wonderfully with a simple cup of hot coffee or tea to balance the sweetness. For a summer twist, serve it alongside fresh berries or a crisp fruit salad for a fresh contrast.
Creative Ways to Present
Instead of a traditional dish, try individual glass jars or pretty parfait glasses layered with pudding, bananas, and wafers for a charming, personalized touch. You can even add a drizzle of caramel sauce between layers for an extra indulgent surprise.
Make Ahead and Storage
Storing Leftovers
Classic Banana Pudding Recipe: 5 Steps to Comfort Food Bliss Recipe tastes even better after resting, so leftovers stored in an airtight container in the refrigerator will stay fresh and delicious for up to 3 days.
Freezing
While freezing banana pudding is possible, it’s best to avoid it as the texture of the bananas and pudding may change after thawing. If you want to freeze, keep the pudding separate from the wafers and bananas and assemble fresh after thawing.
Reheating
This pudding is best enjoyed cold or at room temperature. If you prefer a warmer dessert, gently microwave individual servings for a few seconds but avoid heating the whipped cream topping.
FAQs
Can I use a different type of cookie instead of vanilla wafers?
Absolutely! While vanilla wafers are traditional and provide that classic texture, you can swap in shortbread cookies or even graham crackers for a slightly different flavor and crunch.
How ripe should the bananas be for this recipe?
Choose bananas that are yellow with just a few brown spots — ripe enough for sweetness but still firm. Overripe bananas can become mushy and affect the pudding’s texture.
Can I make this recipe vegan?
You can try substituting plant-based milk, a vegan cornstarch thickener, and coconut cream instead of whipped cream. However, the egg yolks are crucial for the pudding’s richness, so you may need to experiment with suitable vegan custard alternatives.
What’s the best way to avoid lumps in the pudding?
Constant stirring over medium heat is key, along with tempering the egg yolks gradually. Taking your time during these steps ensures a smooth, velvety pudding every time.
How long should I chill the banana pudding before serving?
At least 2 hours in the refrigerator is ideal to let the pudding set and the wafers soften just right, creating those irresistible layers of creamy texture and cookie crunch.
Final Thoughts
There is something truly special about taking a few staple ingredients and transforming them into the soul-soothing magic of our Classic Banana Pudding Recipe: 5 Steps to Comfort Food Bliss Recipe. It’s a timeless dessert that brings joy with every spoonful, delivering comfort and sweetness in perfect harmony. I can’t wait for you to dive in, make it your own, and savor this little piece of pure comfort food bliss.
Print
Classic Banana Pudding Recipe: 5 Steps to Comfort Food Bliss Recipe
- Prep Time: 20 minutes
- Cook Time: 15 minutes
- Total Time: 2 hours 35 minutes
- Yield: 8 servings
- Category: Dessert
- Method: Stovetop
- Cuisine: American
Description
This Classic Banana Pudding recipe is a comforting, nostalgic dessert that layers ripe bananas and vanilla wafers with a creamy homemade vanilla pudding. Topped with whipped cream and chilled to perfection, it’s the ultimate indulgence for gatherings or a sweet treat any time.
Ingredients
Fruit
- 4 ripe bananas
Dry Ingredients
- 1 box vanilla wafers (approximately 12 oz)
- 1/2 cup sugar
- 1/3 cup cornstarch
- 1/4 teaspoon salt
Dairy & Eggs
- 2 cups milk
- 4 egg yolks
- 2 tablespoons butter
- 1 cup whipped cream
Flavorings
- 1 teaspoon vanilla extract
Instructions
- Combine Ingredients for Pudding Base: In a medium saucepan, whisk together the milk, sugar, cornstarch, and salt until smooth.
- Cook Until Thickened: Place the saucepan over medium heat and cook the mixture, stirring constantly, until it thickens and starts to bubble gently, about 5-7 minutes.
- Temper the Egg Yolks: In a separate bowl, whisk together the egg yolks. Gradually pour a small amount of the hot pudding mixture into the yolks while whisking continuously to prevent curdling.
- Finish Cooking the Pudding: Return the tempered egg yolk mixture back to the saucepan. Continue cooking and stirring for an additional 2 minutes until very thick and creamy.
- Stir in Butter and Vanilla: Remove the pudding from heat and stir in the butter and vanilla extract until fully incorporated.
- Prepare Layers: Slice the bananas into thin rounds. In a serving dish, layer vanilla wafers, sliced bananas, and then pour a portion of the pudding over them. Repeat layering until ingredients are used up, finishing with pudding on top.
- Top with Whipped Cream: Spread or pipe the whipped cream on the top layer of pudding for a light, creamy finish.
- Chill: Cover the pudding with plastic wrap and refrigerate for at least 2 hours, allowing the flavors to meld and the pudding to set before serving.
Notes
- Use ripe but firm bananas to avoid mushy texture in the pudding.
- Use low-fat or whole milk depending on preference; whole milk will yield a richer pudding.
- For a decorative touch, reserve some vanilla wafers to crumble on top before serving.
- If you want a quicker set, chill the pudding in the freezer for 45 minutes but do not let it freeze solid.
- Can be made a day ahead and stored in the refrigerator covered tightly.

