
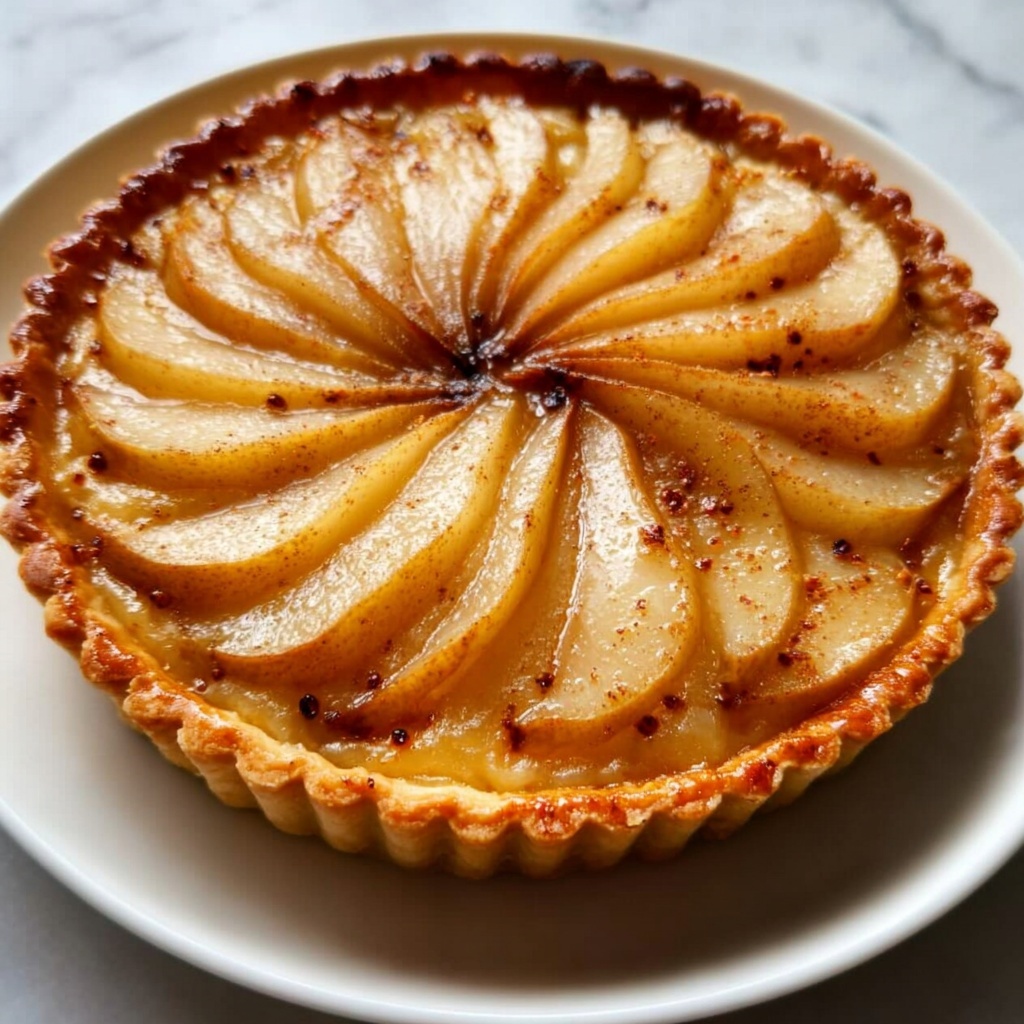
There’s something truly enchanting about the Christmas Pear Tart: 5 Reasons to Make It Magical Recipe that instantly brings warmth and festive cheer to your holiday table. With its tender, juicy pears mingling with cinnamon’s cozy notes on a perfectly golden crust, this tart is not only a feast for the eyes but also a delight for the taste buds. Whether you’re a seasoned baker or just looking for an approachable yet impressive dessert, this recipe captures the spirit of the season in every bite, making it a must-try treat that you’ll want to share with friends and family year after year.
Ingredients You’ll Need
Getting ready to bake this Christmas Pear Tart: 5 Reasons to Make It Magical Recipe is a joyful step because the ingredients are simple, familiar, and each brings its own magic. Every element contributes to balance the flavors, enhance texture, and create that beautiful, festive color that invites everyone to dig in.
- 1 pre-made tart shell: Saves time and ensures a flaky, buttery base ready for your luscious filling.
- 3 ripe pears, peeled and sliced: The star of the tart, their natural sweetness and softness create the perfect filling texture.
- 1/2 cup sugar: Adds the right amount of sweetness, complementing the fruit without overpowering it.
- 1 teaspoon cinnamon: Brings warm, fragrant spice that evokes all the holiday vibes.
- 1 tablespoon lemon juice: Brightens the filling and prevents the pears from browning.
- 2 tablespoons butter, melted: Adds richness and a silky finish to the pear mixture.
- 1 egg, beaten (for egg wash): Ensures the tart crust bakes up beautifully golden and glossy.
How to Make Christmas Pear Tart: 5 Reasons to Make It Magical Recipe
Step 1: Preheat Your Oven
Start by preheating your oven to 375°F (190°C), setting the stage for the perfect bake. A hot oven is crucial to achieve that golden crust and tender pears, so don’t skip this essential step.
Step 2: Mix the Filling
In a large bowl, gently combine the peeled and sliced pears with sugar, cinnamon, lemon juice, and melted butter. This mix allows the pears to soak in all the flavors, creating a fragrant and juicy filling that’s bursting with holiday spirit.
Step 3: Prepare the Tart Shell
Place your pre-made tart shell into a baking dish. This simple step keeps your work neat and ensures even cooking as the delicate crust can sometimes be tricky to manage on its own.
Step 4: Arrange the Pear Mixture
Carefully spoon the pear mixture into the tart shell, spreading it evenly to cover every inch. Watching those pear slices nestle into the buttery shell is honestly one of the most satisfying parts of the process!
Step 5: Apply the Egg Wash
Brush the edges of the tart shell with the beaten egg. This step may seem small, but it’s what gives the crust its irresistible golden sheen and gorgeous finish that makes you proud to present it at any gathering.
Step 6: Bake Until Perfect
Pop the tart into your preheated oven and bake for 25 to 30 minutes. You’ll know it’s ready when the pears are tender and the crust gleams with a golden brown hue — truly mouthwatering and deeply satisfying.
Step 7: Cool Before Serving
Allow your Christmas Pear Tart to cool before slicing. This not only helps the flavors settle and deepen but also makes serving easier, so you get clean, luscious slices every time.
How to Serve Christmas Pear Tart: 5 Reasons to Make It Magical Recipe

Garnishes
The simplest garnishes can turn this tart into an elegant showstopper. A dusting of powdered sugar or a sprinkle of chopped toasted almonds adds texture and a little sparkle. Fresh mint leaves bring a pop of color and a subtle freshness that pairs beautifully with the warm spices.
Side Dishes
Serve your tart alongside a scoop of vanilla bean ice cream or a dollop of freshly whipped cream for a complimentary creaminess that balances the fruit’s natural sweetness. For a cozy twist, a small bowl of cinnamon-spiced yogurt is a wonderful, lighter alternative that still feels indulgent.
Creative Ways to Present
Presentation is half the fun, especially during the holidays. Try arranging additional pear slices in a fan pattern across the top before baking, or glaze the finished tart with a warm apricot jam for extra shine. Using festive plates and a colorful table setting will elevate this rustic tart into a centerpiece everyone will admire.
Make Ahead and Storage
Storing Leftovers
If there are any leftovers (which is rare!), store the tart tightly covered in the refrigerator. This helps maintain the crust’s texture and keeps the pears fresh and flavorful for up to three days. Always enjoy chilled or at room temperature for best taste.
Freezing
You can freeze the tart before baking: wrap it securely in plastic wrap and foil to prevent freezer burn. When ready to enjoy, thaw overnight in the fridge and bake as usual. Freezing after baking is less ideal due to texture changes but can be done if needed.
Reheating
To bring your leftover tart back to life, gently warm it in a 325°F (163°C) oven for about 10 minutes. This refreshes the crust’s crunch and warms the filling without drying it out—perfect for making each slice feel freshly baked.
FAQs
Can I use other fruits instead of pears?
Absolutely! While pears are traditional and perfect here, apples or quinces also work beautifully. Just adjust the baking time slightly depending on the fruit’s firmness.
Do I need to peel the pears?
Peeling is recommended for a smoother texture and to let the tart filling shine, but leaving the skin on adds an extra rustic look and a bit more fiber if you prefer.
Can I make the tart shell from scratch?
Yes! A homemade buttery tart shell is wonderful if you have the time. Just keep the dough chilled and roll it out evenly to fit your pan perfectly.
Is this tart suitable for a gluten-free diet?
To make it gluten-free, use a gluten-free tart shell available in specialty stores or make your own gluten-free pastry dough. The filling is naturally gluten-free.
What’s the best way to slice the tart?
Use a sharp knife and wipe it clean between cuts to get neat slices. Letting it cool completely before slicing ensures it holds together well.
Final Thoughts
If you’re looking to create a memorable holiday dessert that’s as charming as it is delicious, the Christmas Pear Tart: 5 Reasons to Make It Magical Recipe is your golden ticket. It’s approachable yet elegant, warm with cinnamon spice, and bursting with seasonal fruit goodness. Give it a go this season—you’ll be greeted with smiles and eager seconds around your table!
Print
Christmas Pear Tart: 5 Reasons to Make It Magical Recipe
- Prep Time: 10 minutes
- Cook Time: 30 minutes
- Total Time: 40 minutes
- Yield: 8 servings
- Category: Dessert
- Method: Baking
- Cuisine: American
- Diet: Vegetarian
Description
This Christmas Pear Tart is a delightful and elegant dessert featuring ripe pears baked in a pre-made tart shell with a cinnamon-sugar glaze. Perfect for holiday gatherings, this tart combines sweet, tender pears and a golden, flaky crust to create a magical festive treat that’s simple to prepare and sure to impress your guests.
Ingredients
Tart Shell
- 1 pre-made tart shell
Filling
- 3 ripe pears, peeled and sliced
- 1/2 cup sugar
- 1 teaspoon cinnamon
- 1 tablespoon lemon juice
- 2 tablespoons butter, melted
Egg Wash
- 1 egg, beaten (for egg wash)
Instructions
- Preheat Oven: Preheat your oven to 375°F (190°C) to prepare for baking the tart.
- Prepare Filling: In a mixing bowl, combine the sliced pears, sugar, cinnamon, lemon juice, and melted butter. Stir gently to coat the pears evenly with the mixture.
- Place Tart Shell: Position the pre-made tart shell in a suitable baking dish to catch any drips during baking.
- Fill Tart: Arrange the pear mixture evenly inside the tart shell, spreading the pears carefully to ensure an even layer.
- Apply Egg Wash: Using a brush, coat the edges of the tart shell with the beaten egg. This will help create a beautifully golden and shiny crust.
- Bake the Tart: Place the tart in the preheated oven and bake for 25 to 30 minutes until the pears are tender and the crust has turned golden brown.
- Cool and Serve: Remove the tart from the oven and allow it to cool completely before slicing and serving to let the flavors set.
Notes
- Use ripe but firm pears to maintain shape after baking.
- You can swap the pre-made tart shell with a homemade one for a more artisanal touch.
- Brush the crust with egg wash just before baking for a glossy finish.
- For added flavor, sprinkle a little nutmeg or vanilla extract into the filling mixture.
- Serve with whipped cream or vanilla ice cream for an indulgent holiday dessert.

