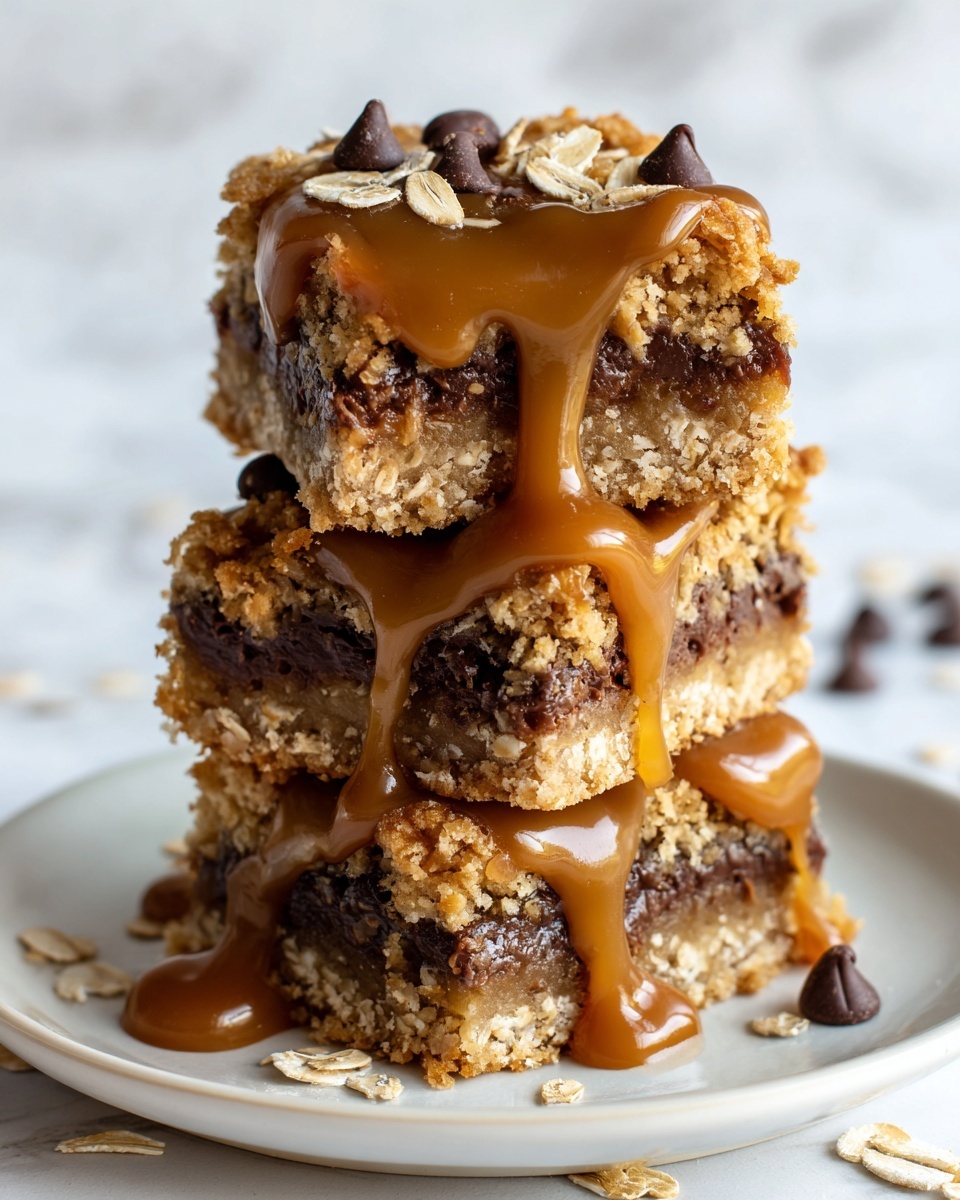
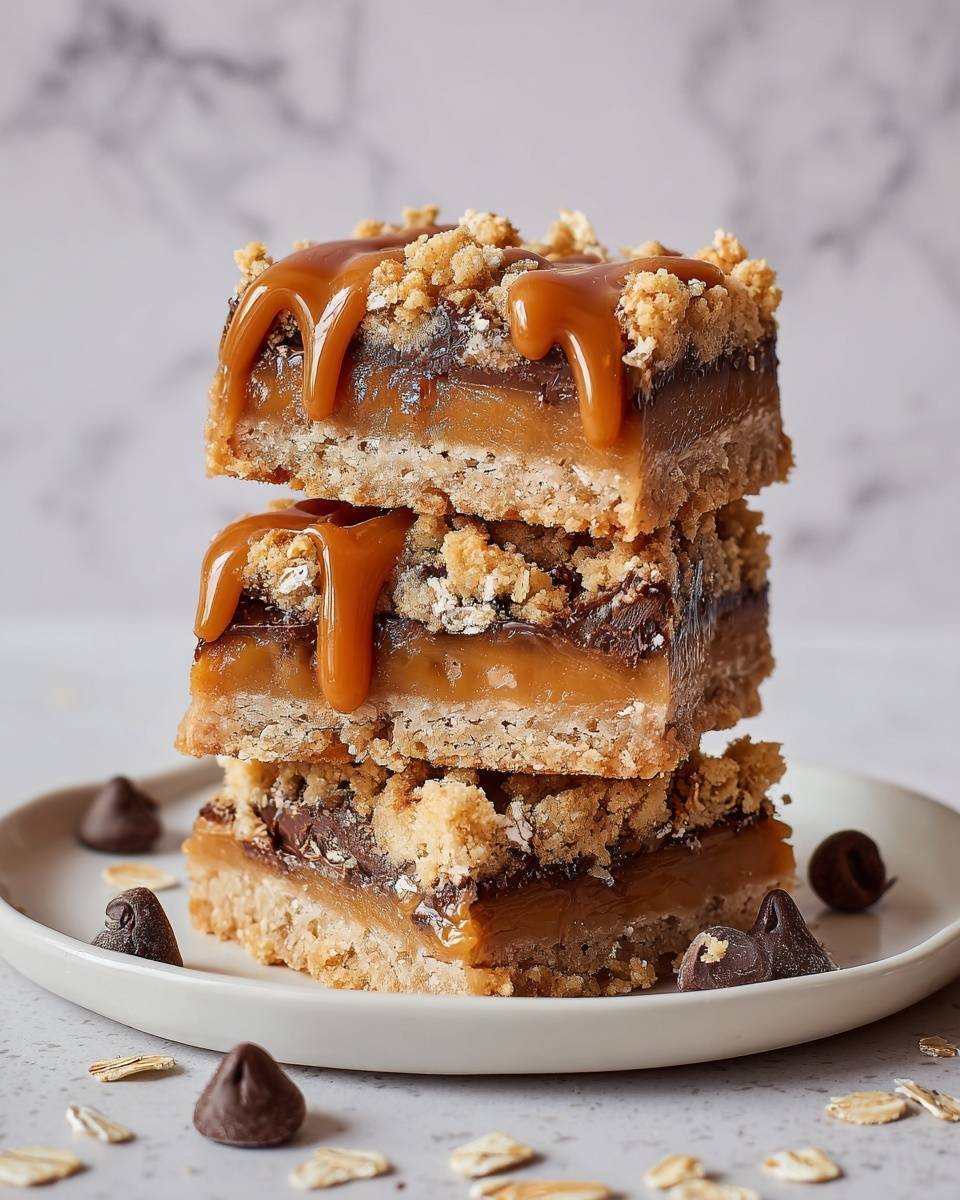
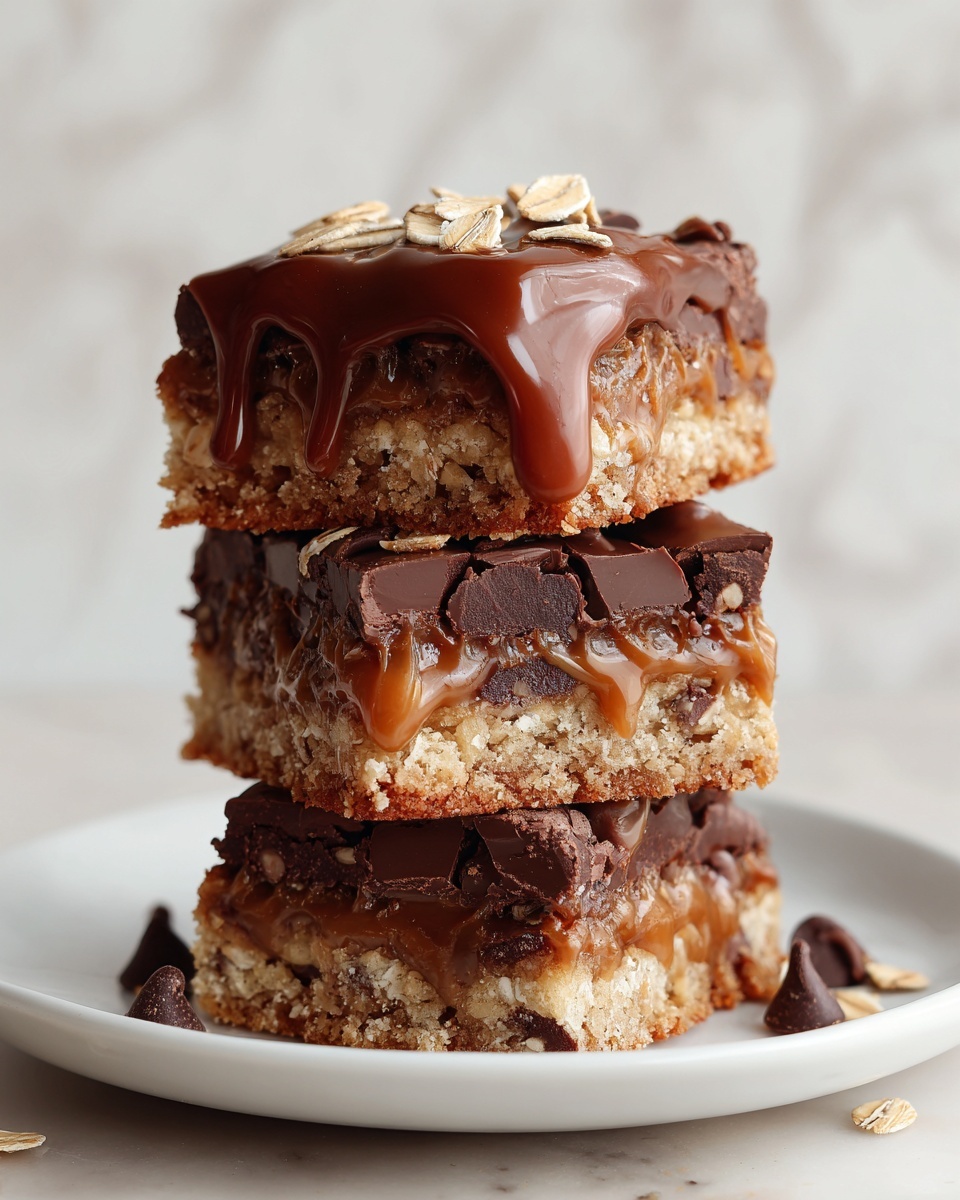
If you’re craving a dessert that brings together the perfect blend of chewy oats, luscious caramel, and rich chocolate, you have to try this Carmelitas Recipe. These delightful bars layer buttery oat crusts with a gooey caramel filling and melt-in-your-mouth chocolate chips, creating a treat that’s comfortingly sweet and wonderfully textured. Whether you’re looking for a crowd-pleaser for your next gathering or a cozy homemade snack, this recipe is a guaranteed winner that feels like a warm hug in every bite.
Ingredients You’ll Need
Gathering these simple yet essential ingredients is the first joyful step to creating your own batch of Carmelitas. Each element plays a crucial role: the oats bring a hearty chew, the caramel squares offer that sticky-sweet decadence, and the chocolate chips add irresistible richness.
- 3/4 cup salted butter, melted: Adds a rich, creamy base that binds everything and gives the bars their buttery flavor.
- 2/3 cup brown sugar, packed: Provides deep sweetness and moisture for a tender crumb.
- 1 Tablespoon vanilla extract: Enhances all the flavors with a warm, comforting aroma.
- 1 1/4 cup all-purpose flour: The structure builder for a soft but sturdy oat crust.
- 1 1/4 cup rolled oats or old fashioned oats: Gives the bars a hearty texture and a touch of rustic charm.
- 1 teaspoon baking soda: Helps the crust rise just enough for a perfect balance of softness and crispness.
- 1/2 teaspoon salt, divided: Brings out the sweet notes and balances the rich caramel and chocolate.
- 40 caramel squares: The star ingredient that melts into a smooth layer of gooey, golden caramel.
- 1/3 cup heavy cream: Creates a silky caramel sauce when combined with the caramel squares.
- 1 1/2 cup semi-sweet chocolate chips: Adds bursts of chocolatey goodness to every bite.
How to Make Carmelitas Recipe
Step 1: Prepare the Pan
Start by preheating your oven to 350°F (177°C). Line an 8×8 inch baking pan with parchment paper and grease it lightly. This simple prep will make sure your Carmelitas come out of the pan easily and keep the caramel from sticking to the bottom.
Step 2: Make the Cookie Mixture
In a large microwave-safe bowl, melt the salted butter. Whisk in the packed brown sugar and vanilla extract until everything is smoothly combined. This mixture is where the magic begins, setting the foundation for the rich, sweet oat crust.
Step 3: Combine Dry Ingredients
Add the all-purpose flour, rolled oats, baking soda, and half of the salt (1/4 teaspoon) to the butter mixture. Mix everything using a pastry cutter or fork until it becomes crumbly yet fully incorporated. This texture is just right for both the base and topping of your Carmelitas.
Step 4: Form the Base
Press about half of your oat mixture evenly into the bottom of the prepared pan. Bake this crust for 10 minutes until it’s just set and looks slightly golden. This step creates the sturdy yet tender foundation needed to hold all the luscious layers coming next.
Step 5: Prepare the Caramel Filling
While the base is baking, combine the caramel squares, heavy cream, and the remaining salt in a microwave-safe bowl. Heat on high for one minute, stir, then repeat until the caramel is smoothly melted. It’s important to heat carefully to avoid seizing so your caramel layer stays silky and pourable.
Step 6: Layer the Chocolate
As soon as the crust is out of the oven, evenly sprinkle the semi-sweet chocolate chips over the warm surface. The heat will soften the chocolate just enough to marry beautifully with the caramel sauce in the next step.
Step 7: Add the Caramel Layer
Pour the smooth, warm caramel sauce evenly over the chocolate layer. This gooey, golden layer is what makes this Carmelitas Recipe so incredibly indulgent and unforgettable.
Step 8: Top with Remaining Crust
Sprinkle the remaining oat mixture over the caramel, gently tapping it down to form a crunchy topping that will bake up nice and golden in the oven, creating a perfect textural contrast.
Step 9: Bake the Bars
Return the pan to the oven and bake for an additional 15 minutes, or until the top is lightly browned and set. This final baking step locks in all the layers and adds a beautifully toasted finish to your bars.
Step 10: Cooling and Slicing
Remove the pan and let it cool completely on a wire rack. To get those neat, clean squares and keep the caramel from oozing out, let your Carmelitas set at room temperature overnight or chill in the refrigerator for at least three hours. Then, slice and enjoy!
How to Serve Carmelitas Recipe
Garnishes
Add a sprinkle of flaky sea salt on top just before serving to enhance the sweet caramel flavors and provide a lovely contrast. You can also dust with a little powdered sugar for a pretty, festive touch that makes each bar look irresistible.
Side Dishes
Carmelitas pair beautifully with a scoop of vanilla ice cream or a dollop of whipped cream. If you’re serving them as part of a party spread, fresh berries or a warm cup of coffee make excellent companions to complement their richness.
Creative Ways to Present
Try cutting these bars into bite-sized pieces and serving them on a decorative platter with small forks for easy snacking. Wrapping individual bars in parchment paper tied with twine also makes for charming gifts or delightful treats to pack in lunchboxes.
Make Ahead and Storage
Storing Leftovers
Stored in an airtight container at room temperature, these Carmelitas stay fresh and chewy for up to four days. Keeping them airtight prevents the oat topping from drying out and the caramel from becoming too firm.
Freezing
For longer storage, freeze the whole pan or individual bars wrapped tightly in plastic wrap and foil. Frozen Carmelitas maintain their taste and texture well and are perfect to pull out for an unexpected sweet craving.
Reheating
Warm your caramel bars briefly in the microwave or in a low-temperature oven to revive that gooey texture before serving. Just 10-15 seconds in the microwave or 5 minutes at 300°F works wonders.
FAQs
Can I use different kinds of chocolate in this Carmelitas Recipe?
Absolutely! While semi-sweet chocolate chips work beautifully, you can swap in milk chocolate or even dark chocolate for a richer flavor. Mixing chocolate types or adding chocolate chunks also creates interesting texture and taste.
Is it necessary to chill the Carmelitas before cutting?
Chilling is highly recommended to keep the caramel from oozing out and to achieve clean cuts. If you’re short on time, letting them set at room temperature for several hours can work, but chilling ensures the best results.
Can I make these bars gluten-free?
Yes, by substituting the all-purpose flour with a gluten-free flour blend and making sure your oats are certified gluten-free, you can easily adapt the Carmelitas Recipe to suit gluten-free diets without sacrificing taste or texture.
How long does it take to prepare and bake the Carmelitas?
Total prep and baking time is about 40 minutes, not counting cooling time. Keep in mind that allowing the bars to cool and set properly overnight yields the best slicing and serving experience.
Can I double the recipe for a larger batch?
Definitely! Just use a larger pan, like a 9×13 inch baking dish, and adjust the baking time slightly. Keep an eye on the bars toward the end so they don’t overbake. Doubling is perfect for bigger families or parties.
Final Thoughts
Making this Carmelitas Recipe is like inviting a little slice of buttery, caramel-chocolate heaven into your kitchen. The combination of textures and flavors feels both nostalgic and special, perfect for sharing with friends or savoring on a quiet afternoon. I can’t wait for you to whip up a batch and see just how addictive these bars become — trust me, they’re worth every delicious bite.
Print
Carmelitas Recipe
- Prep Time: 15 minutes
- Cook Time: 25 minutes
- Total Time: 3 hours 40 minutes (including chilling time)
- Yield: 16 servings
- Category: Dessert
- Method: Baking
- Cuisine: American
Description
Carmelitas are indulgent layered bars featuring a buttery oat crust, rich melted caramel, and a chocolate chip topping. Baked to golden perfection, these sweet bars combine chewy caramel and velvety chocolate for a delightful dessert or snack. Perfect for parties, potlucks, or anytime you crave a decadent treat.
Ingredients
Crust and Topping
- 3/4 cup salted butter, melted
- 2/3 cup brown sugar, packed
- 1 Tablespoon vanilla extract
- 1 1/4 cup all-purpose flour
- 1 1/4 cup rolled oats or old fashioned oats
- 1 teaspoon baking soda
- 1/2 teaspoon salt, divided
Caramel Filling and Topping
- 40 caramel squares
- 1/3 cup heavy cream
- 1 1/2 cup semi-sweet chocolate chips
Instructions
- Prepare the Pan: Preheat your oven to 350°F (177°C). Line and grease an 8×8 inch baking pan, ideally with parchment paper to prevent caramel sticking and enable easy removal.
- Make the Cookie Mixture: In a large microwave-safe bowl, melt the butter. Whisk in the brown sugar and vanilla extract until the mixture is smooth and fully combined.
- Combine Dry Ingredients: Add the flour, oats, baking soda, and 1/4 teaspoon of salt to the butter mixture. Use a pastry cutter or fork to mix until crumbly and well incorporated.
- Form the Base: Press about half of this mixture evenly into the bottom of the prepared baking pan to form the crust. Bake for 10 minutes until slightly set.
- Prepare the Caramel Filling: While the crust bakes, place the caramel squares, heavy cream, and the remaining 1/4 teaspoon salt in a large microwave-safe bowl. Heat on high for 1 minute, stir, then heat another minute and stir until the mixture is melted and smooth to avoid seizing.
- Layer the Chocolate: Once the crust is baked, immediately sprinkle the chocolate chips evenly over the hot crust so they soften.
- Add the Caramel Layer: Pour the prepared caramel sauce evenly over the layer of chocolate chips.
- Top with Remaining Crust: Sprinkle the remaining oat mixture over the caramel, gently pressing or tapping down to form a firm topping.
- Bake the Bars: Return the pan to the oven and bake for another 15 minutes or until the top is lightly browned and set.
- Cooling and Slicing: Remove the pan to a wire rack and let cool completely before slicing. For clean bars and to prevent caramel oozing, set at room temperature overnight or chill in the fridge for at least 3 hours before cutting into squares.
Notes
- Using parchment paper helps remove the bars easily and prevents sticking.
- Microwave the caramel mixture carefully to avoid burning or seizing.
- Allow bars to chill fully for neat slices and to let the caramel set firmly.
- Rolled oats add a chewy texture while all-purpose flour keeps the base sturdy.
- Store bars in an airtight container at room temperature or refrigerate for longer freshness.


