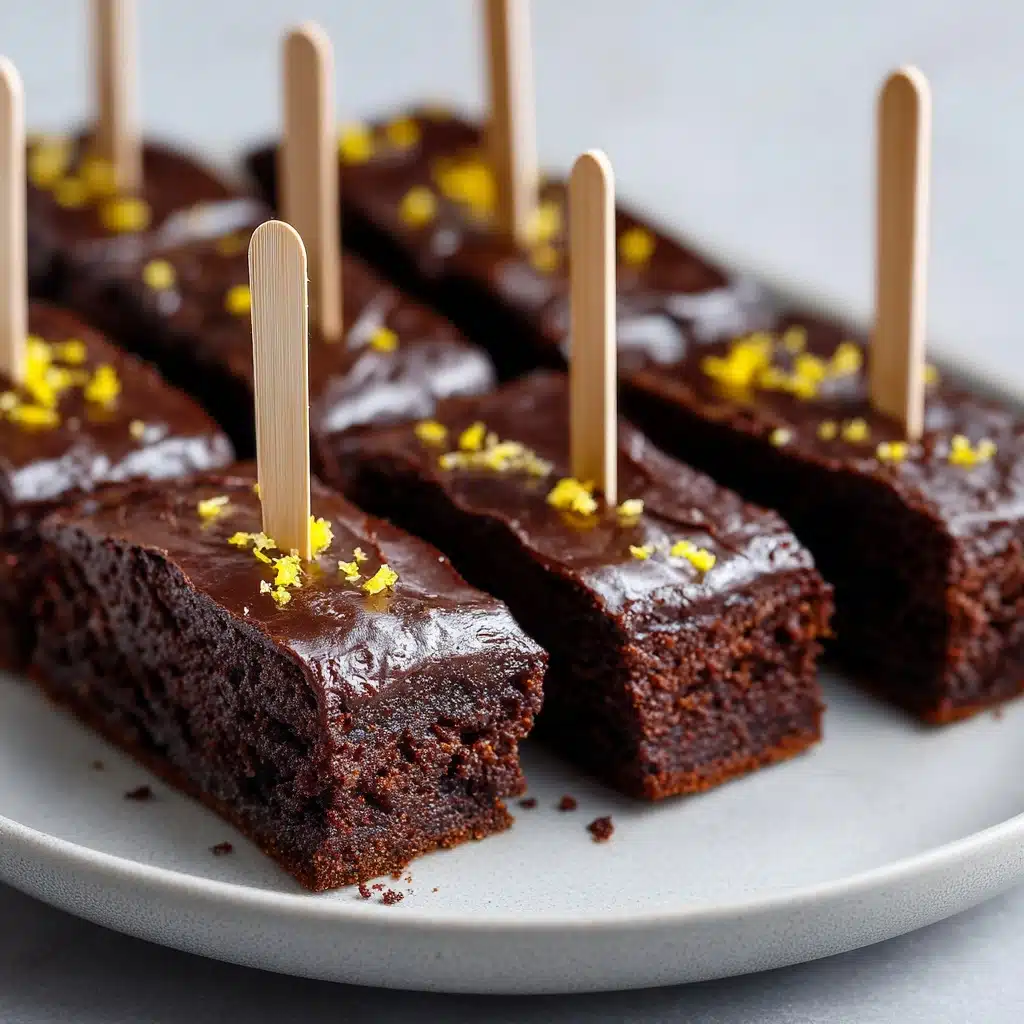
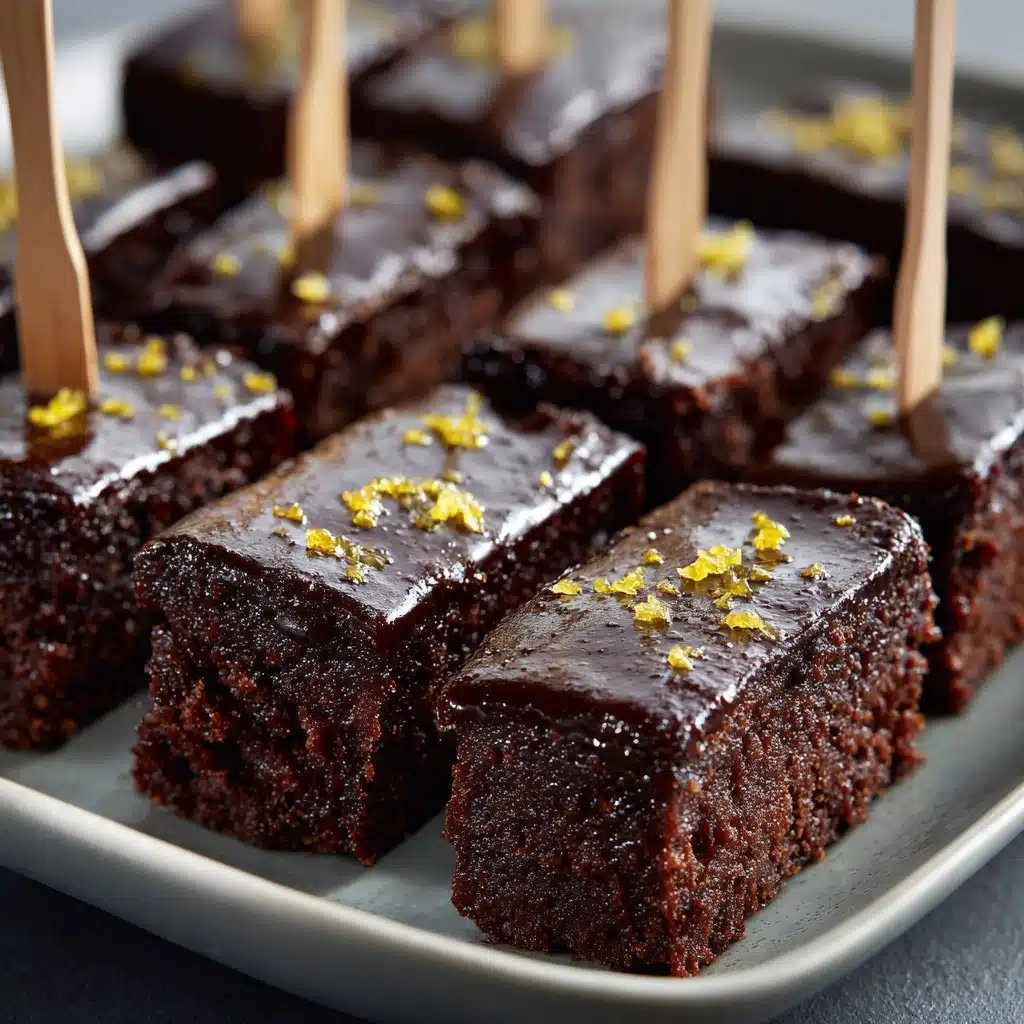
Brownies on a Stick Recipe
If you’re searching for a crowd-pleasing treat that’s as delightful to look at as it is to eat, Brownies on a Stick are pure magic. Imagine rich, fudgy brownie squares perched atop lollipop sticks, dipped in silky chocolate, and sprinkled with your favorite toppings. These cheerful little pops are just as perfect for birthday parties and bake sales as they are for a cozy night in. Simple to make and endlessly customizable, Brownies on a Stick bring a playful twist to classic brownies that everyone will adore.
Ingredients You’ll Need
Gathering the ingredients for Brownies on a Stick couldn’t be easier, and each one plays a starring role. From the deep chocolatey base to the fun, colorful toppings, every element adds its own special touch to this irresistible dessert.
- Brownie Mix (1 box, 18-20 oz): The ultimate shortcut to fudgy, delicious brownies every single time.
- Eggs, Oil & Water (as called for on your box): These are essential to bring the brownie batter together and ensure a moist texture.
- Semi-Sweet Chocolate Chips (1 cup): For that luscious, glossy chocolate coating that takes these pops over the top.
- Vegetable Oil (1 tablespoon): This helps the chocolate chips melt smoothly and creates a perfect dipping consistency.
- Lollipop or Popsicle Sticks (20): The key to turning brownies into a handheld treat—don’t skip these!
- Optional Toppings (sprinkles, crushed nuts, mini M&Ms): These add color, crunch, and a dash of personality to every pop.
How to Make Brownies on a Stick
Step 1: Bake Your Brownies
Start by preparing the brownie batter according to the instructions on your box. Pour the batter into a well-greased 9×13-inch baking pan for that ideal thickness. Bake as directed, then let the brownies cool completely in the pan—this helps them firm up and makes cutting so much easier.
Step 2: Cut and Chill
Once your brownies are cool, use a sharp knife to cut them into 2×2 inch squares. For extra clean edges, you can chill the brownies in the fridge for about 30 minutes before slicing. If they’re still a little soft, pop them in the freezer for 10–15 minutes. This step makes inserting the sticks a breeze and keeps your brownies looking picture-perfect.
Step 3: Insert the Sticks
Gently push a lollipop or popsicle stick into the base of each brownie square, being careful not to push all the way through. If the brownies are chilled or slightly frozen, they’ll hold together beautifully and won’t crack or crumble.
Step 4: Melt the Chocolate
Combine your chocolate chips and vegetable oil in a microwave-safe bowl. Microwave in 30-second intervals, stirring after each burst, until the chocolate is completely melted and glossy. Don’t skip the oil—it’s the secret to that smooth, dippable consistency!
Step 5: Dip and Decorate
Now the fun begins! Dip each brownie pop into the melted chocolate, or drizzle the chocolate over the tops for a more rustic look. Immediately sprinkle on your favorite toppings while the chocolate is still wet—sprinkles, nuts, or mini candies all work beautifully. Lay the finished pops on a parchment-lined tray.
Step 6: Set and Serve
Once your Brownies on a Stick are decorated, slide the tray into the fridge for about 15 minutes. This helps the chocolate set and gives you the perfect snappy shell. After that, they’re ready to be served and enjoyed!
How to Serve Brownies on a Stick
Garnishes
When it comes to garnishing Brownies on a Stick, let your creativity shine! A sprinkle of sea salt, a drizzle of white chocolate, or a dusting of edible glitter can turn these treats into true showstoppers. Mix and match toppings for a rainbow of flavors and textures—there’s really no wrong way to dress them up.
Side Dishes
Pair your Brownies on a Stick with a scoop of vanilla ice cream, a fresh fruit platter, or even a mug of hot cocoa for an extra-special dessert spread. Their portable nature means they play well alongside lots of other treats, making them perfect for parties, potlucks, or family movie nights.
Creative Ways to Present
Presentation is half the fun with Brownies on a Stick! Arrange them upright in mason jars or decorative cups filled with colorful candies, or wrap each pop in cellophane and tie with a ribbon for party favors. For a festive look, you can even poke the sticks into a foam block covered with tissue paper and create an edible centerpiece.
Make Ahead and Storage
Storing Leftovers
If you find yourself with leftover Brownies on a Stick (a rare but happy occasion), simply store them in an airtight container in the fridge. They’ll stay fresh for up to five days, and the chocolate coating helps keep the brownies moist.
Freezing
Brownies on a Stick freeze wonderfully! Arrange them in a single layer on a baking sheet, freeze until solid, then transfer to a zip-top bag or airtight container. They’ll keep for up to two months—just thaw in the fridge before serving for best texture.
Reheating
These treats are best enjoyed chilled or at room temperature, but if you prefer a gooier brownie, you can let them sit at room temp for 10–15 minutes or give them a very quick (5-10 second) zap in the microwave. Be careful not to overheat, or the chocolate coating may melt.
FAQs
Can I use homemade brownies instead of a boxed mix?
Absolutely! If you have a favorite homemade brownie recipe, go for it. Just make sure the brownies are sturdy enough to hold a stick, and consider chilling them before cutting for the cleanest results.
What if my brownies fall apart when I insert the stick?
This usually happens if the brownies are too soft or warm. Chilling or freezing the brownies briefly before inserting the sticks makes them much easier to handle and helps them stay together.
Can I use white chocolate or milk chocolate for the coating?
Yes, feel free to switch up the chocolate! White chocolate, milk chocolate, or even colored candy melts all work well for coating. Just remember to add a little oil for a smooth finish.
Are Brownies on a Stick gluten-free?
They can be! Just swap in your favorite gluten-free brownie mix and double-check that your toppings are gluten-free. The rest of the process stays exactly the same.
Can kids help make Brownies on a Stick?
Definitely! Kids love dipping, decorating, and, of course, sampling. Just supervise closely when it comes to melting chocolate and using sharp knives for cutting.
Final Thoughts
There’s just something so joyful about Brownies on a Stick—they’re playful, delicious, and guaranteed to make any occasion extra special. Whether you’re sharing them at a party or whipping up a batch for your family, don’t be surprised if these little pops disappear in a flash. Give them a try and let your creativity run wild!
Print
Brownies on a Stick Recipe
- Total Time: 40 minutes
- Yield: 20 brownie pops 1x
- Diet: Vegetarian
Description
Brownies on a Stick are a fun and delicious twist on classic brownies, perfect for parties and kids’ treats. Made with a simple boxed brownie mix, these bite-sized brownies are baked, cut into squares, and then dipped in melted chocolate. Finished with a variety of optional toppings like sprinkles, crushed nuts, or mini M&Ms, they are both visually appealing and delectably rich.
Ingredients
Brownie Base
- 1 box (18-20 oz) brownie mix (plus ingredients listed on the box)
Chocolate Coating
- 1 cup semi-sweet chocolate chips
- 1 tablespoon vegetable oil
Assembly
- 20 lollipop or popsicle sticks
- Optional toppings like sprinkles, crushed nuts, or mini M&Ms
Instructions
- Prepare Brownies: Follow the package instructions for the brownie mix, baking it in a 9×13-inch pan. Once baked, allow the brownies to cool completely in the pan to ensure they hold their shape when cut.
- Cut and Insert Sticks: Cut the cooled brownies into approximately 2×2 inch squares. Carefully insert a lollipop or popsicle stick into each square, pushing it about halfway through to secure.
- Melt Chocolate: In a microwave-safe bowl, combine the semi-sweet chocolate chips and vegetable oil. Microwave in 30-second intervals, stirring between each, until the chocolate is fully melted and smooth.
- Dip and Decorate: Dip each brownie pop into the melted chocolate or drizzle the chocolate over the top. While the chocolate is still wet, add optional toppings such as sprinkles, crushed nuts, or mini M&Ms to decorate.
- Set the Chocolate: Place the finished brownie sticks onto a parchment-lined tray and refrigerate for about 15 minutes to let the chocolate fully set and harden, making them ready to serve.
Notes
- For cleaner cuts, chill the brownies before slicing to prevent crumbling.
- If brownies are too soft to hold the popsicle stick securely, freeze them for 10–15 minutes prior to inserting the sticks.
- Prep Time: 15 minutes
- Cook Time: 25 minutes
- Category: Dessert
- Method: Baking
- Cuisine: American
Nutrition
- Serving Size: 1 brownie pop
- Calories: 210
- Sugar: 18g
- Sodium: 130mg
- Fat: 11g
- Saturated Fat: 4g
- Unsaturated Fat: 6g
- Trans Fat: 0g
- Carbohydrates: 27g
- Fiber: 1g
- Protein: 2g
- Cholesterol: 15mg
