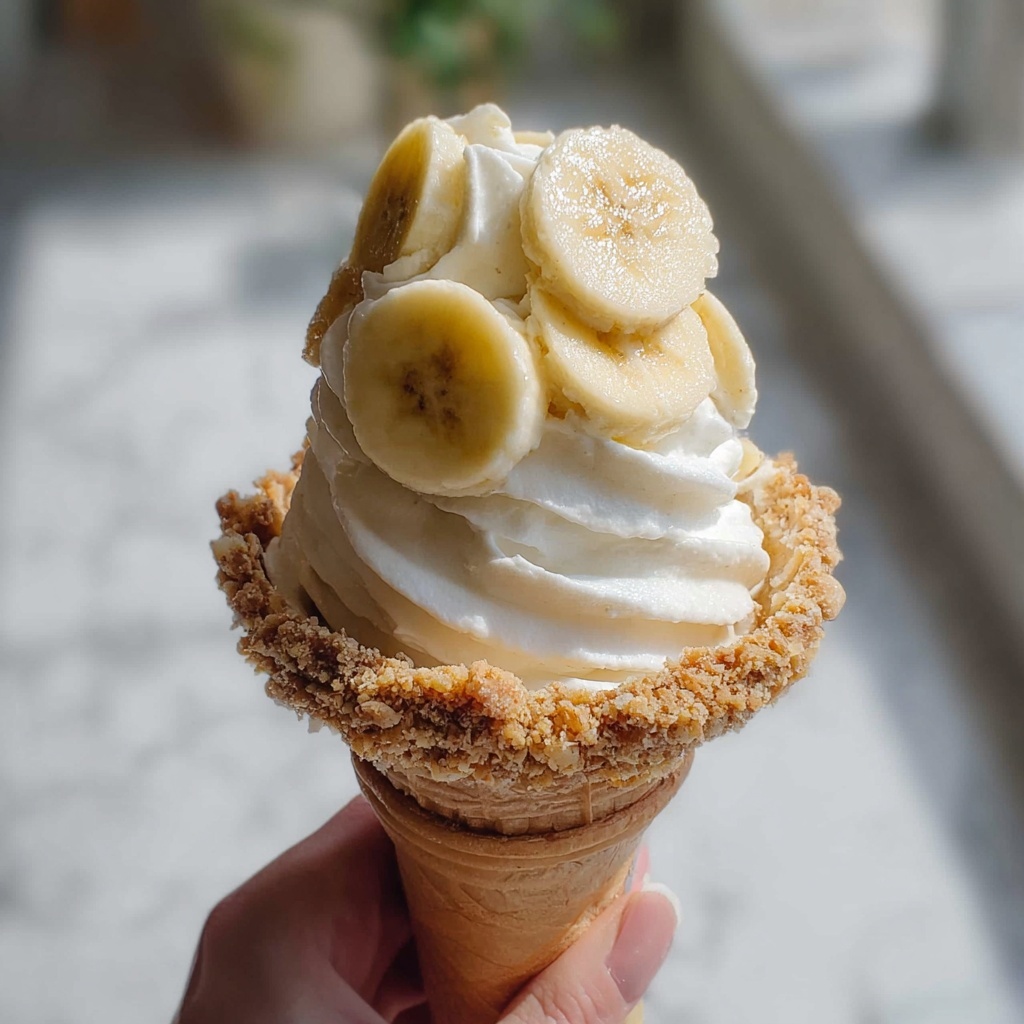
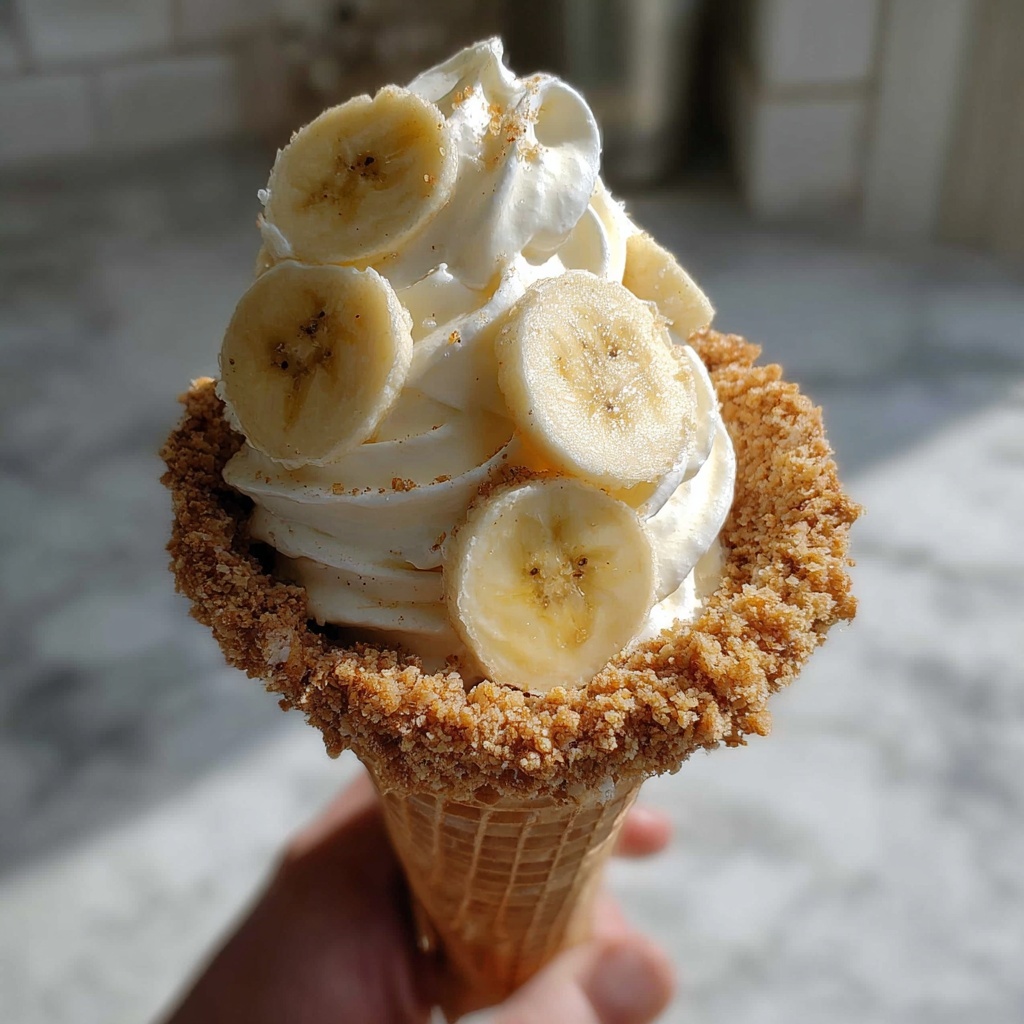
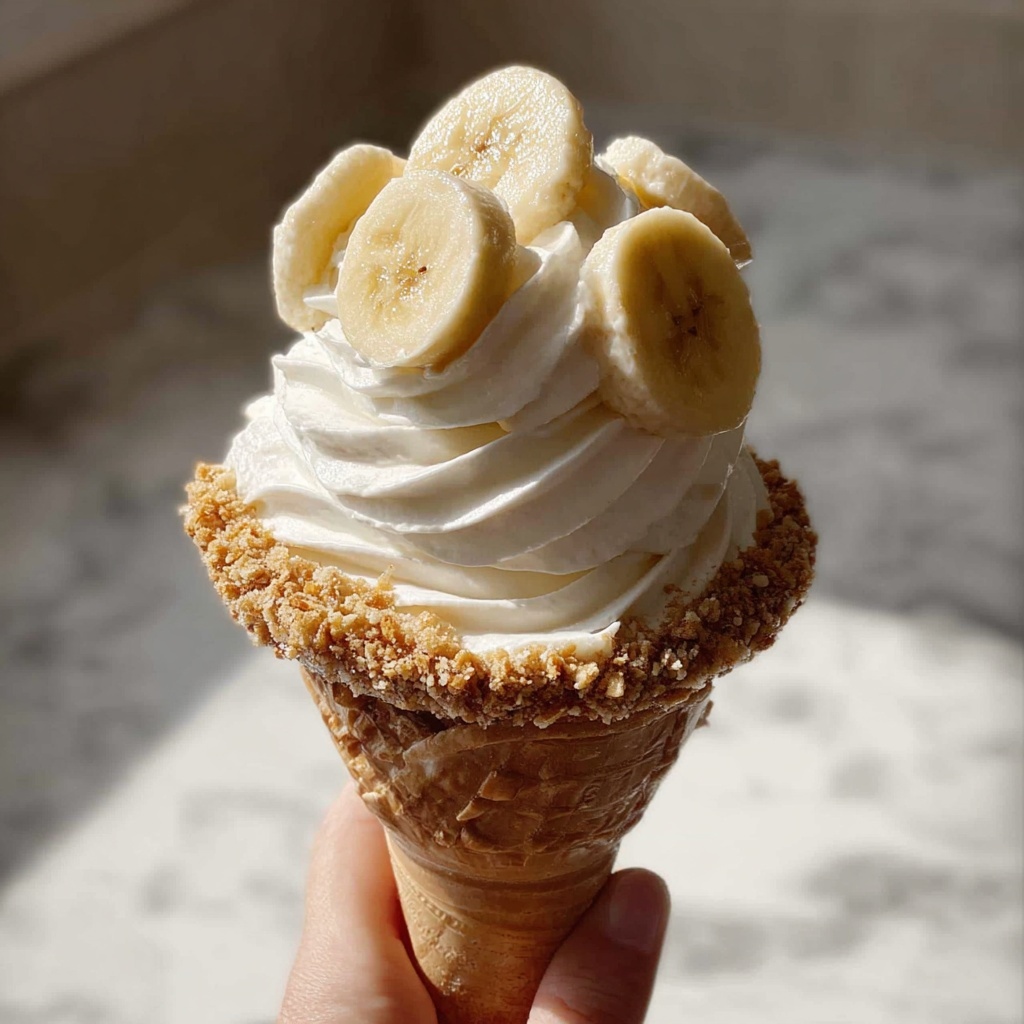
If you are on the hunt for a dessert that brings together all the comforting flavors of Southern banana pudding with the rich creaminess of cheesecake, look no further than this Banana Pudding Cheesecake Cones Recipe. This unique twist serves each bite inside a crunchy ice cream cone, creating a fun and portable treat that’s perfect for parties, family gatherings, or simply indulging your sweet tooth at home. The combination of smooth banana pudding, tangy cream cheese, and buttery graham cracker crust makes every spoonful feel like a little celebration in your mouth. You won’t want to miss making this delightful dessert your new go-to!
Ingredients You’ll Need
Gathering the right ingredients is the first step toward the perfect Banana Pudding Cheesecake Cones Recipe. Each component plays a vital role, contributing to the texture, flavor, and overall deliciousness of this treat.
- 1 cup crushed graham crackers: This creates the buttery, crispy base that mimics a classic cheesecake crust.
- 1/4 cup melted butter: Helps bind the graham cracker crumbs and adds rich flavor.
- 1 package (8 oz) cream cheese, softened: Provides a creamy and slightly tangy element essential to cheesecake.
- 1/2 cup powdered sugar: Sweetens the cream cheese mixture smoothly without graininess.
- 1 cup whipped topping: Adds lightness and fluffy texture to balance the richness.
- 1 package (3.4 oz) instant banana pudding mix: Brings that unmistakable banana flavor and silky texture.
- 2 cups milk: Used to prepare the banana pudding, making it creamy and luscious.
- 1 banana, sliced: Adds fresh fruitiness and a natural touch of sweetness on top.
- 12 ice cream cones: Serve as charming and edible containers for this dreamy dessert.
How to Make Banana Pudding Cheesecake Cones Recipe
Step 1: Prepare the Cone Crust
Start by preheating your oven to 350°F to get it ready for baking the crust. Mix the crushed graham crackers with melted butter until the crumbs are evenly coated and feel like wet sand. Carefully press this mixture into the bottom of each ice cream cone to form a firm, buttery base that bakes up crisp and golden. Pop the cones upright into a muffin tin or a sturdy holder to keep them steady while baking for about 8 minutes. This step ensures your dessert starts with that perfect crunchy layer we all love.
Step 2: Make the Cream Cheese Mixture
In a medium bowl, beat the softened cream cheese with powdered sugar until you achieve a silky smooth texture. This will be the rich, tangy cheesecake component of your cones. Next, gently fold in the whipped topping, being careful not to deflate the airy fluffiness. This lightens the mixture, making it velvety and easy to blend with the banana pudding.
Step 3: Prepare the Banana Pudding
In another bowl, whisk together the instant banana pudding mix and milk according to the package instructions. This makes a silky pudding bursting with banana flavor. Let it set for a few minutes until it thickens, then combine it gently with the cream cheese mixture you prepared earlier. The fusion of these two creamy elements gives your cones that classic banana cheesecake taste with a dreamy, smooth finish.
Step 4: Fill and Chill the Cones
Carefully spoon the banana pudding cheesecake mixture into each graham cracker crust-lined cone, filling them generously. Top each cone with fresh banana slices to add a lovely, natural sweetness and a pop of color. Place the filled cones upright in the refrigerator and let them chill for at least one hour. This chilling step is crucial as it allows the layers to meld together, making every bite wonderfully creamy and refreshing.
How to Serve Banana Pudding Cheesecake Cones Recipe
Garnishes
To make these cones look as fabulous as they taste, consider sprinkling a few crushed graham crackers, a light dusting of powdered sugar, or even a dollop of whipped cream on top. A drizzle of caramel or a sprinkle of chopped nuts can also elevate the presentation and add texture. These simple garnishes turn an already charming dessert into something truly eye-catching.
Side Dishes
These Banana Pudding Cheesecake Cones Recipe treats shine as a solo star, but they can also be paired perfectly with a refreshing glass of cold milk or a cup of rich coffee. If you’re serving a larger spread, a fresh fruit salad or some tangy citrus sorbet works wonderfully to cut through the richness and keep the dessert experience balanced. Keep your sides light to let the cones stand out!
Creative Ways to Present
Who says you need to serve these cones upright only? Another fun idea is to place them in individual dessert cups filled with a colorful fruit compote or crushed nuts to catch any drips and add extra flair. You could also arrange them on a rustic wooden board with banana chips scattered around for a casual yet elegant dessert display. The portability of these cones makes them fantastic for outdoor picnics too!
Make Ahead and Storage
Storing Leftovers
If you have any leftovers (which can be a delightful surprise), store the Banana Pudding Cheesecake Cones Recipe in an airtight container in the refrigerator. They’ll keep their creamy texture and fresh flavor for up to two days, making them perfect for enjoying as a quick treat later without losing their charm.
Freezing
While these cones are best enjoyed fresh, you can freeze them if needed. Place them in a freezer-safe container and freeze for up to one month. When ready to eat, thaw them overnight in the refrigerator to maintain their texture. Keep in mind that the ice cream cone shell might lose some crunch after freezing, but the flavor remains deliciously inviting.
Reheating
These cheesecake cones are designed to be served chilled, so reheating is not recommended. Instead, allow any frozen cones to thaw fully in the fridge, then enjoy them cool for the best creamy and refreshing experience.
FAQs
Can I use fresh banana instead of instant pudding mix?
Absolutely! Using fresh bananas will give you a more natural banana flavor, but the texture may be less creamy and pudding-like. You could blend fresh bananas with some vanilla pudding or gelatin to mimic that classic texture.
Can these be made dairy-free?
Yes, you can substitute dairy ingredients with vegan cream cheese, plant-based whipped topping, and dairy-free milk options. Just be sure to check that the pudding mix is also dairy-free or make your own banana pudding from scratch.
How long can I prepare these cones in advance?
You can prepare the cones up to a day ahead and keep them chilled in the refrigerator. For best texture, add the fresh banana slices just before serving to avoid browning.
What can I use if I don’t have graham crackers?
Digestive biscuits or vanilla wafer cookies crushed finely make excellent substitutes for graham crackers, offering a similar sweet and crispy base for the cones.
Can I use regular ice cream cones, or should I use sugar cones?
Either type works well, but sugar cones tend to have a stronger flavor and crunch that complements this recipe beautifully. Regular cones will still taste great but might be a bit lighter in texture.
Final Thoughts
There is something incredibly joyful about enjoying the classic flavors of banana pudding and cheesecake, especially when they come wrapped in a crunchy ice cream cone. The Banana Pudding Cheesecake Cones Recipe is a perfect way to impress your friends and family with minimal effort but maximum deliciousness. Treat yourself to this sweet creation and watch how it quickly becomes a cherished favorite in your dessert rotation!
Print
Banana Pudding Cheesecake Cones Recipe
- Prep Time: 20 minutes
- Cook Time: 7 minutes
- Total Time: 1 hour 27 minutes
- Yield: 12 servings
- Category: Dessert
- Method: Baking
- Cuisine: American
Description
These Banana Pudding Cheesecake Cones are a delightful twist on classic banana pudding, combining creamy cheesecake filling with the nostalgic crunch of ice cream cones. Perfect for parties or a fun dessert treat, they feature layers of graham cracker crust, smooth banana pudding, and fresh banana slices for pure bliss in every bite.
Ingredients
Crust
- 1 cup crushed graham crackers
- 1/4 cup melted butter
Filling
- 1 package (8 oz) cream cheese, softened
- 1/2 cup powdered sugar
- 1 cup whipped topping
- 1 package (3.4 oz) instant banana pudding mix
- 2 cups milk
Topping
- 1 banana, sliced
- 12 ice cream cones
Instructions
- Preheat Oven: Preheat your oven to 350°F to prepare for baking the graham cracker crust inside the cones.
- Prepare Crust Mixture: In a bowl, mix together the crushed graham crackers and melted butter until the crumbs are evenly coated and hold together when pressed.
- Form Crust in Cones: Press the graham cracker and butter mixture firmly into the bottom of each ice cream cone to create a sturdy crust base.
- Bake Crusts: Place the cones upright in a baking pan and bake them in the preheated oven for about 5-7 minutes to set the crust. Remove and let cool.
- Make Cream Cheese Mixture: In a separate bowl, beat the softened cream cheese with powdered sugar until smooth and creamy, ensuring no lumps remain.
- Fold in Whipped Topping: Gently fold in the whipped topping into the cream cheese mixture to add lightness and fluffiness.
- Prepare Banana Pudding: In another bowl, whisk together the instant banana pudding mix and milk until it thickens according to package instructions, usually about 2 minutes.
- Combine Mixtures: Fold the banana pudding mixture into the cream cheese and whipped topping blend until fully combined and smooth.
- Fill Cones with Filling: Spoon the banana pudding cheesecake mixture into each cone, filling them nearly to the top.
- Add Banana Slices: Garnish each filled cone with fresh banana slices on top for an added burst of flavor and texture.
- Chill: Place the filled cones in the refrigerator and chill for at least 1 hour to allow the filling to set and flavors to meld.
Notes
- Make sure the cream cheese is fully softened for a smooth filling.
- Press the crust firmly to prevent it from crumbling when filling the cones.
- Serve chilled for best texture and flavor.
- Can be made a few hours ahead and stored in the refrigerator.
- For added texture, sprinkle some crushed nuts or chocolate chips on top before chilling.

