DIY Worry Stones: Craft Your Own Calming Gems Today! Recipe
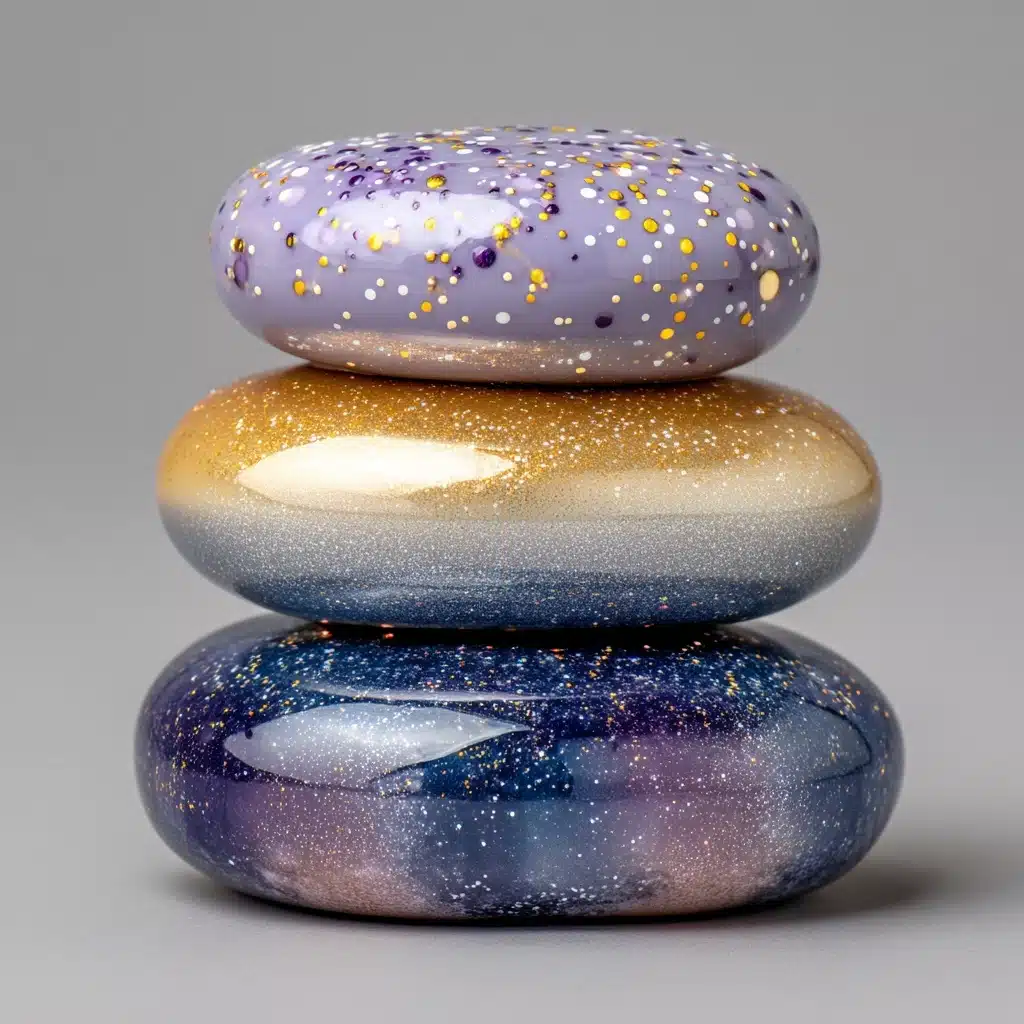
If you’re looking for a hands-on, soul-soothing craft that can double as a thoughtful gift or your own pocket-sized comfort buddy, look no further than DIY Worry Stones: Craft Your Own Calming Gems Today! This wonderful project is perfect for all ages and skill levels, inviting you to get creative with color, texture, and scent. Each finished worry stone is unique, fitting perfectly in your palm and ready to soak up your stress with every gentle rub. Whether you’re trying to focus during a meeting, helping a child wind down before bed, or piecing together a heartfelt present, these homemade gems belong on your craft list!
Ingredients You’ll Need
You only need a few simple supplies to bring your DIY Worry Stones: Craft Your Own Calming Gems Today! masterpieces to life. Each ingredient adds its own flavor, from the sculptable clay that gives body to each stone, to the splash of color and calming scents that personalize your creation—so don’t skip any!
- Air-dry clay or polymer clay: The foundation! Choose your favorite for easy modeling and lasting results.
- Small bowl of water (for smoothing): Helps create a silky, crack-free finish on your stones.
- Assorted tools for shaping (toothpick, small spoon, etc.): Great for adding fun textures, grooves, or patterns.
- Acrylic paints (optional): Adds vibrant color and turns each worry stone into a mini canvas.
- Paintbrushes: Necessary for painting on smooth coats or detailed designs.
- Clear sealant or mod podge (optional for finishing): Gives your stone a glossy, protective finish and longevity.
- Essential oils (optional for scent): A touch of relaxation—dab a little on for extra calming power.
How to Make DIY Worry Stones: Craft Your Own Calming Gems Today!
Step 1: Shape Your Stone Base
Start your adventure by pinching off a small amount of clay (think: a large marble). Roll it between your palms until you have a smooth ball. Flatten the ball gently into an oval or round stone shape that nestles perfectly in the crook of your hand—there’s no right or wrong here, just whatever feels best to you!
Step 2: Make the Signature Thumb Indent
With your stone ready, use your thumb to press a shallow indentation right in the center. This iconic groove is what makes a worry stone so soothing, ready and waiting for your thumb during stressful moments.
Step 3: Smooth and Personalize
Dip your finger into the bowl of water and gently smooth away any cracks or rough patches along the surface. Then grab your tools—maybe a toothpick for doodling swirls or a tiny spoon for adding gentle ridges. This is your moment to create something uniquely yours with DIY Worry Stones: Craft Your Own Calming Gems Today!
Step 4: Let It Dry or Bake
If you’re using air-dry clay, set the stones aside somewhere safe to dry for 24–48 hours (check your clay’s instructions). Going the polymer clay route? Pop those beauties in the oven and bake according to the package—it’s a short wait for a lasting treasure.
Step 5: Get Creative with Paint
Once dry and cool, bring on the acrylic paints! Select colors that bring you calm or happiness, add favorite symbols, or go abstract and let your mood guide you. When the paint is completely dry, your worry stone will really start to shine.
Step 6: Seal and Scent (Optional)
If you’d like an extra glossy finish or a little more durability, brush on a layer of clear sealant or mod podge. For a sensory bonus with DIY Worry Stones: Craft Your Own Calming Gems Today!, rub a drop or two of your favorite essential oil onto the stone for calming aromatherapy on the go.
How to Serve DIY Worry Stones: Craft Your Own Calming Gems Today!

Garnishes
Sprinkle your finished stones with tiny painted dots, gold flecks, or nature-inspired motifs for a dazzling final touch. Adding a little shimmer or a calming symbol can make these worry stones feel extra special and truly one-of-a-kind.
Side Dishes
Pair your worry stones with a handwritten affirmation note, a travel pouch, or a DIY calming spray. These thoughtful “side dishes” make the set the perfect pocket-sized care package, especially when giving as a heartfelt gift.
Creative Ways to Present
Get creative and gift your DIY Worry Stones: Craft Your Own Calming Gems Today! in a small glass jar, a velvet bag, or even nestled in a hand-folded paper box. Attach a tag with instructions or a motivating message—presentation makes all the difference for these charming handmade gems!
Make Ahead and Storage
Storing Leftovers
Keep any extra or unused worry stones in an airtight container or a fabric pouch to prevent dust and scratches. If you’ve added essential oils, separate them with parchment to preserve scents and colors.
Freezing
While you won’t need to freeze your finished stones, you can absolutely stash spare clay in the freezer (as long as it’s sealed well) to keep it from drying out prematurely before your next round of making DIY Worry Stones: Craft Your Own Calming Gems Today!
Reheating
There’s usually no need to “reheat” finished worry stones, but if you notice the scent fading, just refresh with a fresh drop or two of essential oil and your calming gems will be good as new.
FAQs
Can I use any type Craft
Both air-dry and polymer clay work beautifully for DIY Worry Stones: Craft Your Own Calming Gems Today! Just make sure to follow their specific drying or baking instructions for best results.
Are these worry stones safe for children?
Absolutely! With adult supervision for smaller children (especially around paints and small pieces), these stones are a wonderful craft for all ages and a gentle way to introduce calming strategies.
What kind of designs work best?
It truly depends on your style! Swirls, hearts, stars, mandalas, or just calming colors all look fantastic. Let your imagination guide you and have fun personalizing each DIY Worry Stone: Craft Your Own Calming Gems Today! for its recipient.
How long do the scents from essential oils last?
Most essential oil scents will last a few days to a couple of weeks. You can always refresh with another drop for instant aroma and relaxation vibes!
Can I make these in advance for gifts?
Definitely! DIY Worry Stones: Craft Your Own Calming Gems Today! are perfect as handmade gifts. Just be sure everything is thoroughly dried and sealed before wrapping up to ensure they stay pristine.
Final Thoughts
Ready to get hands-on and make something meaningful? DIY Worry Stones: Craft Your Own Calming Gems Today! are such a joy to create, bursting with possibility for creativity and comfort. Whether you keep them for yourself or share them as heartfelt gifts, these calming little gems are sure to bring a bit of peace to any day—so gather your supplies and start crafting your new favorite tradition!
Print
DIY Worry Stones: Craft Your Own Calming Gems Today! Recipe
- Total Time: 10 minutes active, plus drying time
- Yield: 4–6 worry stones 1x
- Diet: Vegetarian
Description
Craft your own calming worry stones with this easy DIY project. Perfect for both kids and adults, these handmade gems make thoughtful gifts or personal relaxation tools.
Ingredients
Clay Stones:
- 1 cup air-dry clay or polymer clay
- Small bowl of water (for smoothing)
- Assorted tools for shaping (e.g., toothpick, small spoon)
Decoration and Finishing:
- Acrylic paints (optional)
- Paintbrushes
- Clear sealant or mod podge (optional for finishing)
- Essential oils (optional for scent)
Instructions
- Prepare the Stones: Pinch off a small amount of clay and roll it into a ball. Flatten into an oval shape, create a thumb indent, and smooth edges with water.
- Add Texture: Use tools to create designs or textures on the stone.
- Drying: Let the clay dry completely per instructions.
- Decorate: Paint the stones if desired and seal with a clear coat.
- Optional Scent: Add essential oils for relaxation.
Notes
- Great for kids and adults
- Handmade gifts or personal calming tools
- Personalize with shapes, colors, or symbols
- Prep Time: 10 minutes
- Cook Time: 0 minutes
- Category: Craft
- Method: Handmade
- Cuisine: Not applicable
Nutrition
- Serving Size: Not applicable
- Calories: 0
- Sugar: 0g
- Sodium: 0mg
- Fat: 0g
- Saturated Fat: 0g
- Unsaturated Fat: 0g
- Trans Fat: 0g
- Carbohydrates: 0g
- Fiber: 0g
- Protein: 0g
- Cholesterol: 0mg
