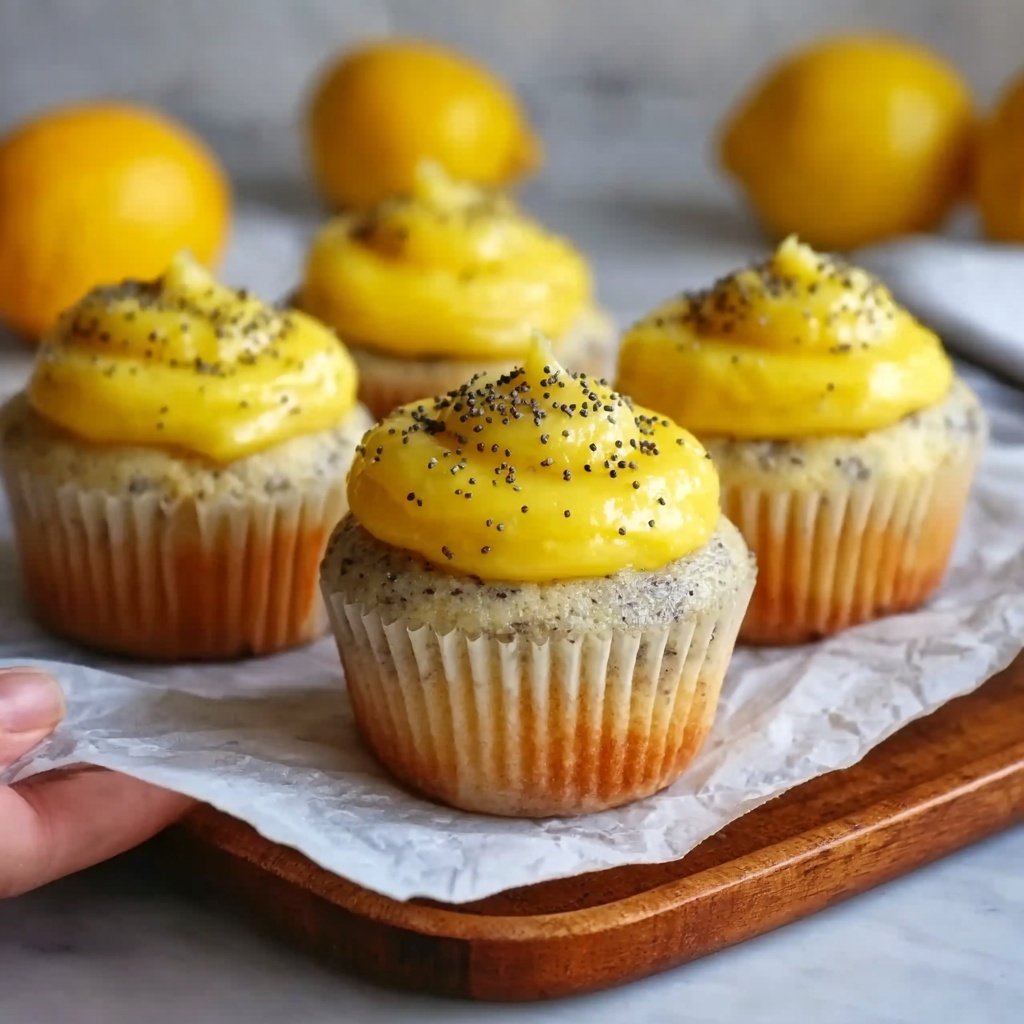
If you’re on the lookout for a bright, zesty treat that’s both easy to whip up and utterly irresistible, this Delicious Lemon Poppyseed Muffins Recipe is exactly what your kitchen needs. Bursting with fresh lemon flavor and dotted with crunchy poppy seeds, these muffins strike a perfect balance of tang and sweetness. Whether you’re enjoying them fresh out of the oven or packing them for a grab-and-go breakfast, they have that moist, tender crumb that keeps you coming back for more. Trust me, once you try this recipe, it’ll quickly become a beloved favorite to share with friends and family.

Ingredients You’ll Need
We’re keeping it simple here with ingredients you likely have on hand, each one playing a crucial role in delivering the perfect texture, flavor, and that inviting golden color. From the zing of fresh lemon zest to the subtle crunch of poppy seeds, every component shines.
- 2 cups all-purpose flour: Provides the structure and chewy texture that form the muffin base.
- 3/4 cup granulated sugar: Sweetens with just the right amount to complement the lemon’s tartness.
- 2 teaspoons baking powder: Helps your muffins rise and stay light and fluffy.
- 2 tablespoons poppy seeds: Adds a delightful nutty crunch that’s signature to this recipe.
- Zest and juice of 1-2 medium lemons: Infuses that unmistakable fresh citrus brightness and tang.
- 2 large eggs: Bind everything together and contribute to a rich, tender crumb.
- 1/2 cup whole milk (or plant-based alternative): Adds moisture for a soft, melt-in-your-mouth texture.
- 1/3 cup melted unsalted butter: Imparts buttery richness and helps keep the muffins moist.
How to Make Delicious Lemon Poppyseed Muffins Recipe
Step 1: Preheat and Prepare
Start by heating your oven to 375°F (190°C). Grease your muffin tin or line it with muffin liners to make sure your muffins come out effortlessly. This small prep step ensures a smooth baking process and easy clean-up.
Step 2: Mix Dry Ingredients
In a sizeable bowl, whisk together the flour, granulated sugar, baking powder, and poppy seeds. Making sure these dry ingredients are well combined sets a solid foundation and distributes the poppy seeds evenly, so every bite has a little crunch.
Step 3: Combine Wet Ingredients
In a separate bowl, blend the melted butter, eggs, milk, lemon zest, and lemon juice until the mixture is smooth and cohesive. The fresh lemon zest and juice infuse the batter with that vibrant citrus flavor that defines this recipe.
Step 4: Bring Wet and Dry Together
Now, gently fold the wet ingredients into the dry mix. The key is not to overmix — stir until just combined to keep the muffins nice and tender. You want to see a few small lumps; they disappear during baking and help with lightness.
Step 5: Fill and Bake
Divide the batter evenly among your prepared muffin cups, filling each about three-quarters full. Pop them into the oven and bake for 25 to 30 minutes until they’re beautifully golden brown on top and a toothpick inserted in the center comes out clean.
Step 6: Cool and Enjoy
Allow the muffins to cool slightly before removing them from the tin. This resting time lets them set perfectly so they won’t crumble. Once cooled just a bit, grab one and enjoy that delightful burst of lemon and poppy seed crunch!
How to Serve Delicious Lemon Poppyseed Muffins Recipe

Garnishes
A simple dusting of powdered sugar or a light glaze of lemon icing can elevate your muffins into an elegant treat. Fresh lemon slices or a sprinkle of poppy seeds on top just before baking also provide a pretty, inviting finish.
Side Dishes
Pair these muffins with a hot cup of tea or coffee to balance their bright and sweet flavors. They also make a wonderful companion to creamy yogurt or fresh fruit salad, rounding out breakfast or a snack with some contrasting textures and flavors.
Creative Ways to Present
For a brunch spread, arrange your muffins on a tiered dessert tray with edible flowers for a stunning presentation. You can also cut them in half and spread a thin layer of cream cheese or lemon curd inside for an indulgent twist that elevates this Delicious Lemon Poppyseed Muffins Recipe even further.
Make Ahead and Storage
Storing Leftovers
Keep your muffins fresh by storing them in an airtight container at room temperature for up to three days. This ensures they stay moist and flavorful without drying out or absorbing fridge odors.
Freezing
If you want to enjoy these muffins later, freeze them in a sealed freezer bag or airtight container for up to three months. Thaw them overnight in the refrigerator or at room temperature, and they’ll taste just as fresh as the day you baked them.
Reheating
To bring your muffins back to life, warm them in the microwave for about 15-20 seconds or pop them in a toaster oven for a few minutes. This quick heat-up revives that fresh-baked softness and buttery aroma that makes these muffins so special.
FAQs
Can I use lemon extract instead of fresh lemon?
While lemon extract can be used in a pinch, fresh lemon zest and juice provide the brightest, most natural citrus flavor that truly makes this Delicious Lemon Poppyseed Muffins Recipe stand out. The zest offers aromatic oils and the juice adds natural acidity that can’t be fully replicated with extract.
Can I substitute the butter with oil?
Yes, you can swap melted butter with a neutral oil like vegetable or canola oil for a slightly lighter texture. However, butter adds a rich flavor and tender crumb that’s part of what makes these muffins so delicious.
Is it necessary to let the batter rest before baking?
Resting the batter is not mandatory for this recipe. Once wet and dry ingredients are combined, it’s best to bake immediately so the muffins rise nicely and have a tender crumb without becoming dense.
How can I make these muffins gluten-free?
To make these muffins gluten-free, substitute the all-purpose flour with a gluten-free baking blend that’s a 1:1 replacement. Just make sure your blend contains xanthan gum or another binder to help maintain structure.
Can I double this recipe for a larger batch?
Absolutely! This Delicious Lemon Poppyseed Muffins Recipe scales nicely. Just double all ingredients and bake in batches if your oven or muffin tin space is limited.
Final Thoughts
There’s something truly comforting and joyful about baking a batch of these Delicious Lemon Poppyseed Muffins Recipe — they brighten the kitchen with their citrus aroma and bring smiles with each bite. Easy enough for everyday baking, yet special enough to share at gatherings, these muffins are a wonderful way to celebrate the simple pleasures of fresh ingredients and homemade goodness. So go ahead, give this recipe a try and let these little golden gems become a treasured part of your baking repertoire!
Print
Delicious Lemon Poppyseed Muffins Recipe
- Prep Time: 10 minutes
- Cook Time: 25-30 minutes
- Total Time: 35-40 minutes
- Yield: 12 muffins
- Category: Baking
- Method: Baking
- Cuisine: American
- Diet: Vegetarian
Description
These delicious Lemon Poppyseed Muffins are moist and bursting with fresh lemon flavor, enhanced by crunchy poppy seeds. Perfect for breakfast, brunch, or a delightful snack, this easy-to-make recipe yields tender muffins with a golden-brown top and a subtle citrus tang.
Ingredients
Dry Ingredients
- 2 cups all-purpose flour
- 3/4 cup granulated sugar
- 2 teaspoons baking powder
- 2 tablespoons poppy seeds
Wet Ingredients
- Zest and juice of 1-2 medium lemons
- 2 large eggs
- 1/2 cup whole milk (or plant-based alternative)
- 1/3 cup melted unsalted butter
Instructions
- Preheat Oven: Preheat your oven to 375°F (190°C) and prepare a muffin tin by lining it with paper liners or greasing it well to prevent sticking.
- Mix Dry Ingredients: In a large mixing bowl, whisk together the all-purpose flour, granulated sugar, baking powder, and poppy seeds until thoroughly combined.
- Combine Wet Ingredients: In a separate bowl, beat the melted unsalted butter, eggs, whole milk, and freshly grated lemon zest and juice until the mixture is smooth and uniform.
- Combine Wet and Dry: Pour the wet ingredients into the bowl containing the dry ingredients. Using a spatula or spoon, gently fold the ingredients together until just combined, being careful not to overmix to keep the muffins tender.
- Fill Muffin Cups: Spoon the batter into the prepared muffin tin, filling each cup about three-quarters full to allow room for rising during baking.
- Bake: Place the muffin tin in the preheated oven and bake for 25 to 30 minutes, or until the muffins are golden brown and a toothpick inserted into the center comes out clean.
- Cool and Serve: Remove the muffins from the oven and allow them to cool slightly in the pan before transferring to a wire rack to cool further. Serve warm or at room temperature.
Notes
- For a dairy-free alternative, substitute whole milk with almond, soy, or oat milk and use a plant-based butter substitute.
- Do not overmix the batter to ensure light and fluffy muffins.
- Lemon zest is essential for maximum citrus flavor; use fresh lemons rather than bottled zest.
- Store muffins in an airtight container at room temperature for up to 3 days, or freeze for longer storage.
- Adding a simple lemon glaze on top after baking can enhance the sweetness and citrus notes.


