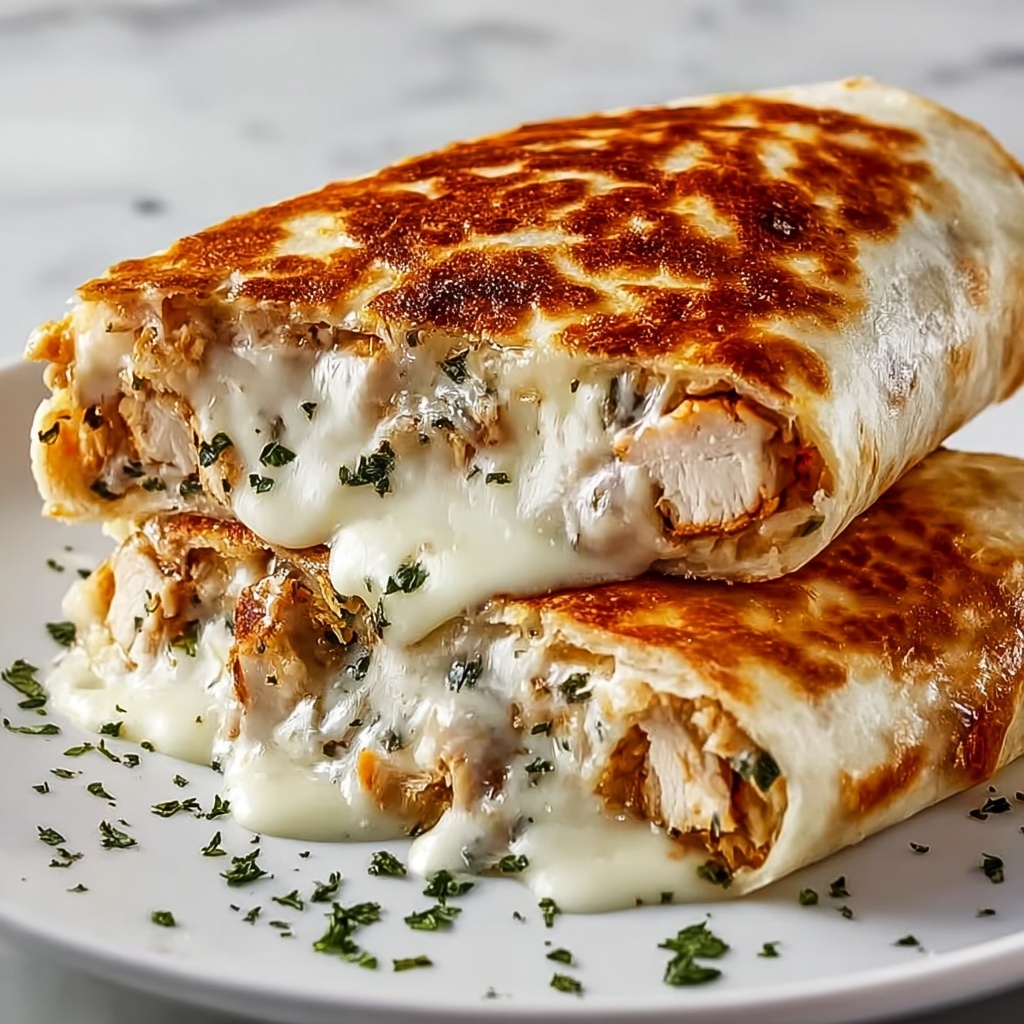
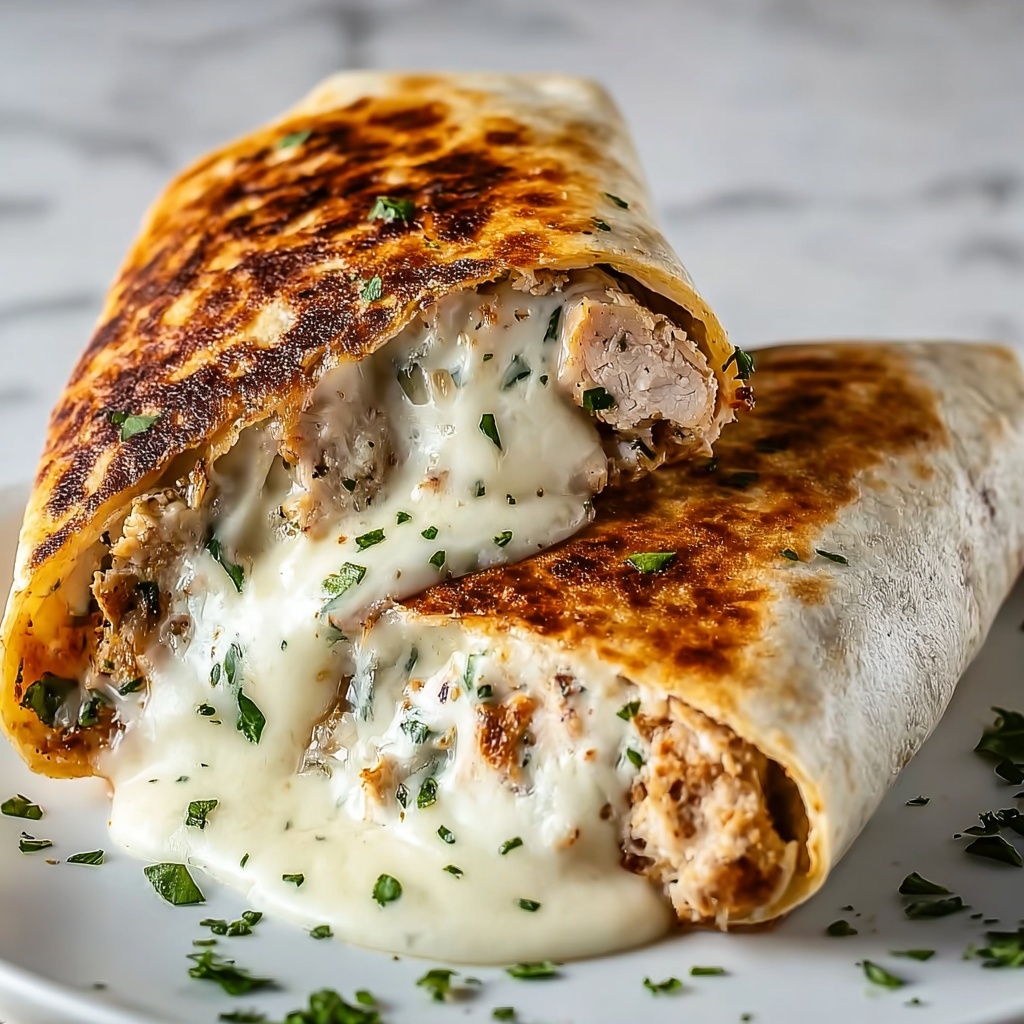
If you are craving something that combines melty cheese, fragrant garlic, and tender chicken all wrapped up in a warm tortilla, look no further because the Cheesy Garlic Chicken Wraps Recipe is your new best friend in the kitchen. This dish is not only bursting with flavor but also incredibly satisfying and easy to whip up on busy weeknights or relaxed weekends. Every bite delivers a perfect balance of creamy, savory, and slightly tangy notes that will keep you coming back for more. Trust me, once you try this recipe, it’s going to be a staple in your meal rotation.
Ingredients You’ll Need
Getting started with the Cheesy Garlic Chicken Wraps Recipe is a breeze, thanks to a handful of simple ingredients that each bring their own magic to the plate. From the aromatic garlic to the rich blend of cheeses, every element plays a crucial role in creating those perfect layers of flavor, texture, and color.
- 2 cups cooked chicken (shredded or diced): Your protein-packed foundation, tender and ready to soak up seasoning.
- 1 tablespoon olive oil: Helps sauté the garlic and adds a subtle fruitiness to the dish.
- 3 cloves garlic (minced): The star flavor component, bright and fragrant.
- 1/2 teaspoon salt: Enhances all the other flavors in the recipe.
- 1/2 teaspoon black pepper: Adds a mild kick that complements the garlic perfectly.
- 1/2 teaspoon paprika: Brings a smoky warmth and beautiful color.
- 1/2 teaspoon Italian seasoning: A blend that adds a herbal depth to the chicken.
- 1/2 cup mayonnaise: Combines creaminess and tang to keep the wraps moist.
- 1/4 cup sour cream: Adds a slight tartness and smooth texture to the sauce.
- 1 tablespoon lemon juice: Gives the sauce a fresh, zesty lift.
- 1 cup shredded mozzarella cheese: Melts beautifully for that gooey texture everyone loves.
- 1/2 cup shredded cheddar cheese: Offers a sharp, cheesy contrast.
- 4 large flour tortillas: Soft and pliable, perfect for wrapping all the delicious fillings.
- 1/2 cup lettuce (shredded): Adds a refreshing crunch and vibrant green color.
- 1/2 cup diced tomatoes: Introduces a juicy, tangy finish to each bite.
How to Make Cheesy Garlic Chicken Wraps Recipe
Step 1: Sauté Garlic and Seasoned Chicken
Start by heating olive oil in a skillet over medium heat. Add the minced garlic and sauté for about 30 seconds until it becomes wonderfully fragrant—this quick step releases all those garlicky aromas that set the tone of the dish. Then add your cooked chicken along with salt, black pepper, paprika, and Italian seasoning. Stir everything together and cook for 3 to 4 minutes until the chicken is heated through and has beautifully absorbed the spices.
Step 2: Whip Up the Creamy Sauce
While your chicken mixture is cooking, combine the mayonnaise, sour cream, and lemon juice in a small bowl. This creamy sauce balances the spice and garlic with a tangy freshness, which is key to making the wraps moist without being heavy. Set it aside until you’re ready to assemble.
Step 3: Assemble the Wraps
Lay the flour tortillas flat on a clean surface. Spread a generous layer of the creamy sauce over each tortilla, creating a luscious base. Then evenly distribute the savory chicken mixture across the tortillas. Next, sprinkle the shredded mozzarella and cheddar cheeses over the top to ensure a glorious melty finish. Add the lettuce and diced tomatoes for that welcome crunch and burst of color.
Step 4: Roll and Crisp the Wraps
Fold the sides of each tortilla inward and roll them up snugly into wraps. Place them seam side down in your skillet over medium heat and cook each side for 2 to 3 minutes until the tortillas are golden brown and that cheese inside is melted to gooey perfection. The crispy exterior contrasts so nicely with the creamy filling—it’s absolute comfort food heaven.
How to Serve Cheesy Garlic Chicken Wraps Recipe

Garnishes
To elevate your wraps, sprinkle some freshly chopped parsley or cilantro on top for a burst of herbal freshness. A dollop of sour cream or a drizzle of your favorite hot sauce can add extra creaminess or heat, depending on your mood. These simple garnishes make your wraps look picture-perfect and enhance every bite.
Side Dishes
Serve these wraps with a crisp green salad tossed in a light vinaigrette for a refreshing counterpoint, or crunchy homemade potato chips to keep the experience fun and satisfying. For a heartier meal, pair them with a cup of tomato soup that complements the tomato and cheese notes in the wraps beautifully.
Creative Ways to Present
Turn your Cheesy Garlic Chicken Wraps Recipe into a party appetizer by cutting the wraps into smaller bite-sized pinwheels—perfect for sharing. Lay them on a colorful platter with bowls of dipping sauces like ranch, guacamole, or salsa. These wraps also make fantastic picnic fare, wrapped tightly in foil to keep them warm and mess-free on the go.
Make Ahead and Storage
Storing Leftovers
If you have any leftover wraps, store them in an airtight container in the refrigerator. They will stay good for up to 3 days. To prevent the tortillas from getting soggy, place a piece of parchment paper between each wrap.
Freezing
For longer storage, wrap each Cheesy Garlic Chicken Wrap tightly in plastic wrap and then foil before freezing. They can be frozen for up to 2 months without losing flavor or texture. This makes them a great option for preparing meals in advance.
Reheating
Reheat your wraps in a skillet over medium-low heat, turning occasionally to crisp the tortilla while melting the cheese inside. Avoid using the microwave if possible to maintain that crispy finish; however, if you’re short on time, microwave for 1 to 2 minutes until warmed through, then crisp briefly in a hot pan.
FAQs
Can I use chicken breast instead of shredded chicken?
Absolutely! You can cook and dice fresh chicken breast or use pre-cooked rotisserie chicken. Just make sure it’s shredded or diced into bite-sized pieces for easy wrapping and even flavor distribution.
Can I make this recipe gluten-free?
Yes! Substitute the flour tortillas with your favorite gluten-free wraps or corn tortillas. The rest of the ingredients are naturally gluten-free, making this dish adaptable to many dietary needs.
Is it possible to make these wraps vegetarian?
Definitely! Swap the chicken for sautéed mushrooms, roasted vegetables, or plant-based protein options, and follow the rest of the recipe as is for a delicious vegetarian version.
Can I prepare the filling ahead of time?
Yes, the chicken mixture can be made a day in advance and stored in the refrigerator. This helps boost the flavors as they meld, and you simply assemble and cook the wraps when you’re ready to eat.
What cheeses work best in this recipe?
Mozzarella and cheddar are perfect for their meltability and flavor contrast, but feel free to experiment with Monterey Jack, provolone, or even pepper jack if you want a little spice.
Final Thoughts
Trying out this Cheesy Garlic Chicken Wraps Recipe means more than just cooking a meal—it’s about bringing flavor, comfort, and a touch of joy to your table with minimal effort. These wraps are a fantastic way to enjoy chicken and cheese in a handheld, satisfying form, perfect for any time of the day. Give them a go, share them with family or friends, and watch how they quickly become a beloved favorite in your kitchen.
Print
Cheesy Garlic Chicken Wraps Recipe
- Prep Time: 10 minutes
- Cook Time: 10 minutes
- Total Time: 20 minutes
- Yield: 4 servings
- Category: Main Course
- Method: Stovetop
- Cuisine: American
Description
Cheesy Garlic Chicken Wraps are a delicious and easy-to-make meal featuring tender cooked chicken seasoned with garlic, paprika, and Italian herbs, wrapped in warm flour tortillas with a creamy sauce, melty mozzarella and cheddar cheese, fresh lettuce, and juicy tomatoes. Perfect for quick lunches or dinners, these wraps offer a satisfying blend of flavors and textures with a crispy finish from a skillet toasting.
Ingredients
Chicken Mixture
- 2 cups cooked chicken, shredded or diced
- 1 tablespoon olive oil
- 3 cloves garlic, minced
- 1/2 teaspoon salt
- 1/2 teaspoon black pepper
- 1/2 teaspoon paprika
- 1/2 teaspoon Italian seasoning
Creamy Sauce
- 1/2 cup mayonnaise
- 1/4 cup sour cream
- 1 tablespoon lemon juice
Wrap Assembly
- 4 large flour tortillas
- 1 cup shredded mozzarella cheese
- 1/2 cup shredded cheddar cheese
- 1/2 cup shredded lettuce
- 1/2 cup diced tomatoes
Instructions
- Prepare the chicken mixture: Heat olive oil in a skillet over medium heat. Add minced garlic and cook for about 30 seconds until fragrant. Add the cooked chicken, salt, black pepper, paprika, and Italian seasoning. Stir well to combine and cook for 3 to 4 minutes until heated through.
- Make the creamy sauce: In a small bowl, mix together mayonnaise, sour cream, and lemon juice until smooth and well combined.
- Assemble the wraps: Lay the tortillas flat and spread a layer of the creamy sauce over each one. Divide the chicken mixture evenly among the tortillas. Sprinkle shredded mozzarella and cheddar cheese on top, then add shredded lettuce and diced tomatoes.
- Roll and crisp the wraps: Fold in the sides of each tortilla and roll tightly into a wrap. Place the wraps seam side down in a skillet over medium heat. Cook for 2 to 3 minutes per side until the wraps are golden brown and the cheese has melted.
- Serve: Slice the wraps and serve warm for best flavor and texture.
Notes
- You can add bacon, avocado, or sautéed peppers for extra flavor and texture.
- These wraps are perfect for quick lunches or dinners and can be prepared ahead of time and reheated as needed.
- To make it lighter, you can substitute mayonnaise with Greek yogurt and use low-fat cheese options.

