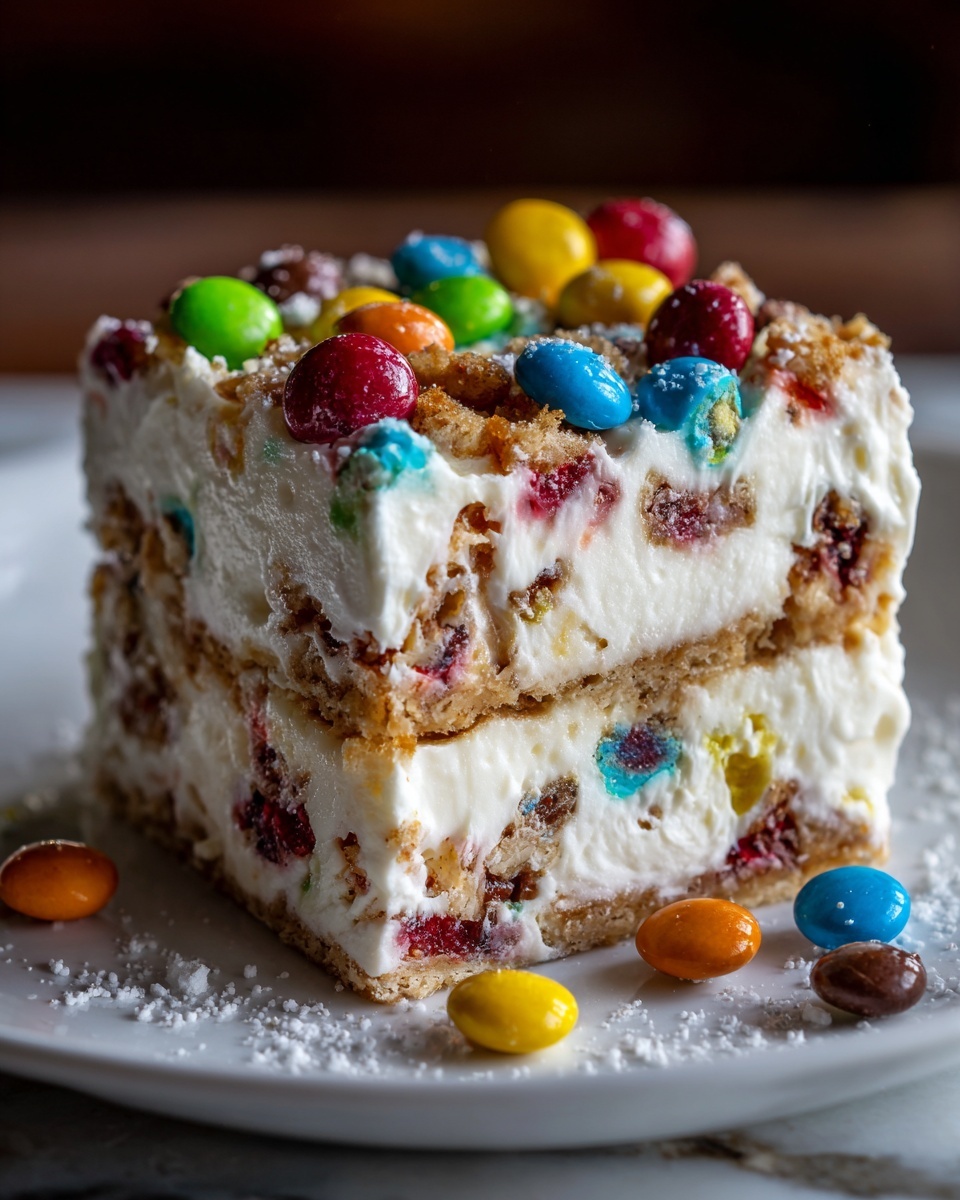
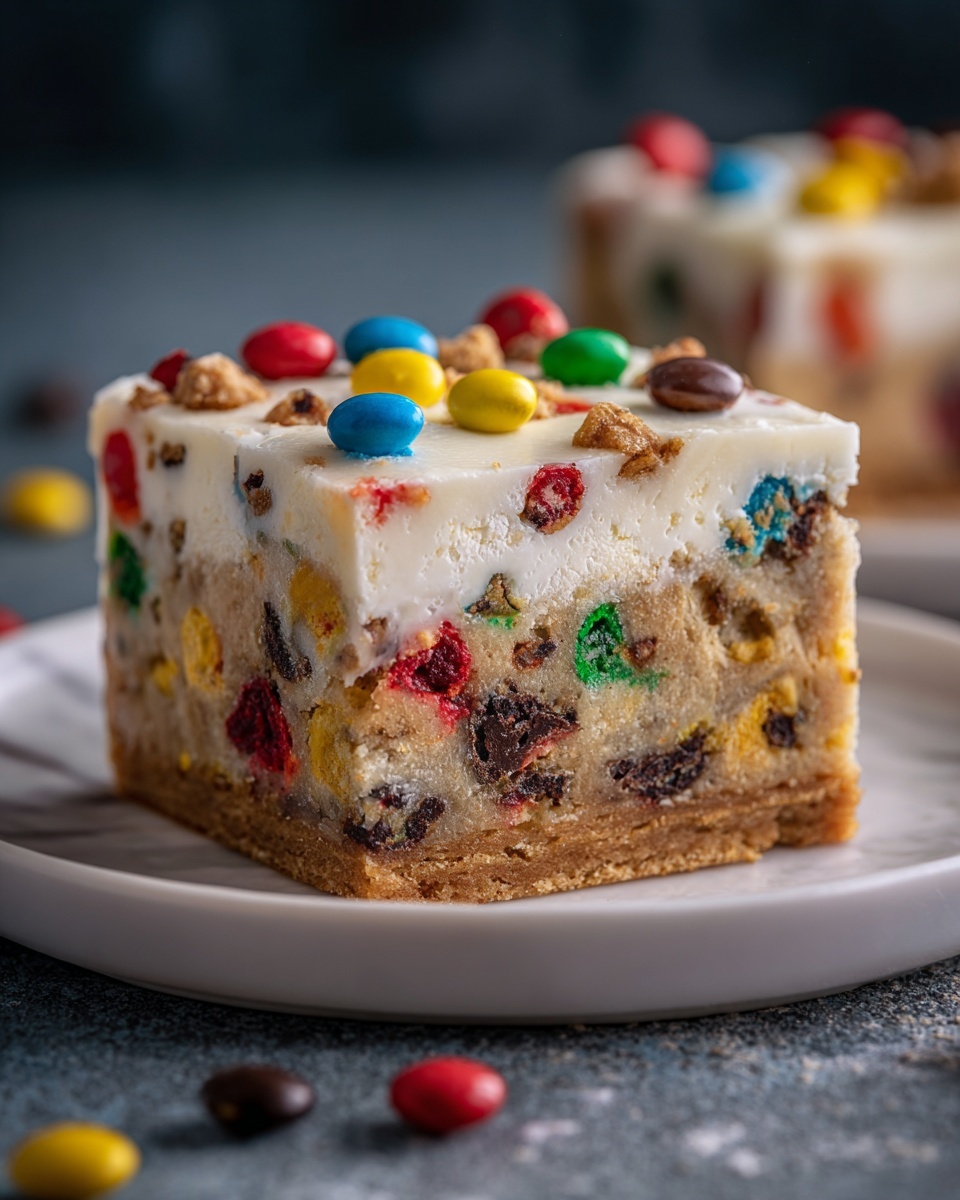
If you’re looking for a fun, colorful, and irresistibly creamy dessert that’s as delightful to make as it is to eat, you’ve found your new go-to. This Easy M&M Ice Cream Sandwich Cake Recipe blends the soft coolness of vanilla ice cream with the chewy crunch of ice cream sandwiches and the playful pop of M&M candies. It’s a layered masterpiece that comes together with minimal effort but delivers maximum smiles — perfect for birthdays, celebrations, or whenever you want a nostalgic treat with a grown-up twist.
Ingredients You’ll Need
Gathering your ingredients for this Easy M&M Ice Cream Sandwich Cake Recipe is straightforward and fun. Each element plays a key role: ice cream sandwiches build the structure, vanilla ice cream adds creaminess, M&Ms bring vibrant color and crunch, whipped cream offers a light and fluffy finish, and optional chocolate syrup lends a luscious drizzle that ties it all together.
- Ice Cream Sandwiches: About 8 to 10 sandwiches will form the sturdy and sweet layers of your cake base, so pick your favorite brand for the best texture.
- Vanilla Ice Cream: Softened (about 1.5 to 2 quarts) so it spreads smoothly and melds everything together with classic creamy goodness.
- M&M Candies: Around 1 to 1.5 cups to sprinkle between layers and on top, adding those signature pops of color and a satisfying chocolate crunch.
- Whipped Cream: 1 to 2 cups for the crowning layer that makes this dessert feel light and festive.
- Chocolate Syrup (optional): A drizzle on top makes for a gorgeous finish and a deeper chocolate flavor that’s hard to resist.
How to Make Easy M&M Ice Cream Sandwich Cake Recipe
Step 1: Prepare Your Ingredients
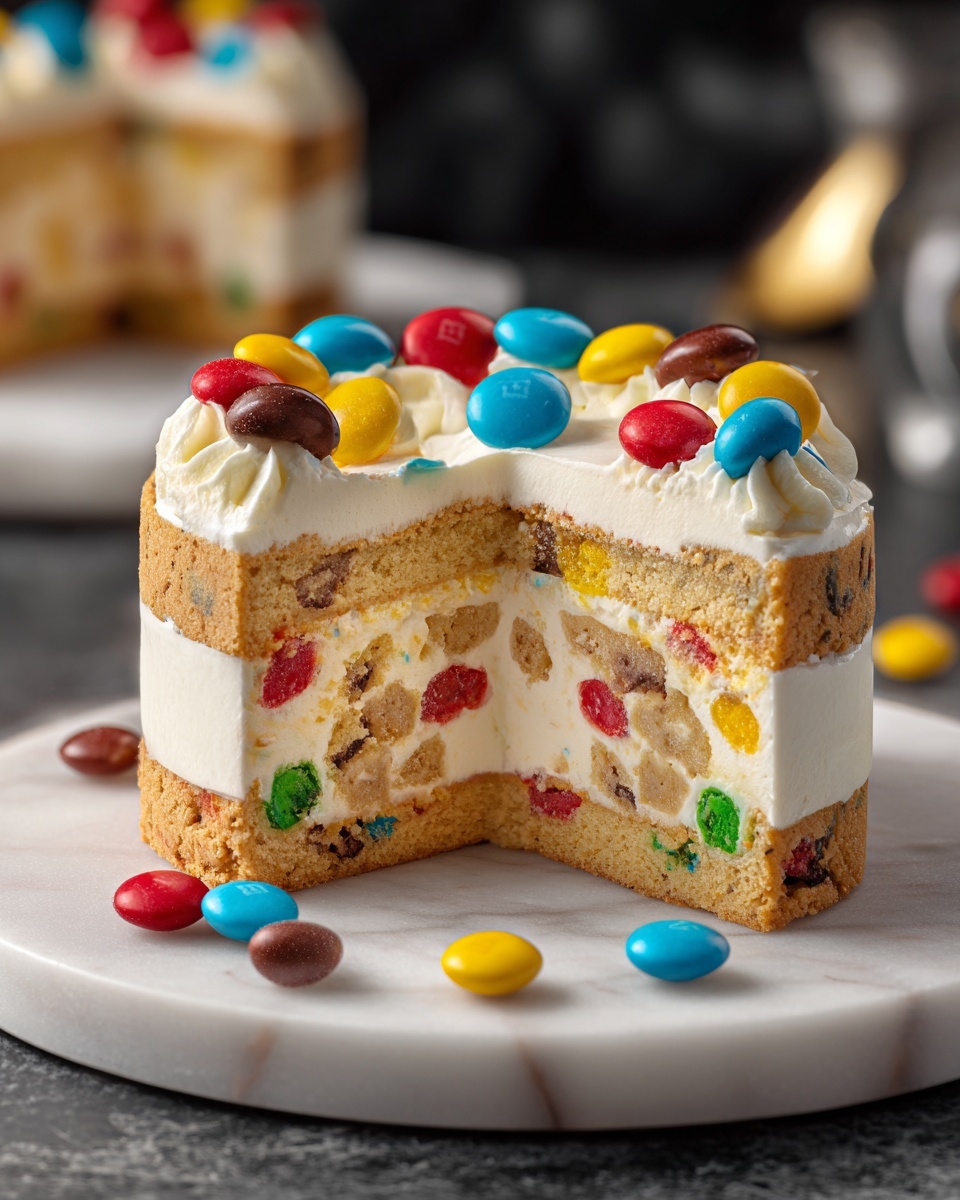
Begin by allowing your vanilla ice cream to soften at room temperature for about 10-15 minutes. This makes it easier to spread later without tearing the ice cream sandwiches. Lay your ice cream sandwiches out on a flat serving dish, arranging them side by side to create a solid base layer — this is the foundation for your cake.
Step 2: Layer the Ice Cream
Use a spatula or butter knife to spread a generous and even layer of the softened vanilla ice cream right over the ice cream sandwich base. This creamy layer acts like glue and adds luscious softness amidst the chewier sandwich layers, making each bite heavenly.
Step 3: Add M&M Candies
Next, sprinkle a generous handful of M&M candies over the ice cream layer. These colorful treats add delightful texture contrasts and brighten the cake visually, making every slice a festive experience.
Step 4: Repeat Layers
Place another layer of ice cream sandwiches carefully over the M&Ms, then repeat the ice cream spreading and candy sprinkling steps to build up your cake to the desired height. Each layer enhances the cake’s flavor complexity and keeps it exciting.
Step 5: Top and Decorate
Finish your Easy M&M Ice Cream Sandwich Cake Recipe by spreading a thick, even layer of whipped cream on top. Scatter extra M&Ms on the whipped cream, and if you like, drizzle with chocolate syrup for a stunning and decadent final touch.
Step 6: Chill and Serve
Cover your cake with plastic wrap and refrigerate it for at least two hours. This chilling step is essential to let the layers firm up so you can slice it beautifully without losing shape. When ready, serve chilled for the most refreshing, creamy, and crunchy bite imaginable.
How to Serve Easy M&M Ice Cream Sandwich Cake Recipe
Garnishes
Enhance the colorful vibe of this treat by topping slices with a few extra M&Ms or a light sprinkle of crushed nuts for unexpected texture. Fresh mint leaves or a dusting of cocoa powder can add an elegant flair if you’re serving guests.
Side Dishes
This cake is so rich and satisfying on its own that sides don’t have to be complicated. Pair it with simple fresh fruit like strawberries or sliced bananas to balance the creaminess with natural sweetness and a bit of zing.
Creative Ways to Present
Try serving the cake in smaller, individual glass cups layered similarly for a whimsical parfait-style presentation. Or cut into fun shapes with cookie cutters for a playful approach at kids’ parties — it’s a guaranteed crowd-pleaser!
Make Ahead and Storage
Storing Leftovers
Store any leftover cake tightly covered in plastic wrap or an airtight container in the refrigerator. It will stay fresh and creamy for up to 3 days, though it’s best enjoyed sooner for peak texture and flavor.
Freezing
If you want to keep it longer, this cake freezes wonderfully. Just wrap it well in plastic wrap and foil, store it in the freezer, and thaw in the fridge for a few hours before serving to maintain its signature soft but firm texture.
Reheating
This cake is best enjoyed cold or at room temperature. Avoid reheating since it’s an ice cream-based dessert — warming it will melt the layers and lose that delightful contrast. Let thaw gently if frozen.
FAQs
Can I use different flavored ice cream sandwiches?
Absolutely! Feel free to swap the vanilla ice cream sandwiches with chocolate, mint, or any flavor you love — it will add a fun twist to the Easy M&M Ice Cream Sandwich Cake Recipe and keep it interesting.
What if I don’t have M&Ms? Can I use other candies?
Of course! You can substitute M&Ms with Reese’s Pieces, mini chocolate chips, or even sprinkles. Just choose candies that won’t melt too quickly to maintain the crunch and color contrast.
How long should the cake be chilled before serving?
Chilling for at least two hours is ideal to let the layers set firmly, which helps with slicing and enhances the flavors as they meld together beautifully.
Is there a way to make this recipe dairy-free?
Yes! Use dairy-free ice cream sandwiches and whipped topping alternatives made from coconut or almond milk. The Easy M&M Ice Cream Sandwich Cake Recipe will still come together with the same fun texture and taste.
How do I prevent ice cream sandwiches from becoming too hard or too soft in the cake?
Using softened ice cream and assembling the cake quickly helps maintain the right texture. Also, chilling it in the fridge rather than the freezer prevents the sandwiches from freezing too solid, so each bite stays soft and chewy.
Final Thoughts
You really can’t go wrong with the Easy M&M Ice Cream Sandwich Cake Recipe; it’s cheerful, simple, and utterly delicious. Whether you’re celebrating something special or just craving a colorful, fun dessert, this cake is sure to bring joy and smiles all around. Gather your ingredients, dive in, and don’t forget to savor each creamy, crunchy, sweet slice with friends and family!
Print
Easy M&M Ice Cream Sandwich Cake Recipe
- Prep Time: 15 minutes
- Cook Time: 0 minutes
- Total Time: 2 hours 15 minutes
- Yield: 8 servings
- Category: Dessert
- Method: No-Cook
- Cuisine: American
Description
This Easy M&M Ice Cream Sandwich Cake is a delightful no-bake dessert perfect for summer gatherings or any celebration. Layers of ice cream sandwiches, softened vanilla ice cream, colorful M&M candies, and whipped cream come together to create a visually stunning and deliciously creamy treat that’s fun to make and even better to eat.
Ingredients
Base and Layers
- 8 to 10 Ice Cream Sandwiches
- 1.5 to 2 quarts Vanilla Ice Cream, softened
- 1 to 1.5 cups M&M Candies
Top Layer and Decoration
- 1 to 2 cups Whipped Cream
- Chocolate Syrup (optional), for drizzling
Instructions
- Prepare Your Ingredients: Allow the vanilla ice cream to soften slightly at room temperature for easier spreading. Arrange the ice cream sandwiches on a flat surface or serving dish to create the base layer of the cake.
- Layer the Ice Cream: Spoon and gently spread a layer of softened vanilla ice cream evenly over the ice cream sandwich base. This layer helps to bind the cake together and adds creaminess.
- Add M&M Candies: Sprinkle a generous amount of M&M candies evenly over the ice cream layer to add vibrant colors and a satisfying crunchy texture.
- Repeat Layers: Place another layer of ice cream sandwiches on top of the M&Ms, then repeat the vanilla ice cream spreading and candy layering process until the cake reaches your desired height, finishing with a top layer of whipped cream.
- Top and Decorate: Spread whipped cream smoothly over the top layer and decorate with additional M&Ms. Optionally, drizzle chocolate syrup over the whipped cream for an elegant finishing touch.
- Chill and Serve: Cover the cake with plastic wrap and refrigerate for at least two hours or until firm enough to slice cleanly. Serve chilled to enjoy a cool, creamy, and colorful dessert.
Notes
- Softening the ice cream to room temperature is key to spreading it easily without melting.
- Use a flat serving plate or a cake board to maintain the cake’s shape while assembling.
- Feel free to substitute M&Ms with other candies or sprinkles for different flavors and decorations.
- For a firmer cake, freeze it overnight instead of chilling for 2 hours before serving.
- Use a warm knife for clean slices; dip the knife in hot water and wipe dry before cutting.


