
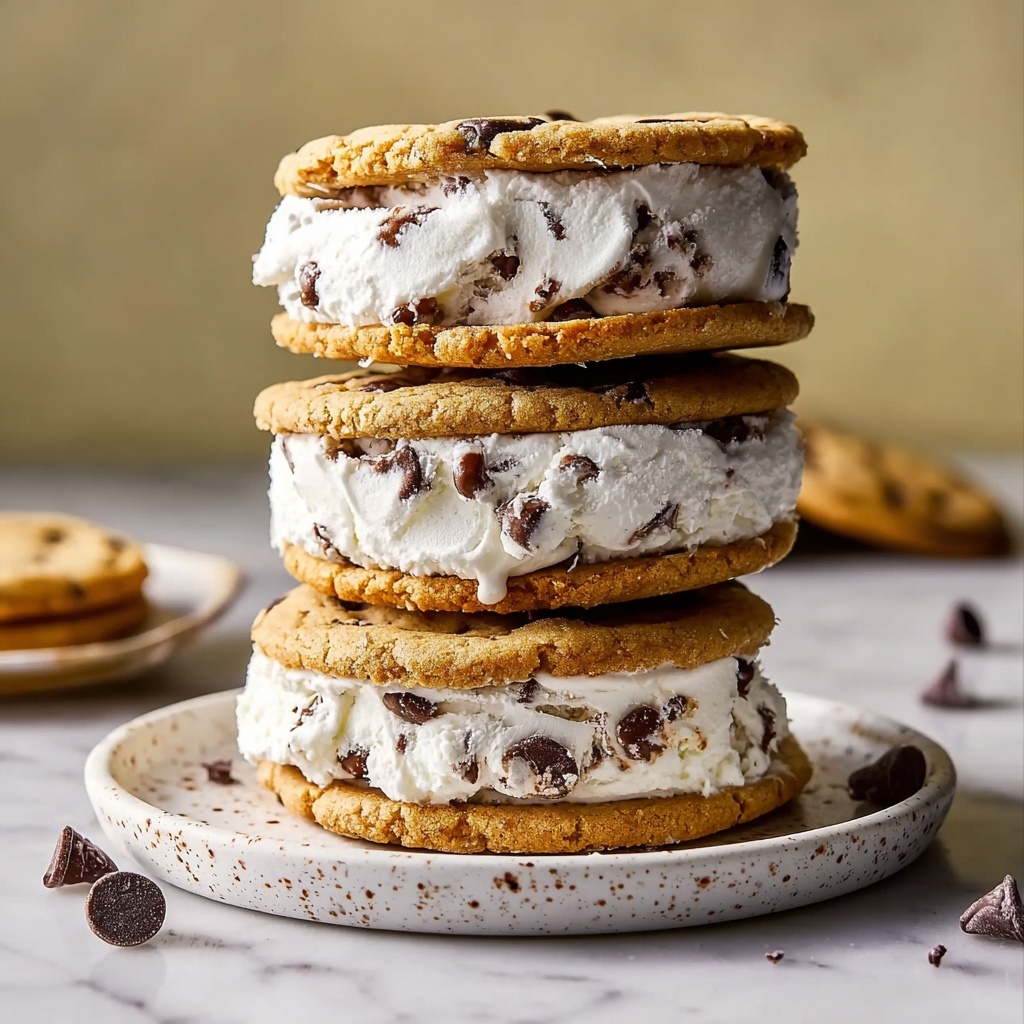
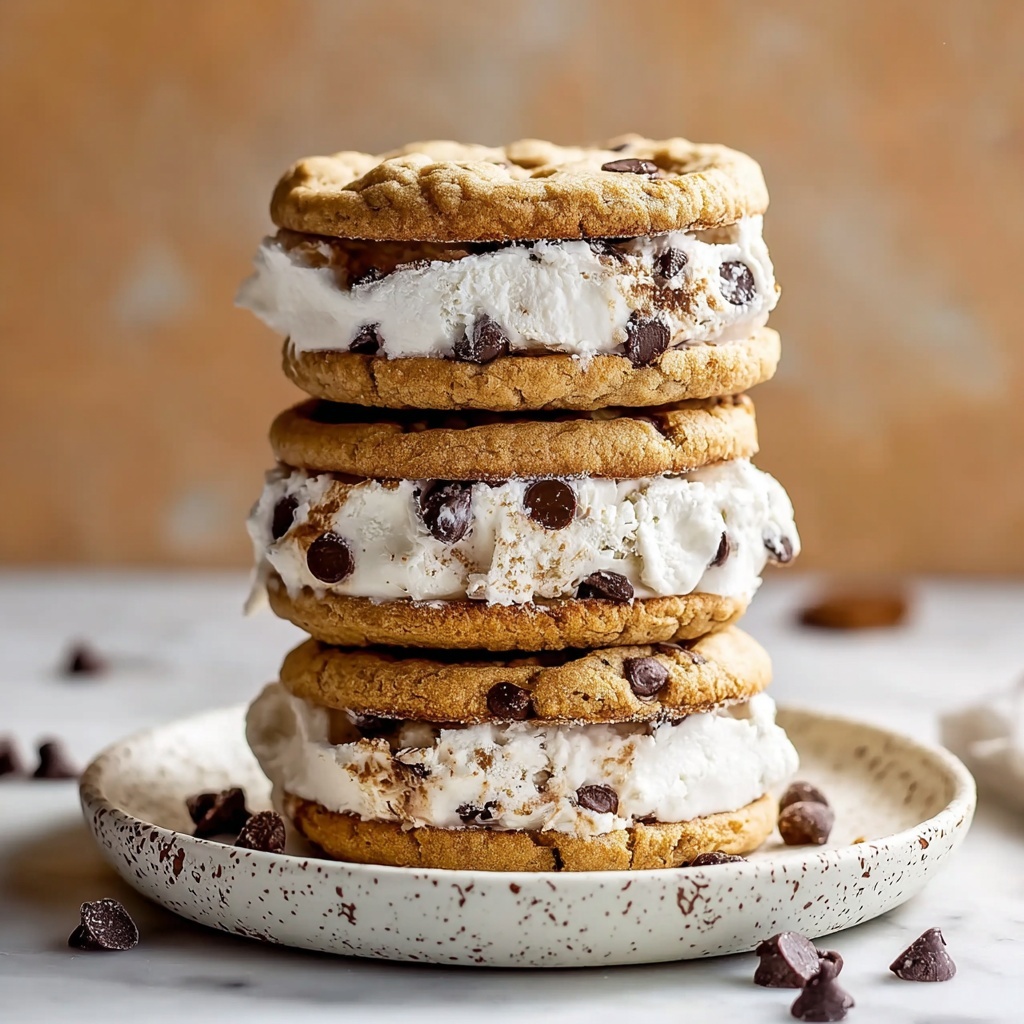
If you love the nostalgic joy of an ice cream sandwich but crave something truly special, then you are going to fall head over heels for this Cookie Ice Cream Sandwiches (Homemade Chipwich) Recipe. Imagine delightfully soft, chewy chocolate chip cookies embracing a generous scoop of creamy vanilla ice cream, all rolled in mini chocolate chips for that extra burst of chocolate heaven. This homemade version elevates the store-bought classic by bringing fresh, buttery cookies combined with luscious ice cream into a harmonious bite that’s perfect for celebrations, warm evenings, or a sweet treat any time you need a smile.
Ingredients You’ll Need
With just a handful of everyday ingredients, this Cookie Ice Cream Sandwiches (Homemade Chipwich) Recipe strikes the perfect balance between simplicity and unforgettable flavor. Each component plays a key role in delivering the ideal texture, sweetness, and chocolatey goodness.
- 1 cup unsalted butter (room temperature): Provides rich creaminess and the perfect cookie texture.
- 1 cup light brown sugar: Adds moisture and a subtle caramel undertone.
- 1/2 cup granulated sugar: Creates a slight crispness and balances sweetness.
- 1 large egg: Binds ingredients and adds tenderness.
- 2 teaspoons vanilla extract: Infuses the dough with warm, fragrant notes.
- 2 1/4 cups all-purpose flour: Forms the cookie’s structure for that perfect chew.
- 1 teaspoon baking soda: Helps the cookies rise just enough for a soft center.
- 1/2 teaspoon salt: Enhances all the flavors in the cookie.
- 1 cup mini chocolate chips (plus more for rolling): Delivers pockets of melty chocolate throughout and adds visual appeal on the edges.
- Vanilla ice cream: Your creamy, cool filling — choose homemade or store-bought for convenience.
How to Make Cookie Ice Cream Sandwiches (Homemade Chipwich) Recipe
Step 1: Preheat and Prepare the Dough
Start by preheating your oven to 350°F (175°C). In a large mixing bowl, beat the butter with the light brown sugar and granulated sugar until the mixture is light, fluffy, and wonderfully creamy. The secret to an irresistible cookie texture lies in this step, where air is incorporated to help the cookies rise just right. Next, add the egg and vanilla extract, mixing until the flavors meld and your batter sings with sweetness.
Step 2: Combine Dry Ingredients
In a separate bowl, whisk together the all-purpose flour, baking soda, and salt. This blends the leavening and seasoning evenly, ensuring every bite is consistent and flavorful. Gradually add these dry ingredients to your wet mixture, stirring gently just until combined—overmixing can make cookies tough, and we definitely want soft edges and a chewy center here.
Step 3: Fold in Chocolate Chips
Now’s the time for the star of the show, the mini chocolate chips. Fold in a full cup, distributing them evenly throughout your dough for a perfect chocolate burst in every bite. These tiny chips melt just right and keep the cookie balanced so it doesn’t get too heavy.
Step 4: Shape and Bake the Cookies
Roll the dough into evenly sized balls and place them on a baking sheet lined with parchment paper, leaving room for spreading. Press each slightly with your fingers or the back of a spoon to flatten into discs. Bake for 10 to 12 minutes or until the edges turn a gorgeous golden brown. This timing keeps them soft and chewy while delivering crisp edges—everything you want in a chipwich cookie.
Step 5: Cool and Chill
Once baked, transfer the cookies to a wire rack to cool completely. Then, pop them into the freezer for 20 to 30 minutes. This step is crucial for assembling your ice cream sandwiches so the cookies don’t melt your ice cream and hold their shape perfectly when you press them together.
Step 6: Assemble Your Homemade Chipwich
Take one chilled cookie, add a generous scoop of vanilla ice cream, and gently press another cookie on top to sandwich the ice cream between. Roll the sides in mini chocolate chips for an extra touch of sweetness and texture. You can serve immediately for soft ice cream or freeze for firmer sandwiches later on.
How to Serve Cookie Ice Cream Sandwiches (Homemade Chipwich) Recipe
Garnishes
A sprinkle of sea salt or a drizzle of caramel sauce can elevate your Cookie Ice Cream Sandwiches (Homemade Chipwich) Recipe to another level of indulgence. Fresh mint leaves or a dusting of powdered sugar add a pop of color and freshness, making your serving spectacular and picture-ready.
Side Dishes
While these sandwiches shine on their own, pairing them with fresh berries or a small glass of cold milk creates a perfectly balanced dessert experience. For a grown-up twist, a scoop of espresso or a glass of dessert wine complements the chocolate and vanilla flavors beautifully.
Creative Ways to Present
Try serving your sandwiches on a wooden board lined with parchment paper for a rustic vibe. For parties, wrap them individually in parchment and tie with twine, transforming them into charming edible gifts. Or stack a few and secure with a skewer for a fun, towering treat that’s sure to wow guests.
Make Ahead and Storage
Storing Leftovers
If you happen to have leftovers, store the assembled Cookie Ice Cream Sandwiches in an airtight container in the freezer to keep them fresh and firm. For unassembled cookies, keep them in a zip-top bag or container at room temperature for up to a week, ensuring they maintain their soft texture.
Freezing
These homemade chipwiches freeze wonderfully. After assembling, wrap each sandwich tightly in plastic wrap and place in a sealed freezer-safe bag or container. They can be frozen for up to a month without compromising flavor or texture.
Reheating
Since these are ice cream sandwiches, reheating isn’t necessary. However, if your cookies have been chilled and you want them softer before assembling, a few seconds in the microwave will do the trick. Just be sure to add the ice cream after warming to keep the perfect temperature contrast.
FAQs
Can I use different ice cream flavors in this recipe?
Absolutely! While vanilla is classic and balances the cookies, feel free to experiment with chocolate, mint chocolate chip, or even salted caramel for a fun twist on the traditional chipwich.
What if I don’t have mini chocolate chips?
No problem! Regular-sized chocolate chips work just fine, but you might want to chop them smaller so they spread evenly and roll nicely on the sandwich edges.
Can I make these gluten-free?
Yes, you can substitute the all-purpose flour with a gluten-free flour blend that’s suitable for baking. Just be sure to check if the blend requires additional binding agents like xanthan gum.
How long do these ice cream sandwiches last in the freezer?
When properly wrapped and stored in an airtight container, they stay delicious for up to one month, allowing you to prep ahead for special occasions or cravings.
What’s the best way to serve these on a hot day?
Serve them straight from the freezer for a refreshing, cool treat. You can also place them on a chilled platter to keep them from melting quickly when entertaining outdoors.
Final Thoughts
This Cookie Ice Cream Sandwiches (Homemade Chipwich) Recipe is pure joy in every bite and a fantastic way to bring homemade charm to a beloved classic. Whipping up these sandwiches is not just about dessert—it’s about creating memories with friends and family, sharing laughs while assembling, and indulging in a treat that feels both special and comforting. I promise once you try this recipe, you’ll keep coming back for more, and it might just become your go-to dessert all year round.
Print
Cookie Ice Cream Sandwiches (Homemade Chipwich) Recipe
- Prep Time: 15 minutes
- Cook Time: 12 minutes
- Total Time: 57 minutes
- Yield: 12 sandwiches
- Category: Dessert
- Method: Baking
- Cuisine: American
Description
These homemade Cookie Ice Cream Sandwiches, also known as Chipwiches, feature soft and chewy chocolate chip cookies sandwiching creamy vanilla ice cream. Perfect for a delightful dessert or summertime treat, these sandwiches combine the comforting flavors of classic chocolate chip cookies with refreshing ice cream, finished with a roll in mini chocolate chips for extra texture and chocolatey goodness.
Ingredients
Cookie Dough
- 1 cup unsalted butter (room temperature)
- 1 cup light brown sugar
- 1/2 cup granulated sugar
- 1 large egg
- 2 teaspoons vanilla extract
- 2 1/4 cups all-purpose flour
- 1 teaspoon baking soda
- 1/2 teaspoon salt
- 1 cup mini chocolate chips (plus more for rolling)
Assembly
- Vanilla ice cream (homemade or store-bought), enough for 12 sandwiches
Instructions
- Preheat Oven: Preheat your oven to 350°F (175°C) to prepare for baking the cookies.
- Mix Wet Ingredients: In a large mixing bowl, beat the room temperature butter with the light brown sugar and granulated sugar until the mixture becomes light and fluffy. Then add the large egg and vanilla extract, mixing thoroughly until well combined.
- Combine Dry Ingredients: In a separate bowl, whisk together the all-purpose flour, baking soda, and salt. Gradually incorporate these dry ingredients into the wet mixture, mixing just until everything is combined to avoid overworking the dough.
- Add Chocolate Chips: Fold in 1 cup of mini chocolate chips evenly throughout the dough.
- Shape Cookies: Roll the cookie dough into evenly sized balls and place them on a baking sheet lined with parchment paper. Lightly press each dough ball down to form flat discs, which help the cookies bake evenly.
- Bake Cookies: Bake the cookies in the preheated oven for 10 to 12 minutes or until the edges are golden brown. Remove from the oven and allow them to cool completely on a wire rack to set the texture.
- Chill Cookies: Place the cooled cookies in the freezer for 20 to 30 minutes to firm up, which will make assembling the sandwiches easier.
- Assemble Sandwiches: Take one chilled cookie and place a generous scoop of vanilla ice cream on top. Gently press another cookie on top to form a sandwich.
- Roll in Chocolate Chips: Roll the edges of the assembled sandwich in extra mini chocolate chips to coat the ice cream edges, adding extra flavor and texture.
- Serve or Freeze: Serve immediately for a soft ice cream treat or place the assembled sandwiches back into the freezer to firm up further before serving.
Notes
- For best results, make sure the butter is softened to room temperature before mixing.
- Do not overmix the dough once the dry ingredients are added to avoid tough cookies.
- Use a cookie scoop for even sized cookies to ensure consistent baking.
- Vanilla ice cream can be homemade or store-bought, depending on your preference.
- If leaving sandwiches in the freezer, wrap them individually in plastic wrap or parchment paper to prevent ice crystals.
- Feel free to substitute mini chocolate chips with other small mix-ins like mini white chocolate chips or toffee bits for variety.


