“`html
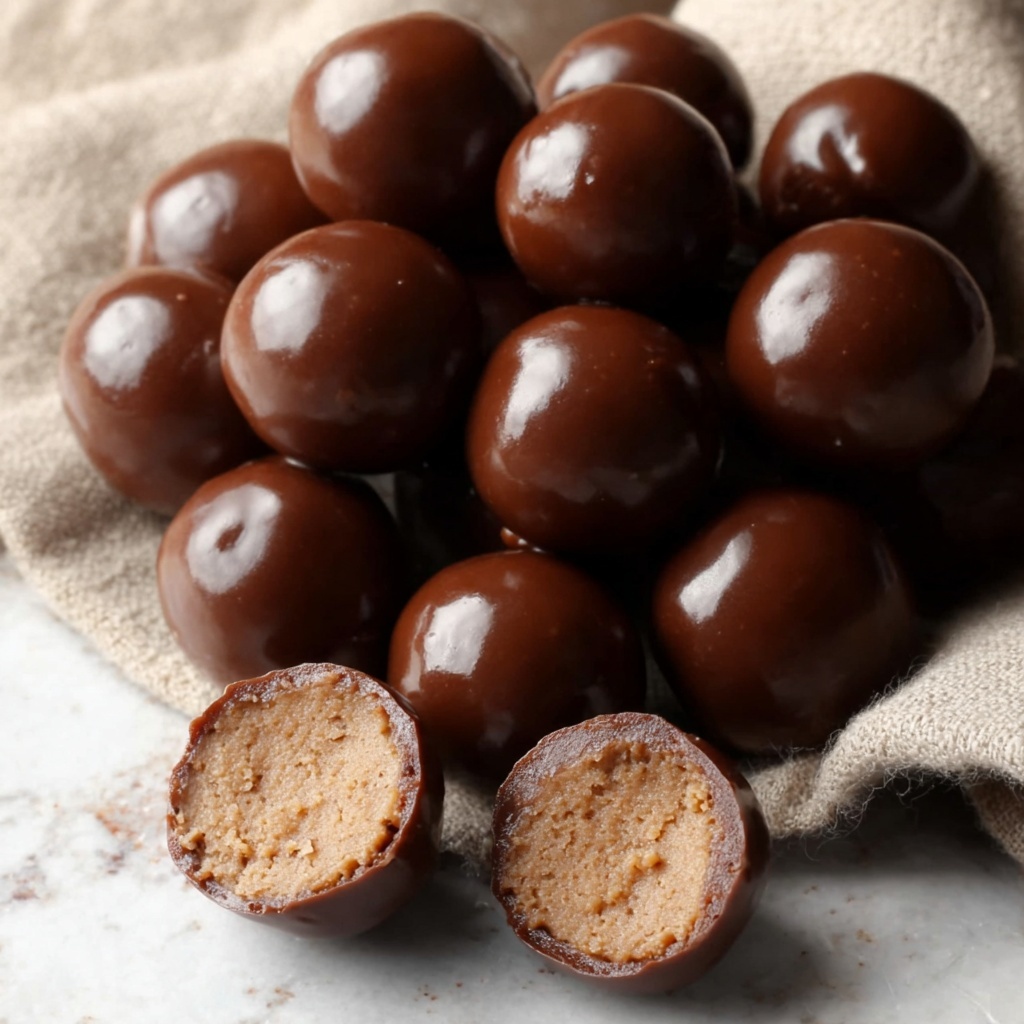
If you have ever craved that perfect crunch paired with a creamy, malty center, then you are about to fall head over heels for this Homemade Malted Milk Balls Recipe. These luscious treats blend the nostalgic malted milk powder flavor with a silky chocolate shell that snaps delightfully with every bite. Whether you want a sweet snack, party favor, or a unique homemade gift, this recipe brings that classic candy shop experience right into your kitchen — with the joy amplified by knowing you crafted them yourself.

Ingredients You’ll Need
Gathering the ingredients for this Homemade Malted Milk Balls Recipe is wonderfully simple. Each item plays a crucial role, from creating the perfect malt flavor to the smooth texture and rich chocolate coating that seals in all the deliciousness.
- Malted milk powder: The star ingredient, delivering that unmistakable crunchy malt taste and texture.
- Powdered sugar: Adds sweetness and helps bind the malt mixture smoothly.
- Cocoa powder: Provides a deep chocolate background that complements the malt perfectly.
- Salt: Balances the sweetness and intensifies the overall flavors.
- Milk: Moistens the dry ingredients to create the perfect dough consistency.
- Vanilla extract: Brings warmth and enhances the malt and chocolate notes.
- Chocolate: About 6 ounces, enough to coat the balls in a luscious, shiny shell.
How to Make Homemade Malted Milk Balls Recipe
Step 1: Mix Dry Ingredients
Start by whisking together the malted milk powder, powdered sugar, cocoa powder, and salt in a mixing bowl until they form a uniform, dry blend. This step ensures every bite has an even distribution of flavor and texture.
Step 2: Combine Wet Ingredients
In a separate bowl, stir the milk and vanilla extract together until the vanilla is thoroughly infused into the milk, setting the stage for a smooth and aromatic dough.
Step 3: Form Dough
Slowly add the wet ingredients to your dry mix while stirring continuously. Keep going until you end up with a well-combined, slightly firm dough without any lumps, ready to be shaped.
Step 4: Chill Mixture
Pop the dough into the refrigerator for about 30 minutes. This chilling makes it firmer and much easier to roll into perfect little balls without sticking to your fingers.
Step 5: Shape Balls
Using a spoon or your clean hands, roll the chilled dough into small balls approximately one inch in diameter. Aim for uniformity so they cook evenly and look professional.
Step 6: Freeze Balls
Arrange your shaped balls on a parchment-lined tray and freeze them for half an hour. This quick freeze locks in their form and preps them for coating.
Step 7: Melt Chocolate
Gently melt your chocolate using a double boiler or microwave, heating in short bursts and stirring often until perfectly smooth. This silky coating is what gives your malted balls that irresistible glossy finish.
Step 8: Coat Balls
Work swiftly to dip each chilled ball into the melted chocolate, making sure each one is completely covered. Then, lay them back on the parchment paper to set up.
Step 9: Final Freeze
Freeze the chocolate-coated malt balls for another 30 minutes to allow the chocolate shell to harden thoroughly and maintain that perfect snap.
How to Serve Homemade Malted Milk Balls Recipe

Garnishes
For a little extra flair, dust your malt balls lightly with cocoa powder, crushed nuts, or even a sprinkle of sea salt. These touches add complexity and an inviting visual contrast.
Side Dishes
Serve alongside a rich cup of coffee or hot chocolate. Their malted crunch pairs beautifully with warm beverages and makes for a delightful dessert after any meal.
Creative Ways to Present
Package your homemade malt balls in decorative jars or cellophane bags tied with ribbons for charming homemade gifts. You could also arrange them artfully on dessert platters as part of a candy buffet for parties.
Make Ahead and Storage
Storing Leftovers
Keep your finished malted milk balls in an airtight container inside the refrigerator. Stored this way, they maintain their freshness and crisp shell for up to 2 weeks, making them an always-ready sweet treat.
Freezing
If you want to keep them longer, freeze the malt balls in a sealed container. They will stay delicious for up to 3 months. Simply thaw in the fridge before serving to preserve their texture and flavor.
Reheating
Since these delightful snack balls are best enjoyed cold, avoid reheating. If you prefer softened chocolate, leave them at room temperature for 10 minutes before serving.
FAQs
Can I use regular milk powder instead of malted milk powder?
You can substitute regular milk powder, but keep in mind the distinctive malt flavor that makes this Homemade Malted Milk Balls Recipe special will be milder or missing. Malted milk powder is key for that nostalgic taste.
What type of chocolate is best for coating?
Semi-sweet or bittersweet chocolate works best as it balances the sweet malt center without overpowering it. You could also experiment with milk chocolate for a sweeter finish.
Can I make these vegan or dairy-free?
Yes! Use plant-based milk alternatives and vegan chocolate to adapt the recipe. Just ensure the malted milk powder is also dairy-free or look for a malted milk alternative.
How do I prevent the chocolate from melting too fast when serving?
Store your malt balls in a cool place or keep refrigerated until just before serving. Chocolate melts quickly in warm hands and environments, so serving chilled helps maintain their lovely snap.
Is there a way to make them less sweet?
To reduce sweetness, try using unsweetened cocoa powder or dark chocolate with a higher cacao percentage. You can also slightly reduce the powdered sugar, but do so carefully to keep the texture intact.
Final Thoughts
If you are looking to impress with a treat that’s both charming and deliciously nostalgic, I can’t recommend this Homemade Malted Milk Balls Recipe enough. It’s such a joy to make these delightful morsels at home, transforming simple ingredients into a candy that feels special and handcrafted. These malted milk balls are sure to bring smiles and maybe even a few happy dance moves, so give it a go and savor every bite!
“`
Print
Homemade Malted Milk Balls Recipe
- Prep Time: 15 minutes
- Cook Time: 30 minutes freezing and chilling time
- Total Time: 45 minutes
- Yield: 24 servings
- Category: Dessert Candy
- Method: No-Cook
- Cuisine: American
Description
Homemade malted milk balls are a deliciously crunchy and chocolatey treat made by combining malted milk powder, cocoa, and sugar into bite-sized balls coated in smooth melted chocolate. This easy no-bake recipe requires chilling and freezing for shaping and coating, resulting in a perfect candy snack that you can enjoy anytime.
Ingredients
Dry Ingredients
- 1 cup malted milk powder
- 1/2 cup powdered sugar
- 1/2 cup cocoa powder
- 1/2 teaspoon salt
Wet Ingredients
- 1/2 cup milk
- 1 tablespoon vanilla extract
Coating
- 6 ounces chocolate (quantity enough to coat balls)
Instructions
- Mix Dry Ingredients: In a bowl, whisk together the malted milk powder, powdered sugar, cocoa powder, and salt until these dry ingredients are well combined and evenly mixed.
- Combine Wet Ingredients: In a separate bowl, whisk the milk and vanilla extract thoroughly to blend the flavors into a smooth liquid mixture.
- Form Dough: Pour the wet ingredients into the bowl with dry ingredients, stirring continuously until a uniform dough forms with no lumps, ensuring the mixture is smooth and cohesive.
- Chill Mixture: Transfer the dough to the refrigerator and chill for 30 minutes, allowing it to firm up to facilitate easier shaping into balls.
- Shape Balls: After chilling, use a spoon or clean hands to roll the dough into small, approximately 1-inch diameter balls, creating uniform size pieces for even coating and freezing.
- Freeze Balls: Arrange the shaped balls on a baking sheet lined with parchment paper and freeze them for 30 minutes to solidify their shape before coating with chocolate.
- Melt Chocolate: Melt the chocolate gently using a double boiler or microwave-safe bowl, heating it slowly until it is smooth and fully melted without burning.
- Coat Balls: Dip each chilled ball thoroughly into the melted chocolate, ensuring an even coating covers the entire surface, then place the coated balls back onto the parchment-lined baking sheet.
- Final Freeze: Freeze the chocolate-coated balls for an additional 30 minutes or until the chocolate hardens completely, providing a crisp shell.
- Store Finished Malted Milk Balls: Transfer the finished malted milk balls to an airtight container and store them in the refrigerator for up to 2 weeks to maintain their freshness and texture.
Notes
- Use parchment paper on the baking sheet to prevent sticking during freezing and coating.
- You can use milk, dark, or white chocolate for coating depending on your taste preference.
- Ensure the chocolate is not overheated during melting to prevent it from seizing.
- For easier rolling, slightly wet or dust your hands with cocoa powder.
- Store the malted milk balls in an airtight container in the fridge to keep them fresh up to 2 weeks.
- These treats can be frozen long term but best enjoyed within two weeks for freshness.

