
There is something irresistibly delightful about homemade cheese straws, and this Cheese Straws Recipe captures that magic in every crispy, cheesy bite. Perfectly golden, with a little hint of spice and a rich sharp cheddar flavor, these crunchy snacks make an excellent treat for any occasion. Whether you’re entertaining friends or just craving something savory to nibble on, this recipe is incredibly approachable and guaranteed to please even the pickiest cheese lover.
Ingredients You’ll Need
The beauty of this Cheese Straws Recipe lies in its simple, carefully selected ingredients. Each one plays a vital role to ensure the perfect blend of flavor, texture, and color—creating cheese straws that are crunchy, cheesy, and irresistibly golden.
- Sharp cheddar cheese: The star ingredient, providing rich flavor and that classic cheesy aroma.
- All-purpose flour: The base that gives structure and crispness to the straws.
- Cold butter: Adds flakiness and helps bind the dough with a lush texture.
- Baking powder: Gives a slight lift so the straws aren’t too dense.
- Salt: Enhances all the flavors and balances the richness of the cheese and butter.
- Cayenne pepper (optional): Introduces a subtle kick to elevate the flavor without overpowering it.
- Ice-cold water: Helps bring the dough together without warming the butter, ensuring a tender result.
How to Make Cheese Straws Recipe
Step 1: Preheat the Oven
Start by heating your oven to 350 degrees Fahrenheit (175 degrees Celsius). Preparing your baking sheet with parchment paper now will ensure your cheese straws bake evenly and won’t stick—making cleanup a breeze later on.
Step 2: Combine Dry Ingredients and Cheese
In a large bowl, mix together the grated sharp cheddar, all-purpose flour, baking powder, salt, and cayenne pepper if you’re using it. This combination is where the flavor foundation is laid down, so be sure to mix well to evenly distribute all those seasonings.
Step 3: Cut in the Cold Butter
Now the fun part: adding that cold, cubed butter! Use a pastry cutter or your fingers, quickly working the butter into the cheese and flour mixture until it resembles coarse crumbs. This step is crucial because it creates the delicate, flaky texture that cheese straws are loved for.
Step 4: Add Ice-Cold Water
Sprinkle cold water, a tablespoon at a time, mixing gently after each addition. You want just enough to bring the dough together without it becoming sticky. Keeping the water ice-cold helps maintain the butter’s firmness and ensures perfect texture once baked.
Step 5: Roll and Cut the Dough
Flour your working surface lightly and roll the dough out to about 1/8-inch thickness. Then slice into strips roughly 1/2 inch wide and 4 to 5 inches long. These will be the classic cheese straws that are easy to pick up and enjoy.
Step 6: Shape and Bake
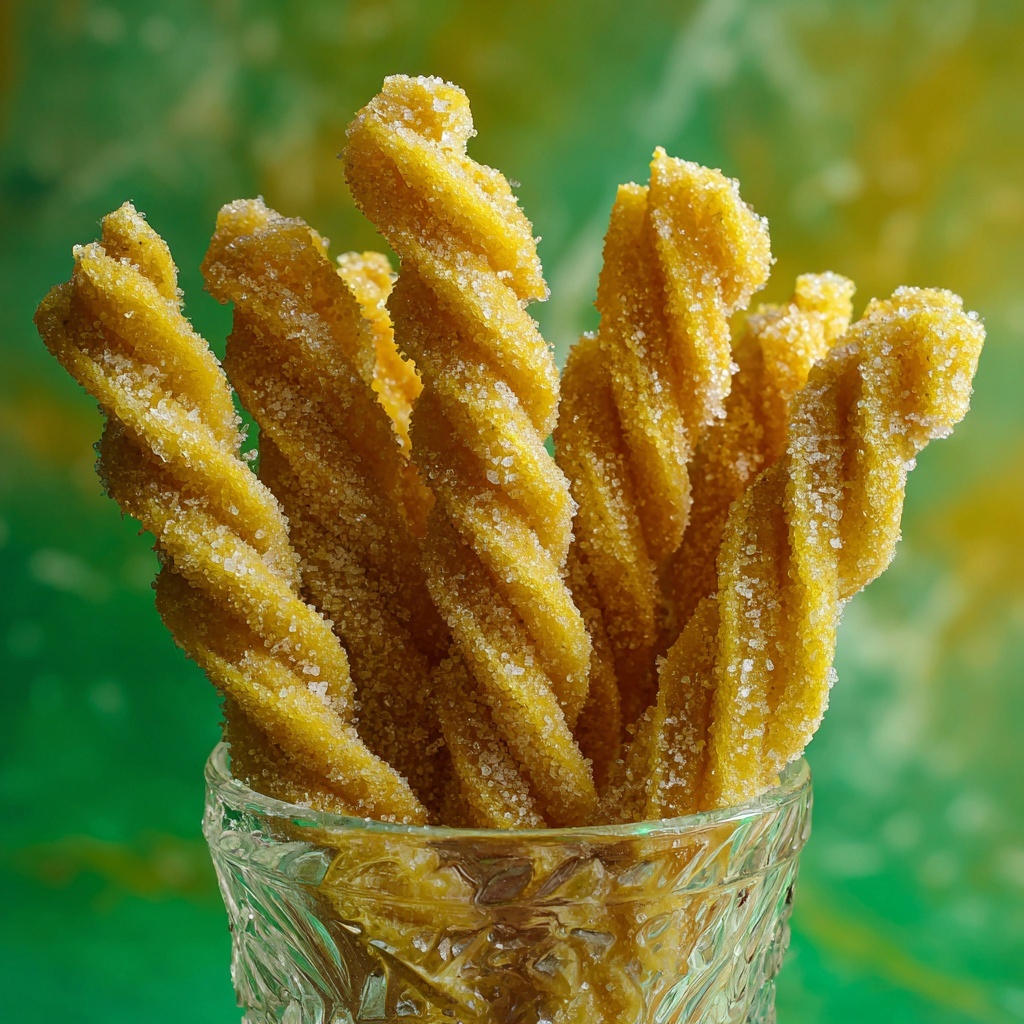
Give each strip a lovely twist to add a fun visual texture and enhance crispiness while baking. Arrange your twists on the prepared baking sheet, leaving a little space between each. Bake them for about 12 to 15 minutes or until they turn beautifully golden and crispy.
Step 7: Cool Before Serving
Once out of the oven, transfer your cheese straws to a wire rack to cool. This step is key to letting them crisp up fully and ensures you get that satisfying crunch with every bite.
How to Serve Cheese Straws Recipe

Garnishes
While these cheese straws shine on their own, a light sprinkle of flaky sea salt or an extra dusting of cayenne pepper right after baking can bring an added pop to their flavor. You can also toss some fresh herbs like finely chopped chives or parsley on the side for a fresh contrast.
Side Dishes
Cheese straws are fantastic finger food alongside soups such as tomato basil or creamy butternut squash. They also make a sensational snack paired with dips like roasted red pepper hummus, spinach and artichoke dip, or even a tangy mustard sauce. Their crisp texture and cheesy punch complement so many dishes.
Creative Ways to Present
Turn your cheese straws into an elegant party appetizer by standing them upright in a tall glass or mason jar, creating a charming edible centerpiece. You can also bundle small bunches with twine for a rustic touch, or serve them on a wooden board with an assortment of cheeses and charcuterie for a truly decadent spread.
Make Ahead and Storage
Storing Leftovers
If you happen to have leftovers (which might be hard!), store them in an airtight container at room temperature. They will retain their crunch for 2 to 3 days and make for perfect on-the-go snacks.
Freezing
Cheese straws also freeze wonderfully. Lay them flat in a single layer on a baking sheet to freeze initially, then transfer to a freezer-safe bag or container. This way, you can keep them frozen for up to a month and bake fresh batches whenever the craving strikes.
Reheating
To refresh your cheese straws and bring back their crispness after storage or freezing, pop them in a preheated oven at 300 degrees Fahrenheit for 5 to 7 minutes. Avoid microwaving as it can make them lose that delightful crunch.
FAQs
Can I use a different type of cheese for this Cheese Straws Recipe?
Absolutely! While sharp cheddar is traditional and offers a robust flavor, you can experiment with cheeses like Parmesan, Gruyere, or a spicy pepper jack to create different flavor profiles.
Is cayenne pepper necessary in the recipe?
Not at all. The cayenne pepper is optional and adds a nice hint of heat. If you prefer your snacks milder, simply omit it without affecting the overall deliciousness of your cheese straws.
Can I make the dough ahead of time?
Yes, you can prepare the dough ahead and store it wrapped tightly in the fridge for up to 24 hours. This can actually help the flavors meld well and make the dough easier to roll out when you’re ready.
How can I make the cheese straws more decorative?
Try twisting different thicknesses or cutting the strips into fun shapes before baking. You can also brush them with an egg wash and sprinkle sesame seeds or poppy seeds for a fancy finish.
Are these cheese straws gluten-free?
The classic recipe uses all-purpose flour, which contains gluten. For a gluten-free version, you’ll need to substitute with a gluten-free flour blend suitable for baking, but results may vary slightly in texture.
Final Thoughts
If you love simple yet insanely tasty snacks, this Cheese Straws Recipe is an absolute must-try. It’s a heartwarming, crunchy treat that’s perfect for sharing, gifting, or simply enjoying with your favorite drink. Once you make these, you’ll understand why they’re a beloved classic that keeps everyone coming back for more.
Print
Cheese Straws Recipe
- Prep Time: 15 minutes
- Cook Time: 15 minutes
- Total Time: 30 minutes
- Yield: 12 servings
- Category: Snack
- Method: Baking
- Cuisine: American
Description
Delightfully crispy and cheesy Cheese Straws made with sharp cheddar, buttery flaky dough, and a hint of cayenne for a subtle kick. Perfect as a snack or appetizer, these golden, twisted cheese sticks are easy to prepare and bake to perfection in just 30 minutes.
Ingredients
For the Cheese Straws:
- 1 1/2 cups sharp cheddar cheese, grated
- 1 cup all-purpose flour
- 1/2 cup cold butter, cubed
- 1 tsp baking powder
- 1/2 tsp salt
- 1/4 tsp cayenne pepper (optional)
- Ice-cold water (as needed)
Instructions
- Preheat the Oven: Preheat your oven to 350°F (175°C) and line a baking sheet with parchment paper to prevent sticking and ensure even baking.
- Prepare the Dough: In a large bowl, combine the grated sharp cheddar cheese, all-purpose flour, baking powder, salt, and cayenne pepper if using. Mix these dry ingredients thoroughly to evenly distribute the flavors.
- Cut in the Butter: Add the cold, cubed butter to the bowl, and use a pastry cutter or your fingertips to work the butter into the mixture until it resembles coarse crumbs with visible pea-sized pieces of butter.
- Add Water: Gradually add ice-cold water, one tablespoon at a time, mixing gently until the dough just comes together into a cohesive ball without being sticky or overworked.
- Roll and Cut: Lightly flour a clean surface and roll the dough out to about 1/8-inch thickness. Using a knife or pizza cutter, cut the dough into strips approximately 1/2 inch wide and 4 to 5 inches long.
- Shape and Bake: Twist each strip gently into a spiral shape and place them on the prepared baking sheet, spaced slightly apart. Bake in the preheated oven for 12 to 15 minutes, or until the cheese straws turn golden brown and crispy.
- Cool: Remove the cheese straws from the oven and transfer them to a wire rack to cool completely before serving to ensure they crisp up further and hold their texture.
Notes
- For extra flavor, you can sprinkle a little additional cayenne pepper or smoked paprika on top before baking.
- Make sure the butter is very cold to achieve a flaky texture.
- Use sharp cheddar cheese for the best bold flavor; mild cheddar will result in a less pronounced taste.
- These cheese straws are best enjoyed fresh but can be stored in an airtight container for up to 3 days.
- If the dough is too dry, add water sparingly to avoid sticky dough.

