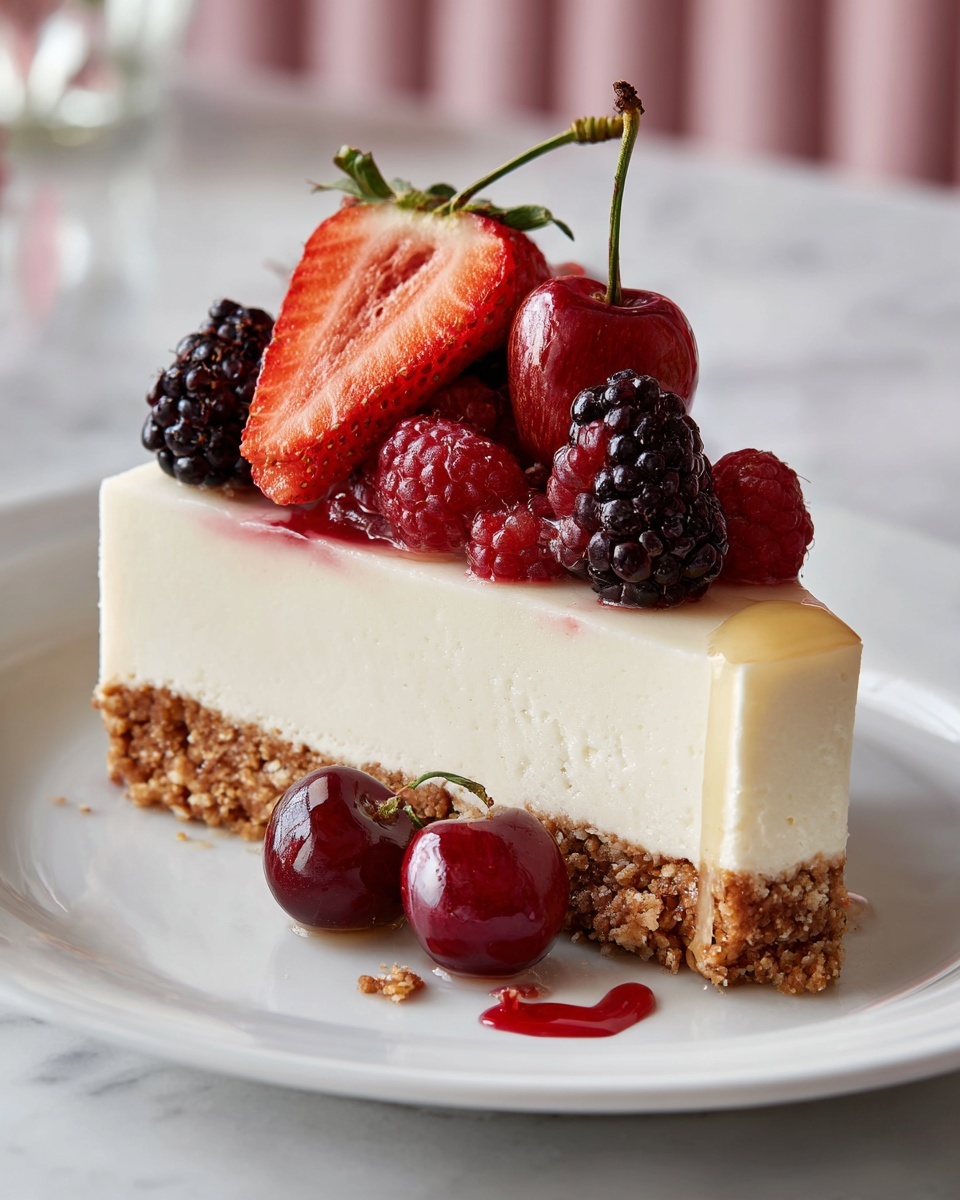
If you’re craving a dessert that feels luxurious but doesn’t require firing up the oven, you’ve come to the right place. This No-Bake Cheesecake Recipe is the perfect answer to those warm days or whenever you want a fuss-free, yet utterly impressive treat. Imagine a buttery graham cracker crust paired with a velvety, smooth cream cheese filling that melts in your mouth—a true classic that brings smiles every time. It’s creamy, dreamy, and incredibly easy to whip up, making it one of my all-time favorite desserts to share with friends and family.
Ingredients You’ll Need
What makes this No-Bake Cheesecake Recipe so accessible is how simple yet essential the ingredients are. Each one plays a big role: the crust provides a crunchy, buttery base, while the filling offers that rich, creamy texture and delicate sweetness that we all love.
- 1 ½ cups graham cracker crumbs: The foundation of your crust, providing that classic flavor and satisfying crunch.
- ¼ cup granulated sugar: Adds just the right touch of sweetness to balance the crust’s richness.
- 6 tablespoons unsalted butter (melted): Binds the crust together and infuses it with a luscious buttery taste.
- 16 oz cream cheese (softened): The star of the filling—soft, smooth, and full of creamy goodness.
- ¾ cup powdered sugar: Sweetens the filling delicately without graininess.
- 1 teaspoon vanilla extract: Adds depth and a warm, comforting aroma to the cheesecake.
- 1 cup heavy whipping cream (cold): Whipped to perfection for that light, airy texture in the filling.
How to Make No-Bake Cheesecake Recipe
Step 1: Prepare the Crust
Start by mixing your graham cracker crumbs, granulated sugar, and melted butter until everything is evenly moistened. Press this mixture firmly into the bottom of a 9-inch springform pan or pie dish. Don’t be shy here—packing the crust down ensures it holds together beautifully when sliced. Pop it into the fridge for at least 15 minutes so it chills and sets properly.
Step 2: Make the Cream Cheese Filling
While the crust chills, beat the softened cream cheese in a bowl until it’s smooth and creamy with no lumps. Add the powdered sugar and vanilla extract, mixing until fully combined. This gives the filling its signature sweetness and warm flavor. Then, whip the cold heavy cream in a separate bowl until stiff peaks form—that means it holds its shape when the whisk is lifted. Gently fold the whipped cream into the cream cheese mixture, taking care not to deflate the airiness you just created.
Step 3: Assemble and Chill
Spread the luscious filling evenly over your chilled crust, smoothing out the top with a spatula for a clean finish. Refrigerate for at least 6 hours, or better yet, overnight. This step is key for the cheesecake to set properly and develop its divine creamy texture. Trust me, the wait is worth it.
How to Serve No-Bake Cheesecake Recipe

Garnishes
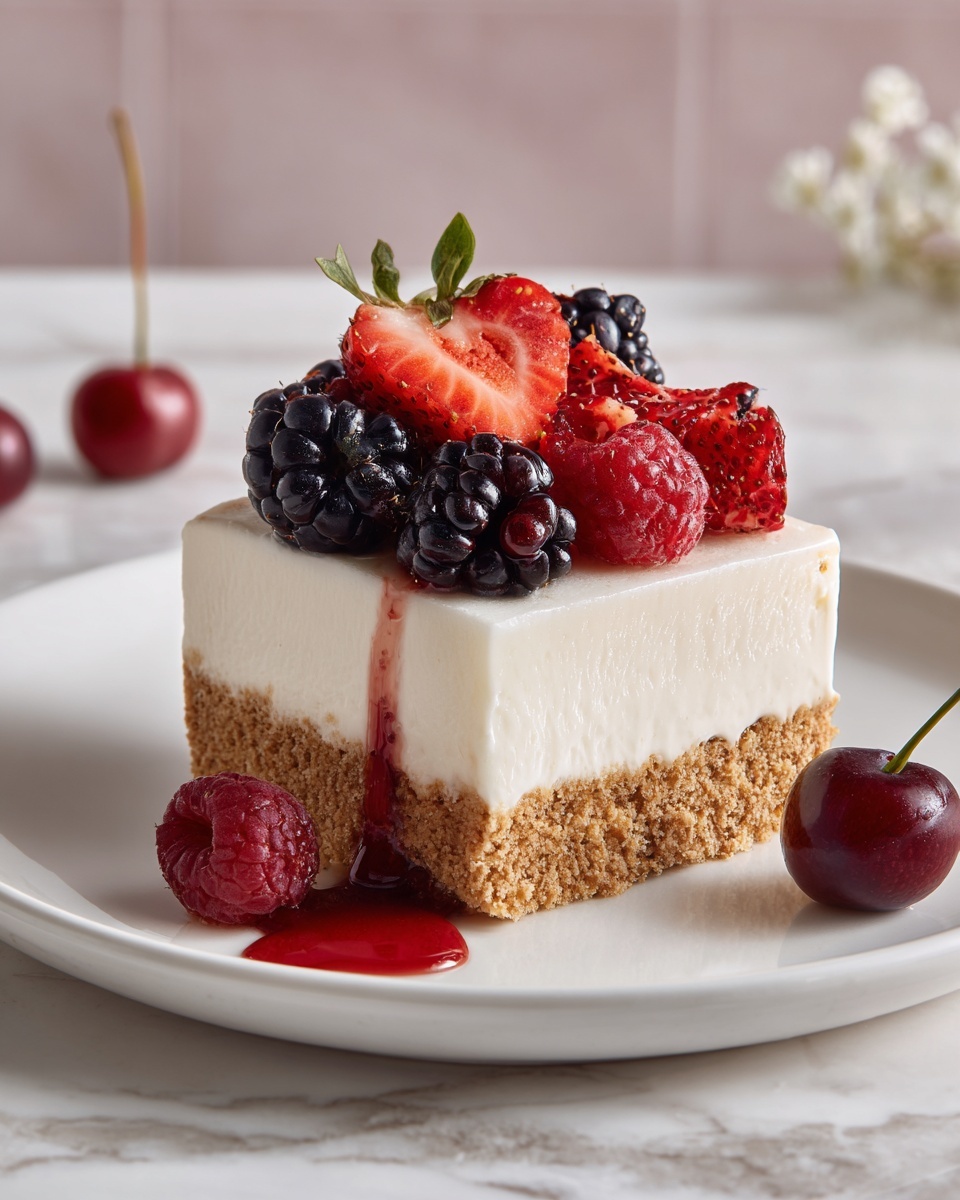
Topping your No-Bake Cheesecake Recipe is an opportunity to get creative and add a pop of color and freshness. Fresh berries like strawberries, blueberries, or raspberries provide a natural tartness that contrasts beautifully with the rich filling. For a bit of indulgence, try shaved chocolate, caramel drizzle, or a spoonful of fruit compote—each adds a unique flair that can elevate the simple cheesecake to a dessert worthy of celebration.
Side Dishes
This cheesecake pairs wonderfully with light side dishes, especially when served at the end of a summer meal. Think fresh fruit salad, a scoop of sorbet, or even a cup of your favorite coffee or tea to balance the richness and keep the experience refreshing and satisfying.
Creative Ways to Present
Want to impress your guests? Serve this cheesecake in individual jars or small cups for portable, personalized desserts. You can layer the crust, filling, and toppings for a beautiful parfait-style presentation. Or use decorative glasses and add colorful layers with fruit purees or crushed cookies. Presentation can turn this simple No-Bake Cheesecake Recipe into an eye-catching showstopper.
Make Ahead and Storage
Storing Leftovers
If you have any leftovers (though they rarely stick around), store them covered in the refrigerator for up to five days. Keeping the cheesecake chilled preserves its creamy texture and fresh flavor, so it tastes just as delightful the next day.
Freezing
To freeze, wrap the cheesecake tightly with plastic wrap and then foil to prevent freezer burn. It can be frozen for up to one month. When ready to enjoy, thaw overnight in the fridge to retain that smooth, luscious texture.
Reheating
No need to reheat this cheesecake—it’s best served cold straight from the fridge. Reheating will compromise its signature creamy texture and can make the crust soggy. Keep it chilled and fresh for the best experience.
FAQs
Can I use low-fat cream cheese in this No-Bake Cheesecake Recipe?
While you can substitute low-fat cream cheese, the texture and creaminess might be slightly compromised. Full-fat cream cheese helps achieve that rich, smooth filling this dessert is known for.
How long does it take for the cheesecake to set?
The cheesecake needs at least 6 hours in the fridge to set up properly, but overnight chilling is recommended for the best texture and flavor.
Can I make this recipe gluten-free?
Absolutely! Just swap the graham cracker crumbs for a gluten-free alternative like gluten-free cookies or specially made gluten-free graham crackers.
Is it possible to make individual servings instead of a whole cheesecake?
Yes, this No-Bake Cheesecake Recipe works wonderfully in individual jars or cups, making for easy portion control and adorable presentations.
Can I add flavors to the filling?
Definitely! Add a bit of lemon zest, cocoa powder, or even fruit purees to the filling for personalized twists on this classic recipe.
Final Thoughts
This No-Bake Cheesecake Recipe is one of those gems that’s as simple as it is delicious—perfect for impressing your friends or treating yourself without any stress. It’s creamy, smooth, and endlessly adaptable, making it a staple dessert you’ll want to return to again and again. Give it a try, share it around, and enjoy every luscious bite!
Print
No-Bake Cheesecake Recipe
- Prep Time: 20 minutes
- Cook Time: 0 minutes
- Total Time: 6 hours 20 minutes
- Yield: 8 servings
- Category: Dessert
- Method: No-Cook
- Cuisine: American
- Diet: Vegetarian
Description
No-Bake Cheesecake is a smooth, creamy, and incredibly easy dessert made without the need for an oven. Featuring a buttery graham cracker crust and a rich cream cheese filling, this classic treat is perfect for warm days or when you want a fuss-free dessert that still impresses.
Ingredients
For the Crust:
- 1 ½ cups graham cracker crumbs
- ¼ cup granulated sugar
- 6 tablespoons unsalted butter, melted
For the Filling:
- 16 oz cream cheese, softened
- ¾ cup powdered sugar
- 1 teaspoon vanilla extract
- 1 cup heavy whipping cream, cold
Instructions
- Prepare the crust: In a bowl, combine graham cracker crumbs, granulated sugar, and melted butter. Mix until evenly moistened, then firmly press the mixture into the bottom of a 9-inch springform pan or pie dish. Chill in the refrigerator for at least 15 minutes to set the crust.
- Make the filling base: In a separate bowl, beat the softened cream cheese until smooth and creamy. Add the powdered sugar and vanilla extract, mixing until fully combined and creamy without lumps.
- Whip the cream: In another cold bowl, whip the heavy whipping cream until stiff peaks form. This ensures a light, airy texture for the cheesecake filling.
- Combine mixtures: Gently fold the whipped cream into the cream cheese mixture until fully incorporated, taking care not to deflate the whipped cream to maintain the lightness of the filling.
- Assemble the cheesecake: Spread the filling evenly over the chilled crust and smooth the top with a spatula.
- Chill to set: Refrigerate the cheesecake for at least 6 hours or overnight until fully set and firm.
- Serve: Once set, serve the cheesecake chilled. Optionally, top with fresh fruit, fruit compote, or chocolate shavings for added flavor and presentation.
Notes
- Use full-fat cream cheese for the best creamy texture and flavor.
- This recipe can be made in individual jars or cups for a convenient, portable dessert.
- Store leftovers in the refrigerator and consume within 5 days for optimal freshness.


